<?xml version="1.0" encoding="UTF-8"?>
<!DOCTYPE html PUBLIC "-//W3C//DTD XHTML 1.0 Strict//EN" "http://www.w3.org/TR/xhtml1/DTD/xhtml1-strict.dtd">
<html xmlns="http://www.w3.org/1999/xhtml"><head><meta http-equiv="Content-Type" content="text/html; charset=UTF-8" /><title>CloudStack 管理者ガイド</title><link rel="stylesheet" type="text/css" href="Common_Content/css/default.css" /><link rel="stylesheet" media="print" href="Common_Content/css/print.css" type="text/css" /><meta name="generator" content="publican 2.8" /><meta name="package" content="Apache_CloudStack-Admin_Guide-4.1.0-ja-JP-1-" /><meta name="description" content="CloudStack 管理ガイド" /><script type="text/javascript" src="../../../../../toc.js"></script><script type="text/javascript">
              addID('Apache_CloudStack');
              
	      addID('Apache_CloudStack.4.1.0');
              
              addID('Apache_CloudStack.4.1.0.books');
	      addID('Apache_CloudStack.4.1.0.Admin_Guide');
              </script></head><body class="toc_embeded "><div id="tocdiv" class="toc"><iframe id="tocframe" class="toc" src="../../../../toc.html">This is an iframe, to view it upgrade your browser or enable iframe display.</iframe></div><p id="title"><a class="left" href="http://cloudstack.apache.org"><img src="Common_Content/images/image_left.png" alt="Product Site" /></a><a class="right" href="http://cloudstack.apache.org/docs"><img src="Common_Content/images/image_right.png" alt="Documentation Site" /></a></p><div xml:lang="ja-JP" class="book" id="idm9844360" lang="ja-JP"><div class="titlepage"><div><div class="producttitle"><span class="productname">Apache CloudStack</span> <span class="productnumber">4.1.0</span></div><div><h1 id="idm9844360" class="title">CloudStack 管理者ガイド</h1></div><p class="edition">エディッション 1</p><div><h3 class="corpauthor">
			<span class="inlinemediaobject"><object data="Common_Content/images/title_logo.svg" type="image/svg+xml"> </object></span>

		</h3></div><div><div xml:lang="ja-JP" class="authorgroup" lang="ja-JP"><div class="author"><h3 class="author"><span class="surname">CloudStack</span> <span class="firstname">Apache</span> [FAMILY Given]</h3></div></div></div><hr /><div><div id="idp23739200" class="legalnotice"><h1 class="legalnotice">法律上の通知</h1><div class="para">
		Licensed to the Apache Software Foundation (ASF) under one or more contributor license agreements. See the NOTICE file distributed with this work for additional information regarding copyright ownership. The ASF licenses this file to you under the Apache License, Version 2.0 (the "License"); you may not use this file except in compliance with the License. You may obtain a copy of the License at
	</div><div class="para">
		http://www.apache.org/licenses/LICENSE-2.0
	</div><div class="para">
		Unless required by applicable law or agreed to in writing, software distributed under the License is distributed on an "AS IS" BASIS, WITHOUT WARRANTIES OR CONDITIONS OF ANY KIND, either express or implied. See the License for the specific language governing permissions and limitations under the License.
	</div><div class="para">
		Apache CloudStack is an effort undergoing incubation at The Apache Software Foundation (ASF).
	</div><div class="para">
		Incubation is required of all newly accepted projects until a further review indicates that the infrastructure, communications, and decision making process have stabilized in a manner consistent with other successful ASF projects. While incubation status is not necessarily a reflection of the completeness or stability of the code, it does indicate that the project has yet to be fully endorsed by the ASF.
	</div></div></div><div><div class="abstract"><h6>概要</h6><div class="para">
				CloudStack 管理ガイド
			</div></div></div></div><hr /></div><div class="toc"><dl><dt><span class="chapter"><a href="#concepts">1. コンセプト</a></span></dt><dd><dl><dt><span class="section"><a href="#whatis">1.1. CloudStack とは</a></span></dt><dt><span class="section"><a href="#feature-overview">1.2. CloudStack の機能</a></span></dt><dt><span class="section"><a href="#deployment-architecture-overview">1.3. 展開アーキテクチャの概要</a></span></dt><dd><dl><dt><span class="section"><a href="#management-server-overview">1.3.1. 管理サーバーについて</a></span></dt><dt><span class="section"><a href="#cloud-infrastructure-overview">1.3.2. クラウドインフラストラクチャの概要</a></span></dt><dt><span class="section"><a href="#networking-overview">1.3.3. ネットワーク</a></span></dt></dl></dd></dl></dd><dt><span class="chapter"><a href="#cloud-infrastructure-concepts">2. クラウドインフラストラクチャのプロビジョニング</a></span></dt><dd><dl><dt><span class="section"><a href="#about-regions">2.1. About Regions</a></span></dt><dt><span class="section"><a href="#about-zones">2.2. ゾーンについて</a></span></dt><dt><span class="section"><a href="#about-pods">2.3. ポッドについて</a></span></dt><dt><span class="section"><a href="#about-clusters">2.4. クラスタについて</a></span></dt><dt><span class="section"><a href="#about-hosts">2.5. ホストについて</a></span></dt><dt><span class="section"><a href="#about-primary-storage">2.6. プライマリストレージについて</a></span></dt><dt><span class="section"><a href="#about-secondary-storage">2.7. セカンダリストレージについて</a></span></dt><dt><span class="section"><a href="#about-physical-networks">2.8. 物理ネットワークについて</a></span></dt><dd><dl><dt><span class="section"><a href="#basic-zone-network-traffic-types">2.8.1. 基本ゾーンのネットワークトラフィックの種類</a></span></dt><dt><span class="section"><a href="#basic-zone-guest-ip-addresses">2.8.2. 基本ゾーンのゲスト IP アドレス</a></span></dt><dt><span class="section"><a href="#advanced-zone-network-traffic-types">2.8.3. 拡張ゾーンのネットワークトラフィックの種類</a></span></dt><dt><span class="section"><a href="#advanced-zone-guest-ip-addresses">2.8.4. 拡張ゾーンのゲスト IP アドレス</a></span></dt><dt><span class="section"><a href="#advanced-zone-public-ip-addresses">2.8.5. 拡張ゾーンのパブリック IP アドレス</a></span></dt><dt><span class="section"><a href="#system-reserved-ip-addresses">2.8.6. システムにより予約済みの IP アドレス</a></span></dt></dl></dd></dl></dd><dt><span class="chapter"><a href="#accounts">3. アカウント</a></span></dt><dd><dl><dt><span class="section"><a href="#accounts-users-domains">3.1. アカウント、ユーザー、およびドメイン</a></span></dt><dt><span class="section"><a href="#LDAPserver-for-user-authentication">3.2. LDAP サーバーによるユーザー認証</a></span></dt><dd><dl><dt><span class="section"><a href="#example-LDAP-configuration-commands">3.2.1. Example LDAP Configuration Commands</a></span></dt><dt><span class="section"><a href="#search-base">3.2.2. Search Base</a></span></dt><dt><span class="section"><a href="#query-filter">3.2.3. Query Filter</a></span></dt><dt><span class="section"><a href="#search-user-bind-dn">3.2.4. Search User Bind DN</a></span></dt><dt><span class="section"><a href="#SSL-keystore-path-and-password">3.2.5. SSL キーストアのパスとパスワード</a></span></dt></dl></dd></dl></dd><dt><span class="chapter"><a href="#user-services-overview">4. User Services Overview</a></span></dt><dd><dl><dt><span class="section"><a href="#offerings-and-templates">4.1. Service Offerings, Disk Offerings, Network Offerings, and Templates</a></span></dt></dl></dd><dt><span class="chapter"><a href="#ui">5. ユーザーインターフェイス</a></span></dt><dd><dl><dt><span class="section"><a href="#log-in">5.1. UIへのログイン</a></span></dt><dd><dl><dt><span class="section"><a href="#end-user-ui-overview">5.1.1. エンドユーザーインターフェイス</a></span></dt><dt><span class="section"><a href="#root-admin-ui-overview">5.1.2. Root 管理者 UI の概要</a></span></dt><dt><span class="section"><a href="#log-in-root-admin">5.1.3. ルート管理者としてのログイン</a></span></dt><dt><span class="section"><a href="#changing-root-password">5.1.4. ルートパスワードの変更</a></span></dt></dl></dd><dt><span class="section"><a href="#using-sshkeys">5.2. Using SSH Keys for Authentication</a></span></dt><dd><dl><dt><span class="section"><a href="#create-ssh-template">5.2.1.  Creating an Instance Template that Supports SSH Keys</a></span></dt><dt><span class="section"><a href="#create-ssh-keypair">5.2.2. Creating the SSH Keypair</a></span></dt><dt><span class="section"><a href="#creating-ssh-instance">5.2.3. Creating an Instance</a></span></dt><dt><span class="section"><a href="#logging-in-ssh">5.2.4. Logging In Using the SSH Keypair</a></span></dt><dt><span class="section"><a href="#reset-ssh">5.2.5. Resetting SSH Keys</a></span></dt></dl></dd></dl></dd><dt><span class="chapter"><a href="#projects">6. プロジェクトによるユーザーとリソースの組織化</a></span></dt><dd><dl><dt><span class="section"><a href="#projects-overview">6.1. プロジェクトの概要</a></span></dt><dt><span class="section"><a href="#configuring-projects">6.2. プロジェクトの構成</a></span></dt><dd><dl><dt><span class="section"><a href="#set-up-invitations">6.2.1. 招待状のセットアップ</a></span></dt><dt><span class="section"><a href="#set-resource-limits-for-projects">6.2.2. Setting Resource Limits for Projects</a></span></dt><dt><span class="section"><a href="#set-projects-creator-permissions">6.2.3. プロジェクト作成者の権限の設定</a></span></dt></dl></dd><dt><span class="section"><a href="#create-new-projects">6.3. 新しいプロジェクトの作成</a></span></dt><dt><span class="section"><a href="#add-members-to-projects">6.4. プロジェクトへのメンバーの追加</a></span></dt><dd><dl><dt><span class="section"><a href="#send-projects-membership-invitation">6.4.1. プロジェクトメンバーになるための招待状の送信</a></span></dt><dt><span class="section"><a href="#add-projects-members-from-ui">6.4.2. ユーザーインターフェイスでのメンバーの追加</a></span></dt></dl></dd><dt><span class="section"><a href="#accept-membership-invite">6.5. メンバー招待の受理</a></span></dt><dt><span class="section"><a href="#suspend-project">6.6. プロジェクトの一時停止または削除</a></span></dt><dt><span class="section"><a href="#use-project-view">6.7. プロジェクトビューの使用方法</a></span></dt></dl></dd><dt><span class="chapter"><a href="#provisioning-steps">7. Steps to Provisioning Your Cloud Infrastructure</a></span></dt><dd><dl><dt><span class="section"><a href="#provisioning-steps-overview">7.1. プロビジョニングの概要</a></span></dt><dt><span class="section"><a href="#region-add">7.2. Adding Regions (optional)</a></span></dt><dd><dl><dt><span class="section"><a href="#region-first">7.2.1. The First Region: The Default Region</a></span></dt><dt><span class="section"><a href="#region-add-2">7.2.2. Adding a Region</a></span></dt><dt><span class="section"><a href="#region-add-n">7.2.3. Adding Third and Subsequent Regions</a></span></dt><dt><span class="section"><a href="#region-delete">7.2.4. Deleting a Region</a></span></dt></dl></dd><dt><span class="section"><a href="#zone-add">7.3. ゾーンの追加</a></span></dt><dd><dl><dt><span class="section"><a href="#basic-zone-configuration">7.3.1. 基本ゾーンの構成</a></span></dt><dt><span class="section"><a href="#advanced-zone-configuration">7.3.2. 拡張ゾーンの構成</a></span></dt></dl></dd><dt><span class="section"><a href="#pod-add">7.4. ポッドの追加</a></span></dt><dt><span class="section"><a href="#cluster-add">7.5. クラスタの追加</a></span></dt><dd><dl><dt><span class="section"><a href="#add-clusters-kvm-xenserver">7.5.1. クラスターの追加:KVM または XenServer</a></span></dt><dt><span class="section"><a href="#add-clusters-vsphere">7.5.2. クラスターの追加:vSphere</a></span></dt></dl></dd><dt><span class="section"><a href="#host-add">7.6. ホストの追加</a></span></dt><dd><dl><dt><span class="section"><a href="#host-add-xenserver-kvm-ovm">7.6.1. ホストの追加(XenServer または KVM)</a></span></dt><dt><span class="section"><a href="#host-add-vsphere">7.6.2. ホストの追加 (vSphere)</a></span></dt></dl></dd><dt><span class="section"><a href="#primary-storage-add">7.7. プライマリストレージの追加</a></span></dt><dd><dl><dt><span class="section"><a href="#sys-require-primary-storage">7.7.1. プライマリストレージのシステム要件</a></span></dt><dt><span class="section"><a href="#adding-primary-storage">7.7.2. プライマリストレージの追加</a></span></dt></dl></dd><dt><span class="section"><a href="#secondary-storage-add">7.8. セカンダリストレージの追加</a></span></dt><dd><dl><dt><span class="section"><a href="#sys-require-secondary-storage">7.8.1. セカンダリストレージのシステム要件</a></span></dt><dt><span class="section"><a href="#adding-secondary-storage">7.8.2. セカンダリストレージの追加</a></span></dt></dl></dd><dt><span class="section"><a href="#initialize-and-test">7.9. 初期化とテスト</a></span></dt></dl></dd><dt><span class="chapter"><a href="#offerings">8. サービスオファリング</a></span></dt><dd><dl><dt><span class="section"><a href="#compute-disk-service-offerings">8.1. Compute and Disk Service Offerings</a></span></dt><dd><dl><dt><span class="section"><a href="#creating-compute-offerings">8.1.1. 新しいコンピューティングオファリングの作成</a></span></dt><dt><span class="section"><a href="#creating-disk-offerings">8.1.2. ディスクオファリングの作成</a></span></dt><dt><span class="section"><a href="#modify-delete-service-offerings">8.1.3. Modifying or Deleting a Service Offering</a></span></dt></dl></dd><dt><span class="section"><a href="#system-service-offerings">8.2. System Service Offerings</a></span></dt><dd><dl><dt><span class="section"><a href="#creating-system-service-offerings">8.2.1. Creating a New System Service Offering</a></span></dt></dl></dd><dt><span class="section"><a href="#network-rate">8.3. Network Throttling</a></span></dt><dt><span class="section"><a href="#sys-offering-sysvm">8.4. Changing the Default System Offering for System VMs</a></span></dt></dl></dd><dt><span class="chapter"><a href="#set-up-network-for-users">9. Setting Up Networking for Users</a></span></dt><dd><dl><dt><span class="section"><a href="#networks-for-users-overview">9.1. Overview of Setting Up Networking for Users</a></span></dt><dt><span class="section"><a href="#about-virtual-networks">9.2. 仮想ネットワークについて</a></span></dt><dd><dl><dt><span class="section"><a href="#isolated-networks">9.2.1. 分離ネットワーク</a></span></dt><dt><span class="section"><a href="#shared-networks">9.2.2. 共有ネットワーク</a></span></dt><dt><span class="section"><a href="#runtime-allocation-virtual-network-resources">9.2.3. 仮想ネットワークリソースの実行時割り当て</a></span></dt></dl></dd><dt><span class="section"><a href="#network-service-providers">9.3. ネットワークサービスプロバイダー</a></span></dt><dt><span class="section"><a href="#network-offerings">9.4. ネットワークオファリング</a></span></dt><dd><dl><dt><span class="section"><a href="#creating-network-offerings">9.4.1. 新しいネットワークオファリングの作成</a></span></dt></dl></dd></dl></dd><dt><span class="chapter"><a href="#virtual-machines">10. 仮想マシンの操作</a></span></dt><dd><dl><dt><span class="section"><a href="#about-working-with-vms">10.1. 仮想マシンの操作</a></span></dt><dt><span class="section"><a href="#best-practices-vm">10.2. Best Practices for Virtual Machines</a></span></dt><dt><span class="section"><a href="#vm-lifecycle">10.3. 仮想マシンのライフサイクル</a></span></dt><dt><span class="section"><a href="#creating-vms">10.4. VMの作成</a></span></dt><dt><span class="section"><a href="#accessing-vms">10.5. 仮想マシンへのアクセス</a></span></dt><dt><span class="section"><a href="#stopping-and-starting-vms">10.6. 仮想マシンの停止と起動</a></span></dt><dt><span class="section"><a href="#changing-vm-name-os-group">10.7. 仮想マシン、OS、グループの名前変更</a></span></dt><dt><span class="section"><a href="#changing-service-offering-for-vm">10.8. 仮想マシンのサービスオファリングの変更</a></span></dt><dt><span class="section"><a href="#manual-live-migration">10.9. ホスト間の仮想マシンの移動（手動ライブマイグレーション）</a></span></dt><dt><span class="section"><a href="#deleting-vms">10.10. VMの削除</a></span></dt><dt><span class="section"><a href="#working-with-iso">10.11. ISO に関わる作業</a></span></dt><dd><dl><dt><span class="section"><a href="#add-iso">10.11.1. ISO の追加</a></span></dt><dt><span class="section"><a href="#attach-iso-to-vm">10.11.2. 仮想マシンへのISOのアタッチ</a></span></dt></dl></dd></dl></dd><dt><span class="chapter"><a href="#working-with-hosts">11. ホストの操作</a></span></dt><dd><dl><dt><span class="section"><a href="#adding-hosts">11.1. ホストの追加</a></span></dt><dt><span class="section"><a href="#scheduled-maintenance-maintenance-mode-hosts">11.2. ホストの計画保守と保守モード</a></span></dt><dd><dl><dt><span class="section"><a href="#vcenter-maintenance-mode">11.2.1. vCenter と保守モード</a></span></dt><dt><span class="section"><a href="#xenserver-maintenance-mode">11.2.2. XenServer と保守モード</a></span></dt></dl></dd><dt><span class="section"><a href="#disable-enable-zones-pods-clusters">11.3. ゾーン、ポッド、およびクラスターの無効化と有効化</a></span></dt><dt><span class="section"><a href="#removing-hosts">11.4. ホストの削除</a></span></dt><dd><dl><dt><span class="section"><a href="#removing-xenserver-kvm-hosts">11.4.1. XenServer および KVM ホストの削除</a></span></dt><dt><span class="section"><a href="#removing-vsphere-hosts">11.4.2. vSphere ホストの削除</a></span></dt></dl></dd><dt><span class="section"><a href="#re-install-hosts">11.5. Re-Installing Hosts</a></span></dt><dt><span class="section"><a href="#maintain-hypervisors-on-hosts">11.6. ハイパーバイザーホストの維持</a></span></dt><dt><span class="section"><a href="#change-host-password">11.7. Changing Host Password</a></span></dt><dt><span class="section"><a href="#host-allocation">11.8. ホストの割り当て</a></span></dt><dd><dl><dt><span class="section"><a href="#over-provisioning-service-offering-limits">11.8.1. オーバープロビジョニングとサービスオファリングの制限</a></span></dt></dl></dd><dt><span class="section"><a href="#vlan-provisioning">11.9. VLAN プロビジョニング</a></span></dt></dl></dd><dt><span class="chapter"><a href="#working-with-templates">12. テンプレートと動作</a></span></dt><dd><dl><dt><span class="section"><a href="#create-templates-overview">12.1. テンプレートの作成:概要</a></span></dt><dt><span class="section"><a href="#requirements-templates">12.2. テンプレートの要件</a></span></dt><dt><span class="section"><a href="#best-practices-templates">12.3. テンプレートのベストプラクティス</a></span></dt><dt><span class="section"><a href="#default-template">12.4. デフォルトのテンプレート</a></span></dt><dt><span class="section"><a href="#private-public-template">12.5. プライベートテンプレートとパブリックテンプレート</a></span></dt><dt><span class="section"><a href="#create-template-from-existing-vm">12.6. 既存の仮想マシンからのテンプレートの作成</a></span></dt><dt><span class="section"><a href="#create-template-from-snapshot">12.7. スナップショットからのテンプレートの作成</a></span></dt><dt><span class="section"><a href="#upload-template">12.8. テンプレートのアップロード</a></span></dt><dt><span class="section"><a href="#export-template">12.9. テンプレートのエクスポート</a></span></dt><dt><span class="section"><a href="#create-windows-template">12.10. Windows テンプレートの作成</a></span></dt><dd><dl><dt><span class="section"><a href="#sysprep-windows-server-2008R2">12.10.1. Windows Server 2008 R2 の Sysprep</a></span></dt><dt><span class="section"><a href="#sysprep-for-windows-server-2003R2">12.10.2. Windows Server 2003 R2 用 システム準備</a></span></dt></dl></dd><dt><span class="section"><a href="#import-ami">12.11. AMI のインポート</a></span></dt><dt><span class="section"><a href="#convert-hyperv-vm-to-template">12.12. Hyper-V 仮想マシンのテンプレートへの変換</a></span></dt><dt><span class="section"><a href="#add-password-management-to-templates">12.13. テンプレートへのパスワード管理機能の追加</a></span></dt><dd><dl><dt><span class="section"><a href="#linux-installation">12.13.1. Linux オペレーティングシステムのインストール</a></span></dt><dt><span class="section"><a href="#windows-installation">12.13.2. Window オペレーティングシステムのインストール</a></span></dt></dl></dd><dt><span class="section"><a href="#delete-templates">12.14. テンプレートの削除</a></span></dt></dl></dd><dt><span class="chapter"><a href="#storage">13. Working With Storage</a></span></dt><dd><dl><dt><span class="section"><a href="#storage-overview">13.1. ストレージについて</a></span></dt><dt><span class="section"><a href="#primary-storage">13.2. プライマリストレージ</a></span></dt><dd><dl><dt><span class="section"><a href="#best-practices-primary-storage">13.2.1. Best Practices for Primary Storage</a></span></dt><dt><span class="section"><a href="#runtime-behavior-of-primary-storage">13.2.2. Runtime Behavior of Primary Storage</a></span></dt><dt><span class="section"><a href="#hypervisor-support-for-primarystorage">13.2.3. ハイパーバイザーのプライマリストレージサポート</a></span></dt><dt><span class="section"><a href="#storage-tags">13.2.4. ストレージタグ</a></span></dt><dt><span class="section"><a href="#maintenance-mode-for-primary-storage.xml">13.2.5. プライマリストレージの保守モード</a></span></dt></dl></dd><dt><span class="section"><a href="#secondary-storage">13.3. セカンダリストレージ</a></span></dt><dt><span class="section"><a href="#working-with-volumes">13.4. Working With Volumes</a></span></dt><dd><dl><dt><span class="section"><a href="#creating-new-volumes">13.4.1. 新しいボリュームの作成</a></span></dt><dt><span class="section"><a href="#upload-existing-volume-to-vm">13.4.2. Uploading an Existing Volume to a Virtual Machine</a></span></dt><dt><span class="section"><a href="#attaching-volume">13.4.3. ボリュームのアタッチ</a></span></dt><dt><span class="section"><a href="#detach-move-volumes">13.4.4. Detaching and Moving Volumes</a></span></dt><dt><span class="section"><a href="#vm-storage-migration">13.4.5. VM Storage Migration</a></span></dt><dt><span class="section"><a href="#resizing-volumes">13.4.6. ボリュームのサイズ変更</a></span></dt><dt><span class="section"><a href="#volume-deletion-garbage-collection">13.4.7. ボリュームの削除とガベージコレクション</a></span></dt></dl></dd><dt><span class="section"><a href="#working-with-snapshots">13.5. スナップショットに関わる作業</a></span></dt><dd><dl><dt><span class="section"><a href="#snapshot-throttling">13.5.1. Snapshot Job Throttling</a></span></dt><dt><span class="section"><a href="#automatic-snapshot-creation-retention">13.5.2. スナップショットの自動作成と保持</a></span></dt><dt><span class="section"><a href="#incremental-snapshots-backup">13.5.3. 増分スナップショットとバックアップ</a></span></dt><dt><span class="section"><a href="#volume-status">13.5.4. ボリュームの状態</a></span></dt><dt><span class="section"><a href="#snapshot-restore">13.5.5. スナップショットの復元</a></span></dt></dl></dd></dl></dd><dt><span class="chapter"><a href="#work-with-usage">14. 使用状況測定サーバーの操作</a></span></dt><dd><dl><dt><span class="section"><a href="#configure-usage-server">14.1. 使用状況測定サーバーの構成</a></span></dt><dt><span class="section"><a href="#set-usage-limit">14.2. Setting Usage Limits</a></span></dt><dt><span class="section"><a href="#globally-configured-limits">14.3. Globally Configured Limits</a></span></dt><dt><span class="section"><a href="#default-account-resource-limit">14.4. デフォルトのアカウントリソースの制限</a></span></dt><dt><span class="section"><a href="#per-domain-limits">14.5. ドメインごとの制限</a></span></dt></dl></dd><dt><span class="chapter"><a href="#networks">15. ネットワークとトラフィックの管理</a></span></dt><dd><dl><dt><span class="section"><a href="#guest-traffic">15.1. ゲスト トラフィック</a></span></dt><dt><span class="section"><a href="#networking-in-a-pod">15.2. Networking in a Pod</a></span></dt><dt><span class="section"><a href="#networking-in-a-zone">15.3. Networking in a Zone</a></span></dt><dt><span class="section"><a href="#basic-zone-physical-network-configuration">15.4. 基本ゾーンの物理ネットワーク構成</a></span></dt><dt><span class="section"><a href="#advanced-zone-physical-network-configuration">15.5. Advanced Zone Physical Network Configuration</a></span></dt><dd><dl><dt><span class="section"><a href="#configure-guest-traffic-in-advanced-zone">15.5.1. 拡張ゾーンのゲストトラフィックの構成</a></span></dt><dt><span class="section"><a href="#configure-public-traffic-in-an-advanced-zone">15.5.2. 拡張ゾーンのパブリックトラフィックの構成</a></span></dt></dl></dd><dt><span class="section"><a href="#using-multiple-guest-networks">15.6. Using Multiple Guest Networks</a></span></dt><dd><dl><dt><span class="section"><a href="#add-additional-guest-network">15.6.1. ゲストネットワークの追加</a></span></dt><dt><span class="section"><a href="#change-network-offering-on-guest-network">15.6.2. ゲストネットワーク上のネットワークオファリングの変更</a></span></dt></dl></dd><dt><span class="section"><a href="#security-groups">15.7. セキュリティグループ</a></span></dt><dd><dl><dt><span class="section"><a href="#about-security-groups">15.7.1. セキュリティグループについて</a></span></dt><dt><span class="section"><a href="#add-security-group">15.7.2. セキュリティグループの追加</a></span></dt><dt><span class="section"><a href="#security-groups-advanced-zones">15.7.3. Security Groups in Advanced Zones (KVM Only)</a></span></dt><dt><span class="section"><a href="#enable-security-groups">15.7.4. Enabling Security Groups</a></span></dt><dt><span class="section"><a href="#add-ingress-egress-rules">15.7.5. Adding Ingress and Egress Rules to a Security Group</a></span></dt></dl></dd><dt><span class="section"><a href="#external-firewalls-and-load-balancers">15.8. External Firewalls and Load Balancers</a></span></dt><dd><dl><dt><span class="section"><a href="#using-netscaler-load-balancers">15.8.1. About Using a NetScaler Load Balancer</a></span></dt><dt><span class="section"><a href="#configure-snmp-rhel">15.8.2. Configuring SNMP Community String on a RHEL Server</a></span></dt><dt><span class="section"><a href="#initial-setup-of-external-firewalls-loadbalancer">15.8.3. 外部ファイアウォールとロードバランサーの初期セットアップ</a></span></dt><dt><span class="section"><a href="#ongoing-config-of-external-firewalls-ld">15.8.4. Ongoing Configuration of External Firewalls and Load Balancers</a></span></dt><dt><span class="section"><a href="#autoscale">15.8.5. Configuring AutoScale</a></span></dt></dl></dd><dt><span class="section"><a href="#load-balancer-rules">15.9. 負荷分散のルール</a></span></dt><dd><dl><dt><span class="section"><a href="#add-load-balancer-rule">15.9.1. ロードバランサールールの追加</a></span></dt><dt><span class="section"><a href="#sticky-session-policies-for-lb-rules">15.9.2. Sticky Session Policies for Load Balancer Rules</a></span></dt></dl></dd><dt><span class="section"><a href="#guest-ip-ranges">15.10. Guest IP Ranges</a></span></dt><dt><span class="section"><a href="#acquire-new-ip-address">15.11. 新しい IP アドレスの取得</a></span></dt><dt><span class="section"><a href="#release-ip-address">15.12. IP アドレスの開放</a></span></dt><dt><span class="section"><a href="#static-nat">15.13. 静的 NAT</a></span></dt><dd><dl><dt><span class="section"><a href="#enable-disable-static-nat">15.13.1. スタティック NAT の有効化、無効化</a></span></dt></dl></dd><dt><span class="section"><a href="#ip-forwarding-firewalling">15.14. IP Forwarding and Firewalling</a></span></dt><dd><dl><dt><span class="section"><a href="#egress-firewall-rule">15.14.1. Creating Egress Firewall Rules in an Advanced Zone</a></span></dt><dt><span class="section"><a href="#firewall-rules">15.14.2. ファイアウォールルール</a></span></dt><dt><span class="section"><a href="#port-forwarding">15.14.3. ポート転送</a></span></dt></dl></dd><dt><span class="section"><a href="#ip-load-balancing">15.15. IP Load Balancing</a></span></dt><dt><span class="section"><a href="#dns-dhcp">15.16. DNSとDHCP</a></span></dt><dt><span class="section"><a href="#vpn">15.17. VPN</a></span></dt><dd><dl><dt><span class="section"><a href="#configure-vpn">15.17.1. VPN の構成</a></span></dt><dt><span class="section"><a href="#using-vpn-with-windows">15.17.2. Windows での VPN の使用方法</a></span></dt><dt><span class="section"><a href="#using-vpn-with-mac">15.17.3. Using VPN with Mac OS X</a></span></dt><dt><span class="section"><a href="#site-to-site-vpn">15.17.4. Setting Up a Site-to-Site VPN Connection</a></span></dt></dl></dd><dt><span class="section"><a href="#inter-vlan-routing">15.18. About Inter-VLAN Routing</a></span></dt><dt><span class="section"><a href="#configure-vpc">15.19. VPC の構成</a></span></dt><dd><dl><dt><span class="section"><a href="#vpc">15.19.1. VPC(Virtual Private Cloud) の概要</a></span></dt><dt><span class="section"><a href="#add-vpc">15.19.2. VPC の追加</a></span></dt><dt><span class="section"><a href="#add-tier">15.19.3. 層の追加</a></span></dt><dt><span class="section"><a href="#configure-acl">15.19.4. Configuring Access Control List</a></span></dt><dt><span class="section"><a href="#add-gateway-vpc">15.19.5. VPC へのプライベートゲートウェイの追加</a></span></dt><dt><span class="section"><a href="#add-vm-to-tier">15.19.6. 層への仮想マシンの展開</a></span></dt><dt><span class="section"><a href="#acquire-new-ip-for-vpc">15.19.7. VPC に対しての新しい IP アドレスの取得</a></span></dt><dt><span class="section"><a href="#release-ip-for-vpc">15.19.8. VPC に割り当てられた IP アドレスの開放</a></span></dt><dt><span class="section"><a href="#enable-disable-static-nat-vpc">15.19.9. VPC での静的 NAT の有効化、無効化</a></span></dt><dt><span class="section"><a href="#add-loadbalancer-rule-vpc">15.19.10. VPC への負荷分散ルールの追加</a></span></dt><dt><span class="section"><a href="#add-portforward-vpc">15.19.11. VPC へのポート転送ルールの追加</a></span></dt><dt><span class="section"><a href="#remove-tier">15.19.12. 層の削除</a></span></dt><dt><span class="section"><a href="#remove-vpc">15.19.13. VPC の編集と再起動、削除</a></span></dt></dl></dd><dt><span class="section"><a href="#persistent-network">15.20. Persistent Networks</a></span></dt><dd><dl><dt><span class="section"><a href="#persistent-network-consideration">15.20.1. Persistent Network Considerations</a></span></dt><dt><span class="section"><a href="#set-up-persistent-network">15.20.2. Creating a Persistent Guest Network</a></span></dt></dl></dd></dl></dd><dt><span class="chapter"><a href="#working-with-system-vm">16. システム仮想マシンの操作</a></span></dt><dd><dl><dt><span class="section"><a href="#system-vm-template">16.1. システム仮想マシンテンプレート</a></span></dt><dt><span class="section"><a href="#multiple-system-vm-vmware">16.2. VMware のための複数のシステム仮想マシンのサポート</a></span></dt><dt><span class="section"><a href="#console-proxy">16.3. コンソールプロキシー</a></span></dt><dd><dl><dt><span class="section"><a href="#use-cert">16.3.1. Using a SSL Certificate for the Console Proxy</a></span></dt><dt><span class="section"><a href="#change-console-proxy-ssl-certificate-domain">16.3.2. コンソールプロキシの SSL 証明書とドメインの変更</a></span></dt></dl></dd><dt><span class="section"><a href="#virtual-router">16.4. 仮想ルーター</a></span></dt><dd><dl><dt><span class="section"><a href="#configure-virtual-router">16.4.1. 仮想ルーターの構成</a></span></dt><dt><span class="section"><a href="#upgrade-virtual-router-with-service-offering">16.4.2. システムサービスオファリングによる仮想ルーターのアップグレード</a></span></dt><dt><span class="section"><a href="#best-practices-virtual-router">16.4.3. 仮想ルーターのベストプラクティス</a></span></dt></dl></dd><dt><span class="section"><a href="#secondary-storage-vm">16.5. セカンダリストレージ VM</a></span></dt></dl></dd><dt><span class="chapter"><a href="#sys-reliability-and-ha">17. システムの信頼性と高可用性</a></span></dt><dd><dl><dt><span class="section"><a href="#ha-management-server">17.1. HA for Management Server</a></span></dt><dt><span class="section"><a href="#management-server-lb">17.2. Management Server Load Balancing</a></span></dt><dt><span class="section"><a href="#ha-enabled-vm">17.3. 高可用性が有効な仮想マシン</a></span></dt><dt><span class="section"><a href="#ha-for-hosts">17.4. ホストの高可用性</a></span></dt><dd><dl><dt><span class="section"><a href="#dedicated-ha-hosts">17.4.1. Dedicated HA Hosts</a></span></dt></dl></dd><dt><span class="section"><a href="#primary-storage-outage-and-data-loss">17.5. プライマリストレージの停止とデータ損失</a></span></dt><dt><span class="section"><a href="#secondary-storage-outage-and-data-loss">17.6. セカンダリストレージの停止とデータ損失</a></span></dt><dt><span class="section"><a href="#api-throttling">17.7. Limiting the Rate of API Requests</a></span></dt><dd><dl><dt><span class="section"><a href="#api-throttling-configure">17.7.1. Configuring the API Request Rate</a></span></dt><dt><span class="section"><a href="#api-throttling-limitations">17.7.2. Limitations on API Throttling</a></span></dt></dl></dd></dl></dd><dt><span class="chapter"><a href="#manage-cloud">18. クラウドの管理</a></span></dt><dd><dl><dt><span class="section"><a href="#tagging-resources">18.1. Using Tags to Organize Resources in the Cloud</a></span></dt><dt><span class="section"><a href="#change-database-config">18.2. Changing the Database Configuration</a></span></dt><dt><span class="section"><a href="#change-database-password">18.3. Changing the Database Password</a></span></dt><dt><span class="section"><a href="#admin-alerts">18.4. 管理者アラート</a></span></dt><dt><span class="section"><a href="#customizing-dns">18.5. ネットワークドメイン名のカスタマイズ</a></span></dt><dt><span class="section"><a href="#stop-restart-management-server">18.6. Stopping and Restarting the Management Server</a></span></dt></dl></dd><dt><span class="chapter"><a href="#global-config">19. Global Configuration Parameters</a></span></dt><dd><dl><dt><span class="section"><a href="#setting-global-config-parameters">19.1. グローバル構成パラメーターの設定</a></span></dt><dt><span class="section"><a href="#about-global-config-parameters">19.2. About Global Configuration Parameters</a></span></dt></dl></dd><dt><span class="chapter"><a href="#api-overview">20. CloudStack API</a></span></dt><dd><dl><dt><span class="section"><a href="#provisioning-auth-api">20.1. プロビジョニングと認証 API</a></span></dt><dt><span class="section"><a href="#allocators">20.2. アロケーター</a></span></dt><dt><span class="section"><a href="#user-data-and-meta-data">20.3. ユーザーデータとメタデータ</a></span></dt></dl></dd><dt><span class="chapter"><a href="#tuning">21. チューニング</a></span></dt><dd><dl><dt><span class="section"><a href="#performance-monitoring">21.1. 性能監視</a></span></dt><dt><span class="section"><a href="#increase-management-server-max-memory">21.2. 管理サーバーの最大メモリの増設</a></span></dt><dt><span class="section"><a href="#set-database-buffer-pool-size">21.3. データベースのバッファープールサイズの設定</a></span></dt><dt><span class="section"><a href="#set-monitor-total-vm-limits-per-host">21.4. Set and Monitor Total VM Limits per Host</a></span></dt><dt><span class="section"><a href="#configure-xenserver-dom0-memory">21.5. XenServer の dom0 メモリの構成</a></span></dt></dl></dd><dt><span class="chapter"><a href="#troubleshooting">22. Troubleshooting</a></span></dt><dd><dl><dt><span class="section"><a href="#events">22.1. イベント</a></span></dt><dd><dl><dt><span class="section"><a href="#events-log">22.1.1. イベントログ</a></span></dt><dt><span class="section"><a href="#event-framework">22.1.2. Event Notification</a></span></dt><dt><span class="section"><a href="#standard-events">22.1.3. 標準イベント</a></span></dt><dt><span class="section"><a href="#long-running-job-events">22.1.4. 長期間実行するジョブのイベント</a></span></dt><dt><span class="section"><a href="#event-log-queries">22.1.5. Event Log Queries</a></span></dt></dl></dd><dt><span class="section"><a href="#troubleshooting-working-with-server-logs">22.2. サーバーログに関わる作業</a></span></dt><dt><span class="section"><a href="#troubleshooting-dataloss-on-exported-primary-storage">22.3. エクスポートしたプライマリストレージのデータ損失</a></span></dt><dt><span class="section"><a href="#troubleshooting-recover-lost-virtual-router">22.4. 喪失した仮想ルーターの復旧</a></span></dt><dt><span class="section"><a href="#troubleshooting-maintenance-mode-not-working-on-vCenter">22.5. vCenter が動作しない際の保守モード</a></span></dt><dt><span class="section"><a href="#troubleshooting-unable-to-deploy-vms">22.6. アップロードした vSphere 用テンプレートが展開できない場合</a></span></dt><dt><span class="section"><a href="#troubleshooting-unable-to-power-on-vm">22.7. VMware 上で仮想マシンの電源が入らない</a></span></dt><dt><span class="section"><a href="#troubleshooting-lb-rules-fails">22.8. 負荷分散ルールがネットワークオファリングを変更すると失敗する</a></span></dt></dl></dd><dt><span class="appendix"><a href="#time-zones">A. タイムゾーン</a></span></dt><dt><span class="appendix"><a href="#event-types">B. イベントの種類</a></span></dt><dt><span class="appendix"><a href="#alerts">C. Alerts</a></span></dt><dt><span class="appendix"><a href="#appe-cloudstack-Revision_History">D. Revision History</a></span></dt></dl></div><div xml:lang="ja-JP" class="chapter" id="concepts" lang="ja-JP"><div class="titlepage"><div><div><h2 class="title">第1章 コンセプト</h2></div></div></div><div class="toc"><dl><dt><span class="section"><a href="#whatis">1.1. CloudStack とは</a></span></dt><dt><span class="section"><a href="#feature-overview">1.2. CloudStack の機能</a></span></dt><dt><span class="section"><a href="#deployment-architecture-overview">1.3. 展開アーキテクチャの概要</a></span></dt><dd><dl><dt><span class="section"><a href="#management-server-overview">1.3.1. 管理サーバーについて</a></span></dt><dt><span class="section"><a href="#cloud-infrastructure-overview">1.3.2. クラウドインフラストラクチャの概要</a></span></dt><dt><span class="section"><a href="#networking-overview">1.3.3. ネットワーク</a></span></dt></dl></dd></dl></div><div xml:lang="ja-JP" class="section" id="whatis" lang="ja-JP"><div class="titlepage"><div><div><h2 class="title" id="whatis">1.1. CloudStack とは</h2></div></div></div><div class="para">
		CloudStack はオープンソースのソフトウェアプラットフォームで、コン ピューティングリソースをプールすることにより、パブリック、プライベート、 およびハイブリッドの IaaS(Infrastructure as a Service)クラウドを構築す ることができます。CloudStack で、クラウドインフラストラクチャを構成する ネットワーク、ストレージ、およびコンピューティングノードを管理します。 CloudStack を使用して、クラウドコンピューティング環境を展開、管理、お よび構成します。
	</div><div class="para">
		本製品の主なユーザーはサービスプロバイダーと企業です。CloudStack を使用すると、次のタスクを実行できます。
	</div><div class="itemizedlist"><ul><li class="listitem"><div class="para">
				オンデマンドで弾力的なクラウドコンピューティングサービスをセッ トアップする。サービスプロバイダーはインターネットを経由して、セルフサービスの仮想マシンインスタンス、スト レージボリューム、およびネットワーク構成を販売できます。
			</div></li><li class="listitem"><div class="para">
				従業員が使用するオンプレミスなプライベートクラウドをセットアップする。企業は物理マシンと同じ方法で仮想マシ ンを管理せずに、IT 部門を介さずにセルフサービスの仮想マシンをユーザーに提供することができます。
			</div></li></ul></div><div class="mediaobject"><img src="./images/1000-foot-view.png" width="444" alt="1000-foot-view.png: Overview of CloudStack" /></div></div><div xml:lang="ja-JP" class="section" id="feature-overview" lang="ja-JP"><div class="titlepage"><div><div><h2 class="title" id="feature-overview">1.2. CloudStack の機能</h2></div></div></div><div class="para">
		<span class="bold bold"><strong>複数のハイパーバイザーのサポート</strong></span>
	</div><div class="para">
		CloudStack はさまざまなハイパーバイザーと連動します。単一のクラウド環境に、ハイパーバイザーの実装を複数含められます。現在の CloudStack リリースでは、エンタープライズクラスのハイパーバイザーである Citrix XenServer や VMware vSphere も CentOS, Ubuntu 上の KVM, Xen と同様にサポートされます。
	</div><div class="para">
		<span class="bold bold"><strong>高度にスケーラブルなインフラストラクチャ管理</strong></span>
	</div><div class="para">
		CloudStack では、地理的に分散した複数のデータセンターに設置される、何万台ものサーバーを管理することが できます。集中型の管理サーバーを直線的に拡張できるので、中間のクラスターレベルの管理サーバーが不要 です。単一のコンポーネントに障害が発生しても、クラスターまたはクラウド全体が停止することはありません。ク ラウドで実行中の仮想マシンの機能に影響を与えずに、管理サーバーの定期保守を実行できます。
	</div><div class="para">
		<span class="bold bold"><strong>自動的な構成管理</strong></span>
	</div><div class="para">
		CloudStack では、各ゲスト仮想マシンのネットワークとストレージの設定が自動的に構成されます。
	</div><div class="para">
		CloudStack では、クラウド自体をサポートする仮想アプライアンスのプールが内部的に管理されます。これらのア プライアンスにより、ファイアウォール、ルーティング、DHCP、VPN アクセス、コンソールプロキシ、ストレージアク セス、およびストレージ複製などのサービスが提供されます。仮想アプライアンスを幅広く使用することによって、 クラウド環境のインストール、構成、および継続的な管理を大いに単純化します。
	</div><div class="para">
		<span class="bold bold"><strong>グラフィカルユーザーインターフェイス</strong></span>
	</div><div class="para">
		CloudStack には、クラウドのプロビジョニングと管理のための管理者用の Web インターフェイスと、仮想マシンの 実行と仮想マシンテンプレートの管理のためのエンドユーザー用の Web インターフェイスが搭載されています。 ユーザーインターフェイスは、サービスプロバイダーまたは企業が希望する外観になるようにカスタマイズできま す。
	</div><div class="para">
		<span class="bold bold"><strong>標準 API のサポート</strong></span>
	</div><div class="para">
		CloudStack provides an API that gives programmatic access to all the management features available in the UI. The API is maintained and documented. This API enables the creation of command line tools and new user interfaces to suit particular needs. See the Developer’s Guide and API Reference, both available at <a href="http://cloudstack.apache.org/docs/en-US/index.html">Apache CloudStack Guides</a> and <a href="http://cloudstack.apache.org/docs/api/index.html">Apache CloudStack API Reference</a> respectively.
	</div><div class="para">
		CloudStack のプラッガブルなアロケーターのアーキテクチャはホストやストレージに対する新しいタイプの割り当てを許容しています。以下のアロケーター実装ガイドも参照して下さい。<a href="http://docs.cloudstack.org/CloudStack_Documentation/Allocator_Implementation_Guide">http://docs.cloudstack.org/CloudStack_Documentation/Allocator_Implementation_Guide</a>
	</div><div class="para">
		<span class="bold bold"><strong>高可用性</strong></span>
	</div><div class="para">
		CloudStack は可用性を高めるためシステムに幾つかの機能を持っています。管理サーバーを複数ノードにインストールし、サーバー間でロードバランシングをすることが出来ます。MySQLをデータベースの障害時に手動でフェイルオーバーするためレプリケーションの設定をすることも可能でしょう。ホストに対しては CloudStack はNICのボンディングやiSCSIのマルチパスのようにストレージ通信を分割することをサポートしています。
	</div></div><div xml:lang="ja-JP" class="section" id="deployment-architecture-overview" lang="ja-JP"><div class="titlepage"><div><div><h2 class="title" id="deployment-architecture-overview">1.3. 展開アーキテクチャの概要</h2></div></div></div><div class="para">
		CloudStack のインストールは、管理サーバーおよび管理サーバーで管理するクラウドインフラストラクチャの 2 つの部分に分けられます。CloudStack クラウドのセットアップと管理においては、ホスト、ストレージデバイス、および IP アドレスのようなリソースを管理者が管理サーバーに準備し、管理サーバーがそれらのリソースを管理します。
	</div><div class="para">
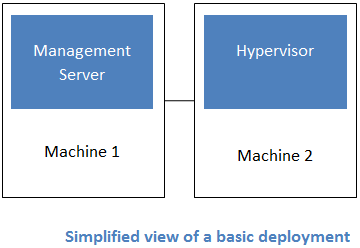
		最小構成でインストールする場合は、CloudStack 管理サーバーを実行する 1 台のマシンとクラウドインフラストラクチャとして動作するもう 1 台のマシンをセットアップします。この場合のクラウドインフラストラクチャは非常に単純で、ハイパーバイザーソフトウェアを実行する 1 台のホストで構成されます。最小の展開では 1 台のマシン上で管理サーバーとハイパーバイザーホストの両方を担うことができます。(その場合、KVM ハイパーバイザーを利用します)
	</div><div class="mediaobject"><img src="./images/basic-deployment.png" alt="basic-deployment.png: Basic two-machine deployment" /></div><div class="para">
		A more full-featured installation consists of a highly-available multi-node Management Server installation and up to tens of thousands of hosts using any of several advanced networking setups. For information about deployment options, see the "Choosing a Deployment Architecture" section of the $PRODUCT; Installation Guide.
	</div><div xml:lang="ja-JP" class="section" id="management-server-overview" lang="ja-JP"><div class="titlepage"><div><div><h3 class="title" id="management-server-overview">1.3.1. 管理サーバーについて</h3></div></div></div><div class="para">
		管理サーバーは、クラウドリソースを管理する CloudStack ソフトウェアです。ユーザーインターフェイスまたは API を介して 管理サーバーを操作することにより、クラウドインフラストラクチャを構成し管理できます。
	</div><div class="para">
		管理サーバーは専用のサーバーまたは仮想マシンです。ホストに対する仮想マシンの割り当てを制御し、ストレージと IP アドレスを仮想マシンインスタンスに割り当てます。CloudStack 管理サーバーは Tomcat コンテナー内で動作し、データ保 持のために MySQL データベースを必要とします。
	</div><div class="para">
		このマシンは「4.3: 最小システム要件」にあるシステム要件を満たしている必要があります。
	</div><div class="para">
		管理サーバー
	</div><div class="itemizedlist"><ul><li class="listitem"><div class="para">
				管理者とエンドユーザーに Web ユーザーインターフェイスを提供します。
			</div></li><li class="listitem"><div class="para">
				CloudStack プラットフォームの API を提供します。
			</div></li><li class="listitem"><div class="para">
				特定ホストに対するゲスト仮想マシンの割り当てを管理します。
			</div></li><li class="listitem"><div class="para">
				特定アカウントに対するパブリックおよびプライベート IP アドレスの割り当てを管理します。
			</div></li><li class="listitem"><div class="para">
				ゲストに対する仮想ディスクとしてのストレージの割り当てを管理します。
			</div></li><li class="listitem"><div class="para">
				スナップショット、テンプレート、および ISO イメージを管理し、場合によっては複数のデータセンターの間でそれらを 複製します。
			</div></li><li class="listitem"><div class="para">
				クラウド構成のための単一の場を提供します。
			</div></li></ul></div></div><div xml:lang="ja-JP" class="section" id="cloud-infrastructure-overview" lang="ja-JP"><div class="titlepage"><div><div><h3 class="title" id="cloud-infrastructure-overview">1.3.2. クラウドインフラストラクチャの概要</h3></div></div></div><div class="para">
		名前が示すとおり、管理サーバーで 1 つ以上のゾーンを管理します。ゾーンは通常データセンターに相当し、ゲスト仮想マ シンが動作するホストコンピューターを含みます。クラウドインフラストラクチャは次のように組織されます。
	</div><div class="itemizedlist"><ul><li class="listitem"><div class="para">
				ゾーン:通常、1 つのゾーンは単一のデータセンターに相当します。ゾーンは 1 つ以上のポッドとセカンダリストレー ジから構成されます。
			</div></li><li class="listitem"><div class="para">
				ポッド:普通、ポッドはレイヤー2スイッチと1つ以上のクラスターを含む1ラック分のハードウェアです。
			</div></li><li class="listitem"><div class="para">
				クラスター:クラスターは 1 つ以上のホストとプライマリストレージから構成されます。
			</div></li><li class="listitem"><div class="para">
				ホスト:クラスター内の単一のコンピューティングノードです。実際のクラウドサービスは、ゲスト仮想マシンの形式で ホストから提供されます。
			</div></li><li class="listitem"><div class="para">
				プライマリストレージはクラスターと関連付けられ、そのクラスター内のホスト上で動作するすべての仮想マシンの ディスクボリュームを格納します。
			</div></li><li class="listitem"><div class="para">
				セカンダリストレージはゾーンと関連付けられ、テンプレート、ISO イメージ、およびディスクボリュームのスナップ ショットを格納します。
			</div></li></ul></div><div class="mediaobject"><img src="./images/infrastructure-overview.png" width="444" alt="infrastructure_overview.png: Nested organization of a zone" /></div><div class="para">
		<span class="bold bold"><strong>詳細情報</strong></span>
	</div><div class="para">
		より詳細な情報はドキュメントの「クラウドインフラストラクチャコンセプト」を参照してください。
	</div></div><div xml:lang="ja-JP" class="section" id="networking-overview" lang="ja-JP"><div class="titlepage"><div><div><h3 class="title" id="networking-overview">1.3.3. ネットワーク</h3></div></div></div><div class="para">
		CloudStack では基本と拡張の 2 種類のネットワーク設定を提供します。
	</div><div class="itemizedlist"><ul><li class="listitem"><div class="para">
				基本ネットワーク。 基本ネットワーク設定では、AWSスタイルのネットワークの単一共有ネットワークを提供します。セキュリティグループ(発信元 IP アドレスのフィルター) のようなレイヤー3 レベルの方法でゲストを分離できます。
			</div></li><li class="listitem"><div class="para">
				拡張ネットワーク。拡張ネットワー ク設定は、より洗練されたネットワーク技術をサポートします。このネットワークモデルを選択すると、より柔軟にゲストの ネットワークを定義できます。
			</div></li></ul></div><div class="para">
		詳しくは、「ネットワークセットアップ」を参照してください。
	</div></div></div></div><div xml:lang="ja-JP" class="chapter" id="cloud-infrastructure-concepts" lang="ja-JP"><div class="titlepage"><div><div><h2 class="title">第2章 クラウドインフラストラクチャのプロビジョニング</h2></div></div></div><div class="toc"><dl><dt><span class="section"><a href="#about-regions">2.1. About Regions</a></span></dt><dt><span class="section"><a href="#about-zones">2.2. ゾーンについて</a></span></dt><dt><span class="section"><a href="#about-pods">2.3. ポッドについて</a></span></dt><dt><span class="section"><a href="#about-clusters">2.4. クラスタについて</a></span></dt><dt><span class="section"><a href="#about-hosts">2.5. ホストについて</a></span></dt><dt><span class="section"><a href="#about-primary-storage">2.6. プライマリストレージについて</a></span></dt><dt><span class="section"><a href="#about-secondary-storage">2.7. セカンダリストレージについて</a></span></dt><dt><span class="section"><a href="#about-physical-networks">2.8. 物理ネットワークについて</a></span></dt><dd><dl><dt><span class="section"><a href="#basic-zone-network-traffic-types">2.8.1. 基本ゾーンのネットワークトラフィックの種類</a></span></dt><dt><span class="section"><a href="#basic-zone-guest-ip-addresses">2.8.2. 基本ゾーンのゲスト IP アドレス</a></span></dt><dt><span class="section"><a href="#advanced-zone-network-traffic-types">2.8.3. 拡張ゾーンのネットワークトラフィックの種類</a></span></dt><dt><span class="section"><a href="#advanced-zone-guest-ip-addresses">2.8.4. 拡張ゾーンのゲスト IP アドレス</a></span></dt><dt><span class="section"><a href="#advanced-zone-public-ip-addresses">2.8.5. 拡張ゾーンのパブリック IP アドレス</a></span></dt><dt><span class="section"><a href="#system-reserved-ip-addresses">2.8.6. システムにより予約済みの IP アドレス</a></span></dt></dl></dd></dl></div><div xml:lang="ja-JP" class="section" id="about-regions" lang="ja-JP"><div class="titlepage"><div><div><h2 class="title" id="about-regions">2.1. About Regions</h2></div></div></div><div class="para">
		To increase reliability of the cloud, you can optionally group resources into multiple geographic regions. A region is the largest available organizational unit within a CloudStack deployment. A region is made up of several availability zones, where each zone is roughly equivalent to a datacenter. Each region is controlled by its own cluster of Management Servers, running in one of the zones. The zones in a region are typically located in close geographical proximity. Regions are a useful technique for providing fault tolerance and disaster recovery.
	</div><div class="para">
		By grouping zones into regions, the cloud can achieve higher availability and scalability. User accounts can span regions, so that users can deploy VMs in multiple, widely-dispersed regions. Even if one of the regions becomes unavailable, the services are still available to the end-user through VMs deployed in another region. And by grouping communities of zones under their own nearby Management Servers, the latency of communications within the cloud is reduced compared to managing widely-dispersed zones from a single central Management Server.
	</div><div class="para">
		Usage records can also be consolidated and tracked at the region level, creating reports or invoices for each geographic region.
	</div><div class="mediaobject"><img src="./images/region-overview.png" width="444" alt="region-overview.png: Nested structure of a region." /></div><div class="para">
		Regions are visible to the end user. When a user starts a guest VM, the user must select a region for their guest. Users might also be required to copy their private templates to additional regions to enable creation of guest VMs using their templates in those regions.
	</div></div><div xml:lang="ja-JP" class="section" id="about-zones" lang="ja-JP"><div class="titlepage"><div><div><h2 class="title" id="about-zones">2.2. ゾーンについて</h2></div></div></div><div class="para">
		A zone is the second largest organizational unit within a CloudStack deployment. A zone typically corresponds to a single datacenter, although it is permissible to have multiple zones in a datacenter. The benefit of organizing infrastructure into zones is to provide physical isolation and redundancy. For example, each zone can have its own power supply and network uplink, and the zones can be widely separated geographically (though this is not required).
	</div><div class="para">
		ゾーンは次のものから構成されます。
	</div><div class="itemizedlist"><ul><li class="listitem"><div class="para">
				1つ以上のポッド。各ポッドはホストを含む1つ以上のクラスターと、1つ以上のプライマリストレージサーバーから構成されます。
			</div></li><li class="listitem"><div class="para">
				セカンダリストレージ。ゾーン内のすべてのポッドで共有されます。
			</div></li></ul></div><div class="mediaobject"><img src="./images/zone-overview.png" width="444" alt="zone-overview.png: Nested structure of a simple zone." /></div><div class="para">
		ゾーンはユーザーが確認することができ、ユーザーがゲストVMを起動させた際ゾーンを選択する必要があります。また、ユーザーは追加ゾーンでプライベートのテンプレートを利用する場合追加ゾーンに対してテンプレートのコピーを実施する必要があります。
	</div><div class="para">
		ゾーンはパブリック、プライベートを選択でき、パブリックゾーンは全てのユーザーに対して公開されます。これはどのユーザーもゾーンに対してゲストVMを作成することを意味します。プライベートゾーンは特定のドメインに対し予約され、対象ドメインもしくはそのサブドメインのユーザーのみがゾーンに対してゲストVMを作成できます。
	</div><div class="para">
		同一ゾーンのホストはファイアウォールを介さず直接互いにアクセス可能であり、異種ゾーン間のホストは静的に設定されたVPNトンネルを介して通信します。
	</div><div class="para">
		各ゾーンに対して管理者は以下について設計する必要があります。
	</div><div class="itemizedlist"><ul><li class="listitem"><div class="para">
				いくつのポッドをゾーンに配置するか。
			</div></li><li class="listitem"><div class="para">
				いくつのクラスターを各ポッドに配置するか。
			</div></li><li class="listitem"><div class="para">
				いくつのホストを各クラスターに配置するか。
			</div></li><li class="listitem"><div class="para">
				いくつのプライマリストレージサーバーを各クラスターに配置し、総容量をどうするか。
			</div></li><li class="listitem"><div class="para">
				いくつのセカンダリストレージサーバーをゾーンに配置するか。
			</div></li></ul></div><div class="para">
		新しいゾーンを追加した際は、まずゾーンに対し物理ネットワークや第一のポッド、クラスター、ホスト、プライマリストレージ、セカンダリストレージを設定します。
	</div></div><div xml:lang="ja-JP" class="section" id="about-pods" lang="ja-JP"><div class="titlepage"><div><div><h2 class="title" id="about-pods">2.3. ポッドについて</h2></div></div></div><div class="para">
		A pod often represents a single rack. Hosts in the same pod are in the same subnet. A pod is the second-largest organizational unit within a CloudStack deployment. Pods are contained within zones. Each zone can contain one or more pods. A pod consists of one or more clusters of hosts and one or more primary storage servers. Pods are not visible to the end user.
	</div><div class="mediaobject"><img src="./images/pod-overview.png" alt="pod-overview.png: Nested structure of a simple pod" /></div></div><div xml:lang="ja-JP" class="section" id="about-clusters" lang="ja-JP"><div class="titlepage"><div><div><h2 class="title" id="about-clusters">2.4. クラスタについて</h2></div></div></div><div class="para">
		クラスターはホストをグループ化する方法です。これは XenServer のサーバープール、KVM サーバーのセットもしくは vCenter で事前用意された VMware cluster に相当します。クラスター内の全てのホストはすべて同一のハードウェアから構成され、同じハイパーバイザーを実行し、同じサブネット上にあり、同じ共有プライマリストレージにアクセスします。仮想マシンインスタンスはクラスター内のあるホストから他のホストにユーザーへのサービスを中断せずにライブマイグレーションすることができます。
	</div><div class="para">
		クラスタはCloudStackの3番目に大きい管理単位です。クラスタはポッドに格納され、ポッドはゾーンに格納されます。クラスタ内のホスト台数は、基盤のハイパーバイザーにより制限されますが、ほとんどの場合CloudStackはより少ない台数を推奨しますので、ベストプラクティスを確認してください。
	</div><div class="para">
		クラスタは1つ以上のホストと1つ以上のプライマリストレージから成り立ちます。
	</div><div class="mediaobject"><img src="./images/cluster-overview.png" alt="cluster-overview.png: Structure of a simple cluster" /></div><div class="para">
		CloudStackは1つのクラウドに複数のクラスタを含めることを認めています。
	</div><div class="para">
		ローカルストレージを利用している場合クラスター毎にホストが1つしかない場合でもクラスターを組織化する必要があります。
	</div><div class="para">
		VMware を使用する場合、すべての VMware クラスタは vCenter Server に管理されます。管理者は vCenter を CloudStack に登録する必要があります。1つのゾーンには複数の vCenter Server が存在する可能性があります。それぞれの vCenter Server の配下には、複数の VMware クラスタが存在する可能性があります。
	</div></div><div xml:lang="ja-JP" class="section" id="about-hosts" lang="ja-JP"><div class="titlepage"><div><div><h2 class="title" id="about-hosts">2.5. ホストについて</h2></div></div></div><div class="para">
		ホストは単一のコンピューターです。ホストは、ゲスト仮想マシンを実行するコンピューティングリソースを提供します。各ホストにはゲスト仮想マシンを管理するためのハイパーバイザーソフトウェアをインストールしま す。たとえば、KVM が有効な Linux サーバー、Citrix XenServer が動作するサーバー、および ESXi サーバーがホストです。
	</div><div class="para">
		ホストは CloudStack 環境内の最小の組織単位です。ホストはクラスターに含まれ、クラスターはポッドに含まれ、ポッドは ゾーンに含まれます。
	</div><div class="para">
		CloudStack 環境内のホストには次の機能があります。
	</div><div class="itemizedlist"><ul><li class="listitem"><div class="para">
				仮想マシンをホストするために必要な CPU、メモリ、ストレージ、およびネットワークリソースを提供します。
			</div></li><li class="listitem"><div class="para">
				高帯域幅の TCP/IP ネットワークに相互接続して、インターネットに接続します。
			</div></li><li class="listitem"><div class="para">
				地理的に異なる複数データセンターに横断的に配置されています。
			</div></li><li class="listitem"><div class="para">
				1 つのクラスター内のホストはすべて同種である必要がありますが、CPU 速度や RAM サイズなど、能力が異なる可能性があります。
			</div></li></ul></div><div class="para">
		ゲストVMの能力を向上させるためにいつでもホストを追加できます。
	</div><div class="para">
		CloudStack は自動的にホストのCPU、メモリのリソースを検出します。
	</div><div class="para">
		ホストはユーザーに対し不可視であり、ユーザーはどのホストに対しゲストVMが割り当てられているかわかりません。
	</div><div class="para">
		CloudStack 内のホストを機能させるには、次の作業が必要です。
	</div><div class="itemizedlist"><ul><li class="listitem"><div class="para">
				ホストにハイパーバイザーソフトウェアをインストールする。
			</div></li><li class="listitem"><div class="para">
				ホストに IP アドレスを割り当てる。
			</div></li><li class="listitem"><div class="para">
				ホストが CloudStack 管理サーバーに接続していることを確認する。
			</div></li></ul></div></div><div xml:lang="ja-JP" class="section" id="about-primary-storage" lang="ja-JP"><div class="titlepage"><div><div><h2 class="title" id="about-primary-storage">2.6. プライマリストレージについて</h2></div></div></div><div class="para">
		プライマリストレージはクラスターと関連付けられ、そのクラスター内のホスト上で動作するすべての仮想マシンのディスクボリュームを格納します。複数のプライマリストレージをクラスターに追加することができ、少なくとも1つのプライマリストレージが必要です。通常はパフォーマンス向上のため、ホストの近くに配置します。
	</div><div class="para">
		CloudStack は利用するハイパーバイザーでサポートされている全ての標準規格に沿ったiSCSI、NFSに対応するよう設計されています。それは次にしめすデバイスを含みます。
	</div><div class="itemizedlist"><ul><li class="listitem"><div class="para">
				Dell EqualLogic™ for iSCSI
			</div></li><li class="listitem"><div class="para">
				Network Appliances filers for NFS and iSCSI
			</div></li><li class="listitem"><div class="para">
				Scale Computing for NFS
			</div></li></ul></div><div class="para">
		もし、ローカルディスクのみを使ってインストールを進める場合、次のセカンダリストレージにスキップすることができます。
	</div></div><div xml:lang="ja-JP" class="section" id="about-secondary-storage" lang="ja-JP"><div class="titlepage"><div><div><h2 class="title" id="about-secondary-storage">2.7. セカンダリストレージについて</h2></div></div></div><div class="para">
		セカンダリストレージはゾーンと関連付けられ、次の項目を格納します。
	</div><div class="itemizedlist"><ul><li class="listitem"><div class="para">
				テンプレート – 仮想マシンの起動に使用できるオペレーティングシステムイメージで、アプリケーションのインストー ルなど追加の構成を含めることができます。
			</div></li><li class="listitem"><div class="para">
				ISO イメージ – データまたはオペレーティングシステムの起動可能なメディアを含むディスクイメージです。
			</div></li><li class="listitem"><div class="para">
				ディスクボリュームのスナップショット – 仮想マシンデータの保存コピーです。データの復元または新しいテンプ\nレートの作成に使用できます。
			</div></li></ul></div><div class="para">
		セカンダリストレージ内の項目は、ゾーン内のすべてのホストで使用できます。CloudStack は特定のプライマリストレージデバイスに対するゲストVMの仮想ディスクを管理します。
	</div><div class="para">
		セカンダリストレージ内の項目をクラウドを介して全てのホストで利用可能にするには OpenStack オブジェクトストレージ(Swift, <a href="http://swift.openstack.org">swift.openstack.org</a>) をセカンダリストレージに追加することができます。Swiftを使う場合、Swiftストレージを CloudStack 全体で構成します。通常通りセカンダリストレージを各ゾーンで設定すると、各ゾーンのセカンダリストレージは全てのテンプレートや他のセカンダリストレージのデータをSwiftに中継します。Swiftストレージはクラウド全体に渡るリソースとして動作し、作成されたテンプレートやその他のデータがクラウド上のあらゆるゾーンから利用可能になります。Swiftストレージは階層的な構造ではなく、ストレージオブジェクト毎に単一のSwiftコンテナーが用意されます。クラウド上の全てのセカンダリストレージは必要に応じSwiftからコンテナーを取得します。その際、あるゾーンから他のゾーンに対してテンプレートやスナップショットをコピーする必要はなく、単一のNFSのように扱うことができ、全てのデータはあらゆる場所から利用可能になります。
	</div></div><div xml:lang="ja-JP" class="section" id="about-physical-networks" lang="ja-JP"><div class="titlepage"><div><div><h2 class="title" id="about-physical-networks">2.8. 物理ネットワークについて</h2></div></div></div><div class="para">
		ゾーン追加時に物理ネットワークを設定します。拡張ゾーンにおいて1つもしくは複数の物理ネットワークを各ゾーン関連付けることができます。これはホストのハイパーバイザーにおけるNICに相当し、各物理ネットワークは1つもしくは複数のネットワークのトラフィックタイプを転送します。各ネットワークに対するトラフィックタイプの選択はゾーン作成時に基本ネットワーク、拡張ネットワークのどちらを選択したかに強く依存します。
	</div><div class="para">
		物理ネットワークはゾーンにおけるネットワークハードウェアやケーブルの配線に相当し、複数の物理ネットワークを持たせることができます。管理者は次のようなことができます。
	</div><div class="itemizedlist"><ul><li class="listitem"><div class="para">
				ゾーン内の物理ネットワークの追加/削除/更新
			</div></li><li class="listitem"><div class="para">
				物理ネットワークのVLAN設定
			</div></li><li class="listitem"><div class="para">
				ハイパーバイザーからネットワークを認識するための名前の設定
			</div></li><li class="listitem"><div class="para">
				物理ネットワーク上で利用可能なサービスプロバイダーの設定(ファイアウォール、ロードバランサー等)
			</div></li><li class="listitem"><div class="para">
				物理ネットワークに渡すIPアドレスの設定
			</div></li><li class="listitem"><div class="para">
				物理ネットワークで流れるトラフィックタイプの指定
			</div></li></ul></div><div xml:lang="ja-JP" class="section" id="basic-zone-network-traffic-types" lang="ja-JP"><div class="titlepage"><div><div><h3 class="title" id="basic-zone-network-traffic-types">2.8.1. 基本ゾーンのネットワークトラフィックの種類</h3></div></div></div><div class="para">
		基本ネットワーク設定を使用する場合は、ゾーンで使用できる物理ネットワークは 1 つだけです。その物理ネットワークでは、次の 3 種類のトラ フィックが伝送されます。
	</div><div class="itemizedlist"><ul><li class="listitem"><div class="para">
				ゲスト : エンドユーザーが仮想マシンを実行すると、ゲストトラフィックが生成されます。ゲスト仮想マシンは、ゲストネットワークと呼ばれるネットワークを介して互いに通信します。基本ゾーンの各ポッドはブロードキャストドメイン なので、ゲストネットワークに対してそれぞれ異なる IP アドレス範囲を持ちます。管理者は、各ポッドの IP アドレス 範囲を構成する必要があります。
			</div></li><li class="listitem"><div class="para">
				Management. When CloudStack's internal resources communicate with each other, they generate management traffic. This includes communication between hosts, system VMs (VMs used by CloudStack to perform various tasks in the cloud), and any other component that communicates directly with the CloudStack Management Server. You must configure the IP range for the system VMs to use.
			</div><div class="note"><div class="admonition_header"><h2>注記</h2></div><div class="admonition"><div class="para">
					￼管理トラフィックとゲストトラフィックに別々の NIC を使用することを強くお勧めします。
				</div></div></div></li><li class="listitem"><div class="para">
				パブリック : パブリックトラフィックはクラウド上の仮想マシンがインターネットにアクセスする際に生成されます。これには外部からアクセス可能な IP が割り当てられなければいけません。「新規 IP アドレスの取得」に記述されているようにエンドユーザーはこれらの IP を CloudStack ユーザーインターフェースから取得しゲストネットワークとパブリックネットワーク間の NAT を実現できます。
			</div></li><li class="listitem"><div class="para">
				Storage. While labeled "storage" this is specifically about secondary storage, and doesn't affect traffic for primary storage. This includes traffic such as VM templates and snapshots, which is sent between the secondary storage VM and secondary storage servers. CloudStack uses a separate Network Interface Controller (NIC) named storage NIC for storage network traffic. Use of a storage NIC that always operates on a high bandwidth network allows fast template and snapshot copying. You must configure the IP range to use for the storage network.
			</div></li></ul></div><div class="para">
		基本ネットワークの場合は、物理ネットワークの構成はごく簡単です。多くの場合、’構成する必要があるのはゲスト仮想マシンが生成するトラフィックを伝送するための 1 つのゲストネットワークだけです。もしNetScaler ロードバランサーを用い、エラスティック IP や エラスティックロードバランサー(EIP, ELB) 機能を利用する場合はパブリックトラフィックを転送するためのネットワークを設定しなければなりません。CloudStack ではユーザーインターフェースから新しいゾーンを追加する際に必要なネットワーク設定に注意を払う必要があります。
	</div></div><div xml:lang="ja-JP" class="section" id="basic-zone-guest-ip-addresses" lang="ja-JP"><div class="titlepage"><div><div><h3 class="title" id="basic-zone-guest-ip-addresses">2.8.2. 基本ゾーンのゲスト IP アドレス</h3></div></div></div><div class="para">
		基本ネットワーク設定を使用する場合は、CloudStack はポッドの CIDR の IP アドレスをそのポッドのゲストに割り当てます。 管理者は、そのためにポッドの直接 IP アドレスの範囲を追加する必要があります。これらの IP アドレスはホストと同じ VLAN に含まれます。
	</div></div><div xml:lang="ja-JP" class="section" id="advanced-zone-network-traffic-types" lang="ja-JP"><div class="titlepage"><div><div><h3 class="title" id="advanced-zone-network-traffic-types">2.8.3. 拡張ゾーンのネットワークトラフィックの種類</h3></div></div></div><div class="para">
		拡張ネットワーク設定を使用する場合は、ゾーンで複数の物理ネットワークを使用できます。各物理ネットワークで 1 つまたは複数の種類のトラフィックを伝送できます。各ネットワークで伝送するネットワークトラフィックの種類を、CloudStack に 識別させる必要があります。拡張ゾーンのトラフィックには次の種類があります。
	</div><div class="itemizedlist"><ul><li class="listitem"><div class="para">
				ゲスト : エンドユーザーが仮想マシンを実行すると、ゲストトラフィックが生成されます。ゲスト仮想マシンは、ゲストネットワークと呼ばれるネットワークを介して互いに通信します。このネットワークは、分離することも共有すること もできます。分離されたゲストネットワークの場合は、管理者は各 CloudStack アカウントのネットワークを分離するための VLAN 範囲を予約する必要があります(多数の VLAN が必要になる可能性があります)。共有されたゲ ストネットワークでは、すべてのゲスト仮想マシンが 1 つのネットワークを共有します。この場合は、セキュリティグループなどのレイヤー3 のネットワーク分離技術を使用して分離を提供できます。
			</div></li><li class="listitem"><div class="para">
				管理 : CloudStack の内部リソースが互いに通信すると、管理トラフィックが生成されます。これには、ホスト、シス テム仮想マシン(クラウド内のさまざまなタスクを実行するために CloudStack によって使用される仮想マシン)、および CloudStack 管理サーバーと直接通信するほかのコンポーネントの間の通信が含まれます。使用するシステム仮想マシンの IP 範囲を構成する必要があります。
			</div></li><li class="listitem"><div class="para">
				パブリック : パブリックトラフィックは、クラウド内の仮想マシンがインターネットにアクセスすると生成されます。このために、パブリックにアクセスできる IP アドレスを割り当てる必要があります。エンドユーザーは、「新規 IP アドレスの取得」にあるように CloudStack ユーザーインターフェイスを使用してそれらの IP アドレスを取得して、ゲストネットワークとパブリックネットワークの間に NAT を実装できます。
			</div></li><li class="listitem"><div class="para">
				Storage. While labeled "storage" this is specifically about secondary storage, and doesn't affect traffic for primary storage. This includes traffic such as VM templates and snapshots, which is sent between the secondary storage VM and secondary storage servers. CloudStack uses a separate Network Interface Controller (NIC) named storage NIC for storage network traffic. Use of a storage NIC that always operates on a high bandwidth network allows fast template and snapshot copying. You must configure the IP range to use for the storage network.
			</div></li></ul></div><div class="para">
		これらのトラフィックは、それぞれ異なる物理ネットワークで伝送することも、一定の制限の下に同じ物理ネットワークで伝送することもできます。ユーザーインターフェイスでゾーンの追加ウィザードを使用して新しいゾーンを作成すると、有効な選択肢のみが提示されます。
	</div></div><div xml:lang="ja-JP" class="section" id="advanced-zone-guest-ip-addresses" lang="ja-JP"><div class="titlepage"><div><div><h3 class="title" id="advanced-zone-guest-ip-addresses">2.8.4. 拡張ゾーンのゲスト IP アドレス</h3></div></div></div><div class="para">
		拡張ネットワーク設定を使用する場合は、ゲストが使用するための追加のネットワークを作成できます。それらのネットワークは、ゾーン全体を対象にしてすべてのアカウントが使用できるようにすることも、単一のアカウントを対象にすること もできます。後者の場合、それらのネットワークに接続するゲストを作成できるのはそのアカウントだけになります。ネットワークは、VLAN ID、IP アドレス範囲、およびゲートウェイによって定義されます。管理者は、こうしたネットワークを必要に応じて何千もプロビジョニングできます。
	</div></div><div xml:lang="ja-JP" class="section" id="advanced-zone-public-ip-addresses" lang="ja-JP"><div class="titlepage"><div><div><h3 class="title" id="advanced-zone-public-ip-addresses">2.8.5. 拡張ゾーンのパブリック IP アドレス</h3></div></div></div><div class="para">
		拡張ネットワーク設定を使用する場合は、ゲストが使用するための追加のネットワークを作成できます。それらのネットワークは、ゾーン全体を対象にしてすべてのアカウントが使用できるようにすることも、単一のアカウントを対象にすること もできます。後者の場合、それらのネットワークに接続するゲストを作成できるのはそのアカウントだけになります。ネットワークは、VLAN ID、IP アドレス範囲、およびゲートウェイによって定義されます。管理者は、こうしたネットワークを必要に応じて何千もプロビジョニングできます。
	</div></div><div xml:lang="ja-JP" class="section" id="system-reserved-ip-addresses" lang="ja-JP"><div class="titlepage"><div><div><h3 class="title" id="system-reserved-ip-addresses">2.8.6. システムにより予約済みの IP アドレス</h3></div></div></div><div class="para">
		各ゾーンで、管理ネットワーク用に予約済みの IP アドレスの範囲を構成する必要があります。このネットワークは、CloudStack 管理サーバーとさまざまなシステム仮想マシン(セカンダリストレージ仮想マシン、コンソールプロキシ仮想マシン、DHCP など)の間の通信に使用されます。
	</div><div class="para">
		予約済みの IP アドレスは、クラウド全体で一意である必要があります。たとえば、2 つのゾーンのホストに同じプライベート IP アドレスを使用することはできません。
	</div><div class="para">
		ポッド内のホストにはプライベート IP アドレスが割り当てられます。これは通常、RFC1918 アドレスです。コンソールプロキシとセカンダリストレージのシステム仮想マシンにも、それらが作成されたポッドの CIDR のプライベート IP アドレスが割り当てられます。
	</div><div class="para">
		コンピューティングサーバーと管理サーバーはシステム予約 IP 範囲外の IP アドレスを利用します。例として、システム予約 IP 範囲が 192.168.154.2 から始まり 192.168.154.7 で終わる場合、CloudStack は .2 から .7 をシステム仮想マシンに利用できます。 これはポッドの CIDR とは別になり .8 から .254 を管理サーバーやハイパーバイザーホストに利用できます。
	</div><div class="para">
		<span class="bold bold"><strong>全てのゾーンで : </strong></span>
	</div><div class="para">
		各ポッドのシステムにプライベート IP アドレスを割り当てて、CloudStack で準備します。
	</div><div class="para">
		KVM と XenServer で推奨されるポッドあたりのプライベート IP アドレスの数は、ホストごとに 1 つです。ポッドの拡張が予想される場合は、拡張に対応できるだけの数のプライベート IP アドレスをあらかじめ追加しておきます。
	</div><div class="para">
		<span class="bold bold"><strong>拡張ネットワーク設定を使用するゾーンで : </strong></span>
	</div><div class="para">
		ゾーンに対し拡張ネットワーク設定を使用する場合は、顧客の合計数に必要な CloudStack システム仮想マシンの数を加えた数のプライベート IP アドレスを準備することをお勧めします。通常は、システム仮想マシン用に約 10 個の IP アドレスが追加で必要になります。システム仮想マシンについて詳しくは、「システム仮想マシンの操作」を参照してください。
	</div><div class="para">
		拡張ネットワーク設定を使用する場合は、各ポッドで使用できるプライベート IP アドレスの数は、そのポッドのノードで実行するハイパーバイザーによって異なります。Citrix XenServer と KVM ではリンクローカルアドレスが使用されるため、理論上は、アドレスブロック内で 65,000 を超える数のプライベート IP アドレスを使用できます。次第にポッドが拡張されても、ホ ストやゲスト仮想ルーターの IP アドレスが足りなくなることはまずありません。一方、VMWare ESXi では、管理者が指定するサブネット方式が使用されるため、一般的なポッドあたりの IP アドレスの数は 255 個のみです。これらのアドレスは、物理マシン、ゲスト仮想ルーター、およびそのほかのエンティティに割り当てられるため、ノードで ESXi が実行されているポッ ドを拡張するときには、プライベート IP アドレスが足りなくなる可能性があります。
	</div><div class="para">
		拡張ネットワーク設定を使用する ESXi ポッドでプライベート IP 領域を拡張するための適切な余裕を確保するには、次のどちらか、または両方の方法を使用します。
	</div><div class="itemizedlist"><ul><li class="listitem"><div class="para">
				サブネットに対してより大きい CIDR ブロックを指定する。サフィックスが/20 のサブネットマスクでは、4,000 個を超える IP アドレスを提供できます。
			</div></li><li class="listitem"><div class="para">
				複数のポッドを、それぞれ独自のサブネットを指定して作成する。たとえば、10 個のポッドを作成し、各ポッドに 255 個の IP を持たせる場合、2,550 個の IP アドレスを提供できます。
			</div></li></ul></div></div></div></div><div xml:lang="ja-JP" class="chapter" id="accounts" lang="ja-JP"><div class="titlepage"><div><div><h2 class="title">第3章 アカウント</h2></div></div></div><div class="toc"><dl><dt><span class="section"><a href="#accounts-users-domains">3.1. アカウント、ユーザー、およびドメイン</a></span></dt><dt><span class="section"><a href="#LDAPserver-for-user-authentication">3.2. LDAP サーバーによるユーザー認証</a></span></dt><dd><dl><dt><span class="section"><a href="#example-LDAP-configuration-commands">3.2.1. Example LDAP Configuration Commands</a></span></dt><dt><span class="section"><a href="#search-base">3.2.2. Search Base</a></span></dt><dt><span class="section"><a href="#query-filter">3.2.3. Query Filter</a></span></dt><dt><span class="section"><a href="#search-user-bind-dn">3.2.4. Search User Bind DN</a></span></dt><dt><span class="section"><a href="#SSL-keystore-path-and-password">3.2.5. SSL キーストアのパスとパスワード</a></span></dt></dl></dd></dl></div><div xml:lang="ja-JP" class="section" id="accounts-users-domains" lang="ja-JP"><div class="titlepage"><div><div><h2 class="title" id="accounts-users-domains">3.1. アカウント、ユーザー、およびドメイン</h2></div></div></div><div class="formalpara"><h5 class="formalpara" id="idp36252176">アカウント</h5>
			アカウントは、通常、サービスプロバイダーの顧客や、大規模な組織の部門を表します。1 つのアカウントに複数のユー ザーを存在させることができます。
		</div><div class="formalpara"><h5 class="formalpara" id="idp4646704">ドメイン</h5>
			アカウントはドメインによってグループ化されます。ドメインには、通常、相互に何らかの論理的な関係がある複数のアカウ ントと、ドメインおよびそのサブドメインに対して何らかの権限を持つ一連の委任管理者が含まれます。たとえば、複数の 販売代理店を持つサービスプロバイダーでは、販売代理店ごとにドメインを作成することができます。
		</div><div class="para">
		各アカウントはクラウドのインストール時に3つの違う種類のユーザーアカウントとして作成されます: ルート管理者、ドメイン管理者、ユーザー
	</div><div class="formalpara"><h5 class="formalpara" id="idp13076024">ユーザー</h5>
			ユーザーは、アカウント内のエイリアスのようなものです。同じアカウントのユーザーは互いに分離されませんが、ほかのアカウントのユーザーからは分離されます。ほとんどのインストールでは、1 つのアカウントで複数のユーザーを使用することはないため、ユーザーの概念が問題になることはありません。
		</div><div class="para">
		ユーザー名はドメインをまたぐアカウント内で一意です。同じユーザー名はサブドメインを含め他のドメイン上で存在することができます。ドメイン名はルートからのフルパス名が一意であれば繰り返す利用することができます。たとえば、root/foo/d1, root/sales/d1 と同様に root/d1 も利用することができます。
	</div><div class="para">
		管理者はシステム上で特別な権限を持つアカウントです。システムには複数の管理者が存在することができます。管理者は他の管理者を作成、削除することができ、システム上のユーザーのパスワードを変更することができます。
	</div><div class="formalpara"><h5 class="formalpara" id="idp16600104">ドメイン管理者</h5>
			ドメイン管理者はドメインに所属するユーザーに対しての管理権限を持つことができます。ドメイン管理者は物理サーバーや他のドメインからは不可視です。
		</div><div class="formalpara"><h5 class="formalpara" id="idp24377232">ルート管理者</h5>
			ルート管理者はシステムに対してテンプレート操作、サービスオファリング、ユーザー管理、ドメインなど完全なアクセス権限を持ちます。
		</div><div class="para">
		アカウントが所有するリソースはアカウント内のユーザー独自のものではありません。たとえば、課金、リソース制限などはアカウント単位で管理されユーザー単位ではありません。ユーザーはアカウントに割り当てられたあらゆるリソースを利用できその権限を持ちます。権限はその役割によって決定付けられます。
	</div></div><div xml:lang="ja-JP" class="section" id="LDAPserver-for-user-authentication" lang="ja-JP"><div class="titlepage"><div><div><h2 class="title" id="LDAPserver-for-user-authentication">3.2. LDAP サーバーによるユーザー認証</h2></div></div></div><div class="para">
		Microsoft Active Directory や ApacheDS などの外部 LDAP サーバーを使用して CloudStack のエンドユーザーを認証でき ます。クエリフィルターを使用して、CloudStack アカウントを対応する LDAP アカウントにマップする以外に必要な作業はありません。クエリフィルターは使用する LDAP サーバーのクエリ構文で作成します。ユーザーの電子メールアドレスや名前などの共通の値を一致させる、CloudStack の特別なワイルドカード文字を含めることができます。指定する基本ディレクトリから外部 LDAP ディレクトリツリーが CloudStack によって検索され、一致するユーザーの識別名とパスワードが戻されます。この情報と実際に入力されるパスワードを使用して、ユーザーを認証します。
	</div><div class="para">
		CloudStack で LDAP 認証をセットアップするには、CloudStack API コマンドの 「ldapConfig」 を呼び出して次の情報を指定します。
	</div><div class="itemizedlist"><ul><li class="listitem"><div class="para">
				LDAP サーバーのホスト名または IP アドレスとリッスンポート
			</div></li><li class="listitem"><div class="para">
				基本ディレクトリとクエリフィルター
			</div></li><li class="listitem"><div class="para">
				検索ユーザー識別名の資格情報(これにより、CloudStack が LDAP サーバーで検索を行えるようになります)
			</div></li><li class="listitem"><div class="para">
				SSL キーストアとパスワード(SSL を使用する場合)
			</div></li></ul></div><div xml:lang="ja-JP" class="section" id="example-LDAP-configuration-commands" lang="ja-JP"><div class="titlepage"><div><div><h3 class="title" id="example-LDAP-configuration-commands">3.2.1. Example LDAP Configuration Commands</h3></div></div></div><div class="para">
		To understand the examples in this section, you need to know the basic concepts behind calling the CloudStack API, which are explained in the Developer’s Guide.
	</div><div class="para">
		The following shows an example invocation of ldapConfig with an ApacheDS LDAP server
	</div><pre class="programlisting">http://127.0.0.1:8080/client/api?command=ldapConfig&amp;hostname=127.0.0.1&amp;searchbase=ou%3Dtesting%2Co%3Dproject&amp;queryfilter=%28%26%28uid%3D%25u%29%29&amp;binddn=cn%3DJohn+Singh%2Cou%3Dtesting%2Co%project&amp;bindpass=secret&amp;port=10389&amp;ssl=true&amp;truststore=C%3A%2Fcompany%2Finfo%2Ftrusted.ks&amp;truststorepass=secret&amp;response=json&amp;apiKey=YourAPIKey&amp;signature=YourSignatureHash</pre><div class="para">
		The command must be URL-encoded. Here is the same example without the URL encoding:
	</div><pre class="programlisting">http://127.0.0.1:8080/client/api?command=ldapConfig
&amp;hostname=127.0.0.1
&amp;searchbase=ou=testing,o=project
&amp;queryfilter=(&amp;(%uid=%u))
&amp;binddn=cn=John+Singh,ou=testing,o=project
&amp;bindpass=secret
&amp;port=10389
&amp;ssl=true
&amp;truststore=C:/company/info/trusted.ks
&amp;truststorepass=secret
&amp;response=json
&amp;apiKey=YourAPIKey&amp;signature=YourSignatureHash
</pre><div class="para">
		The following shows a similar command for Active Directory. Here, the search base is the testing group within a company, and the users are matched up based on email address.
	</div><pre class="programlisting">http://10.147.29.101:8080/client/api?command=ldapConfig&amp;hostname=10.147.28.250&amp;searchbase=OU%3Dtesting%2CDC%3Dcompany&amp;queryfilter=%28%26%28mail%3D%25e%29%29 &amp;binddn=CN%3DAdministrator%2COU%3Dtesting%2CDC%3Dcompany&amp;bindpass=1111_aaaa&amp;port=389&amp;response=json&amp;apiKey=YourAPIKey&amp;signature=YourSignatureHash</pre><div class="para">
		The next few sections explain some of the concepts you will need to know when filling out the ldapConfig parameters.
	</div></div><div xml:lang="ja-JP" class="section" id="search-base" lang="ja-JP"><div class="titlepage"><div><div><h3 class="title" id="search-base">3.2.2. Search Base</h3></div></div></div><div class="para">
		An LDAP query is relative to a given node of the LDAP directory tree, called the search base. The search base is the distinguished name (DN) of a level of the directory tree below which all users can be found. The users can be in the immediate base directory or in some subdirectory. The search base may be equivalent to the organization, group, or domain name. The syntax for writing a DN varies depending on which LDAP server you are using. A full discussion of distinguished names is outside the scope of our documentation. The following table shows some examples of search bases to find users in the testing department..
	</div><div class="informaltable"><table border="1"><colgroup><col width="50%" /><col width="50%" /></colgroup><thead><tr><th align="left">
						<div class="para">
							LDAP Server
						</div>
					</th><th align="left">
						<div class="para">
							Example Search Base DN
						</div>
					</th></tr></thead><tbody><tr><td align="left">
						<div class="para">
							ApacheDS
						</div>
					</td><td align="left">
						<div class="para">
							ou=testing,o=project
						</div>
					</td></tr><tr><td align="left">
						<div class="para">
							Active Directory
						</div>
					</td><td align="left">
						<div class="para">
							OU=testing, DC=company
						</div>
					</td></tr></tbody></table></div></div><div xml:lang="ja-JP" class="section" id="query-filter" lang="ja-JP"><div class="titlepage"><div><div><h3 class="title" id="query-filter">3.2.3. Query Filter</h3></div></div></div><div class="para">
		The query filter is used to find a mapped user in the external LDAP server. The query filter should uniquely map the CloudStack user to LDAP user for a meaningful authentication. For more information about query filter syntax, consult the documentation for your LDAP server.
	</div><div class="para">
		The CloudStack query filter wildcards are:
	</div><div class="informaltable"><table border="1"><colgroup><col width="50%" /><col width="50%" /></colgroup><thead><tr><th align="left">
						<div class="para">
							Query Filter Wildcard
						</div>
					</th><th align="left">
						<div class="para">
							説明
						</div>
					</th></tr></thead><tbody><tr><td align="left">
						<div class="para">
							%u
						</div>
					</td><td align="left">
						<div class="para">
							User name
						</div>
					</td></tr><tr><td align="left">
						<div class="para">
							%e
						</div>
					</td><td align="left">
						<div class="para">
							Email address
						</div>
					</td></tr><tr><td align="left">
						<div class="para">
							%n
						</div>
					</td><td align="left">
						<div class="para">
							First and last name
						</div>
					</td></tr></tbody></table></div><div class="para">
		The following examples assume you are using Active Directory, and refer to user attributes from the Active Directory schema.
	</div><div class="para">
		If the CloudStack user name is the same as the LDAP user ID:
	</div><pre class="programlisting">(uid=%u)</pre><div class="para">
		If the CloudStack user name is the LDAP display name:
	</div><pre class="programlisting">(displayName=%u)</pre><div class="para">
		To find a user by email address:
	</div><pre class="programlisting">(mail=%e)</pre></div><div xml:lang="ja-JP" class="section" id="search-user-bind-dn" lang="ja-JP"><div class="titlepage"><div><div><h3 class="title" id="search-user-bind-dn">3.2.4. Search User Bind DN</h3></div></div></div><div class="para">
		The bind DN is the user on the external LDAP server permitted to search the LDAP directory within the defined search base. When the DN is returned, the DN and passed password are used to authenticate the CloudStack user with an LDAP bind. A full discussion of bind DNs is outside the scope of our documentation. The following table shows some examples of bind DNs.
	</div><div class="informaltable"><table border="1"><colgroup><col width="50%" /><col width="50%" /></colgroup><thead><tr><th align="left">
						<div class="para">
							LDAP Server
						</div>
					</th><th align="left">
						<div class="para">
							Example Bind DN
						</div>
					</th></tr></thead><tbody><tr><td align="left">
						<div class="para">
							ApacheDS
						</div>
					</td><td align="left">
						<div class="para">
							cn=Administrator,dc=testing,ou=project,ou=org
						</div>
					</td></tr><tr><td align="left">
						<div class="para">
							Active Directory
						</div>
					</td><td align="left">
						<div class="para">
							CN=Administrator, OU=testing, DC=company, DC=com
						</div>
					</td></tr></tbody></table></div></div><div xml:lang="ja-JP" class="section" id="SSL-keystore-path-and-password" lang="ja-JP"><div class="titlepage"><div><div><h3 class="title" id="SSL-keystore-path-and-password">3.2.5. SSL キーストアのパスとパスワード</h3></div></div></div><div class="para">
		LDAPサーバーがSSLを要求する場合、ldapConfigコマンドでssl、truststore、truststorepassを設定することで有効にする必要があります。SSLをldapConfigで有効にする前に、LDAPサーバーが使用している証明書を取得し、信頼されたキーストアに追加します。キーストアのパスとパスワードを把握しておく必要があります。
	</div></div></div></div><div xml:lang="ja-JP" class="chapter" id="user-services-overview" lang="ja-JP"><div class="titlepage"><div><div><h2 class="title">第4章 User Services Overview</h2></div></div></div><div class="toc"><dl><dt><span class="section"><a href="#offerings-and-templates">4.1. Service Offerings, Disk Offerings, Network Offerings, and Templates</a></span></dt></dl></div><div class="para">
		In addition to the physical and logical infrastructure of your cloud, and the CloudStack software and servers, you also need a layer of user services so that people can actually make use of the cloud. This means not just a user UI, but a set of options and resources that users can choose from, such as templates for creating virtual machines, disk storage, and more. If you are running a commercial service, you will be keeping track of what services and resources users are consuming and charging them for that usage. Even if you do not charge anything for people to use your cloud – say, if the users are strictly internal to your organization, or just friends who are sharing your cloud – you can still keep track of what services they use and how much of them.
	</div><div class="section" id="offerings-and-templates"><div class="titlepage"><div><div><h2 class="title" id="offerings-and-templates">4.1. Service Offerings, Disk Offerings, Network Offerings, and Templates</h2></div></div></div><div class="para">
			A user creating a new instance can make a variety of choices about its characteristics and capabilities. CloudStack provides several ways to present users with choices when creating a new instance:
		</div><div class="itemizedlist"><ul><li class="listitem"><div class="para">
					Service Offerings, defined by the CloudStack administrator, provide a choice of CPU speed, number of CPUs, RAM size, tags on the root disk, and other choices. See Creating a New Compute Offering.
				</div></li><li class="listitem"><div class="para">
					Disk Offerings, defined by the CloudStack administrator, provide a choice of disk size for primary data storage. See Creating a New Disk Offering.
				</div></li><li class="listitem"><div class="para">
					Network Offerings, defined by the CloudStack administrator, describe the feature set that is available to end users from the virtual router or external networking devices on a given guest network. See Network Offerings.
				</div></li><li class="listitem"><div class="para">
					Templates, defined by the CloudStack administrator or by any CloudStack user, are the base OS images that the user can choose from when creating a new instance. For example, CloudStack includes CentOS as a template. See Working with Templates.
				</div></li></ul></div><div class="para">
			In addition to these choices that are provided for users, there is another type of service offering which is available only to the CloudStack root administrator, and is used for configuring virtual infrastructure resources. For more information, see Upgrading a Virtual Router with System Service Offerings.
		</div></div></div><div xml:lang="ja-JP" class="chapter" id="ui" lang="ja-JP"><div class="titlepage"><div><div><h2 class="title">第5章 ユーザーインターフェイス</h2></div></div></div><div class="toc"><dl><dt><span class="section"><a href="#log-in">5.1. UIへのログイン</a></span></dt><dd><dl><dt><span class="section"><a href="#end-user-ui-overview">5.1.1. エンドユーザーインターフェイス</a></span></dt><dt><span class="section"><a href="#root-admin-ui-overview">5.1.2. Root 管理者 UI の概要</a></span></dt><dt><span class="section"><a href="#log-in-root-admin">5.1.3. ルート管理者としてのログイン</a></span></dt><dt><span class="section"><a href="#changing-root-password">5.1.4. ルートパスワードの変更</a></span></dt></dl></dd><dt><span class="section"><a href="#using-sshkeys">5.2. Using SSH Keys for Authentication</a></span></dt><dd><dl><dt><span class="section"><a href="#create-ssh-template">5.2.1.  Creating an Instance Template that Supports SSH Keys</a></span></dt><dt><span class="section"><a href="#create-ssh-keypair">5.2.2. Creating the SSH Keypair</a></span></dt><dt><span class="section"><a href="#creating-ssh-instance">5.2.3. Creating an Instance</a></span></dt><dt><span class="section"><a href="#logging-in-ssh">5.2.4. Logging In Using the SSH Keypair</a></span></dt><dt><span class="section"><a href="#reset-ssh">5.2.5. Resetting SSH Keys</a></span></dt></dl></dd></dl></div><div xml:lang="ja-JP" class="section" id="log-in" lang="ja-JP"><div class="titlepage"><div><div><h2 class="title" id="log-in">5.1. UIへのログイン</h2></div></div></div><div class="para">
		CloudStack はWebベースのUIを管理者とエンドユーザーの両方に提供しています。ログインに使用したユーザーの権限に応じて適切なUIが表示されます。UIはIE7、IE8、IE9、Firefox 3.5以降、Firefox 4、Safari 4 そしてSafari 5に対応しています。URLは(あなたの環境の管理サーバーのIPアドレスに置き換えてください)
	</div><pre class="programlisting">http://&lt;management-server-ip-address&gt;:8080/client</pre><div class="para">
		未設定の管理サーバーにアクセスすると、ガイドツアーのスプラッシュスクリーンが表示されます。以降のアクセス時には、ダッシュボードにアクセスするために下記の情報を入力するログイン画面が表示されます。
	</div><div class="formalpara"><h5 class="formalpara" id="idp2879824">ユーザー名</h5>
			あなたのアカウントのユーザーID。デフォルトのユーザー名はadminです。
		</div><div class="formalpara"><h5 class="formalpara" id="idp3404248">パスワード</h5>
			ユーザーIDに関連付けられたパスワード。デフォルトユーザーのパスワードはpasswordです。
		</div><div class="formalpara"><h5 class="formalpara" id="idm7590824">ドメイン</h5>
			もしもあなたがrootドメインのユーザーならば、フィールドは空白のままにします。
		</div><div class="para">
		もしもあなたがサブドメインのユーザーならば、rootドメインを除いた、そのドメインへのフルパスを入力します。
	</div><div class="para">
		例えばrootドメインの下にComp1/hrといった複数階層があると仮定します。Comp1ドメインのユーザーはドメインフィールドにComp1と入力し、Comp1/salesドメインのユーザーはComp1/salesと入力します。
	</div><div class="para">
		より詳細なUIへのログインのガイドラインに関しては「ルート管理者としてのログイン」を参照してください。
	</div><div xml:lang="ja-JP" class="section" id="end-user-ui-overview" lang="ja-JP"><div class="titlepage"><div><div><h3 class="title" id="end-user-ui-overview">5.1.1. エンドユーザーインターフェイス</h3></div></div></div><div class="para">
		CloudStack ユーザーインターフェイスはユーザーのクラウドインフラストラクチャにおいて閲覧や仮想マシン、テンプレートと ISO、データボリュームとスナップショット、ゲストネットワーク、IP アドレスなどのクラウドリソースの利用を手助けします。もしユーザーが1つ以上の CloudStack プロジェクトのメンバーもしくは管理者である場合、ユーザーインターフェイスはプロジェクト向けのビューを提供します。
	</div></div><div xml:lang="ja-JP" class="section" id="root-admin-ui-overview" lang="ja-JP"><div class="titlepage"><div><div><h3 class="title" id="root-admin-ui-overview">5.1.2. Root 管理者 UI の概要</h3></div></div></div><div class="para">
		CloudStack UI は CloudStack 管理者のプロビジョニングや確認、クラウドインフラストラクチャやドメイン、ユーザーアカウント、プロジェクト、構成設定の管理を手助けします。初回の管理サーバーのインストール時、クラウドインフラストラクチャのプロビジョニングのため、次のガイドツアーを利用できます。ログイン後、ユーザー毎のダッシュボードが表示され、様々なリンクや、様々な管理者機能へのナビゲーションバーが左側に表示されます。Root 管理者はエンドユーザーに提供されている UI のように全てのタスクを UI から利用することができます。
	</div></div><div xml:lang="ja-JP" class="section" id="log-in-root-admin" lang="ja-JP"><div class="titlepage"><div><div><h3 class="title" id="log-in-root-admin">5.1.3. ルート管理者としてのログイン</h3></div></div></div><div class="para">
		管理サーバーをインストールして起動後、CloudStack のユーザーインターフェイスを起動させることができます。このユーザーインターフェイスはプロビジョニングやビュー、クラウドインフラストラクチャの管理を手助けします。
	</div><div class="orderedlist"><ol><li class="listitem"><div class="para">
				お好みのウェブブラウザーを開き URL を入力します。代わりに管理サーバーの IP アドレスを入力することもできます。
			</div><pre class="programlisting">http://&lt;management-server-ip-address&gt;:8080/client</pre><div class="para">
				新しくインストールされた管理サーバーにログインするとガイドツアーのスプラッシュ画面が表示されます。後にアクセスした場合は直接ダッシュボード画面が表示されます。
			</div></li><li class="listitem"><div class="para">
				初回スプラッシュ画面が表示され、次の項目が選択できます。
			</div><div class="itemizedlist"><ul><li class="listitem"><div class="para">
						<span class="bold bold"><strong>Continue with basic setup :</strong></span> CloudStack を試したく、すぐ使い始められるようガイド付きの設定を行いたいたい合はこちらを選択します。次のような機能を持つクラウド環境のセットアップをお手伝いします。1台のマシン上で CloudStack ソフトウェアと NFS によって提供されるストレージが動作する。1台のマシン上で XenServer や KVM ハイパーバイザー配下に仮想マシンが動作する。そしてパブリックネットワークを共有する。
					</div><div class="para">
						ツアーガイドで表示される情報は全て必要な情報になります。しかしより詳細を知りたい場合は次の「トライアルインストールガイド」を参照することもできます。
					</div></li><li class="listitem"><div class="para">
						<span class="bold bold"><strong>I have used CloudStack before</strong></span> 既に高度な展開を設計、計画したことがある、もしくは基本セットアップでセットアップしたトライアルクラウドをよりスケールアップさせたい場合はこちらを選びます。管理者インターフェイスからはより高度な VLAN ネットワーク、高可用性、負荷分散装置やファイアウォールなどの追加のネットワーク要素、Citrix XenServer, KVM, VMware vSphere を含む様々なハイパーバイザーのサポートといった機能を利用することができます。
					</div><div class="para">
						ルート管理者のダッシュボードが表示されます。
					</div></li></ul></div></li><li class="listitem"><div class="para">
				新しいルート管理者のパスワードを設定するべきです。もし基本セットアップを選択した場合、新しいパスワードの入力画面が表示されます。もし経験済みユーザーを選択した場合は <a class="xref" href="#changing-root-password">「ルートパスワードの変更」</a> の手順を参照してください。
			</div></li></ol></div><div class="warning"><div class="admonition_header"><h2>警告</h2></div><div class="admonition"><div class="para">
			ルート管理者としてログインした場合、物理インフラストラクチャを含むCloudStack の展開を管理します。ルート管理者は一般的な機能を変更するための設定変更や、ユーザーアカウントの作成と削除、その他多くの権限を持つ行動を振る舞うことができます。そのためデフォルトのパスワードは新しく一意なパスワードに変更してください。
		</div></div></div><div class="para">
	</div></div><div xml:lang="ja-JP" class="section" id="changing-root-password" lang="ja-JP"><div class="titlepage"><div><div><h3 class="title" id="changing-root-password">5.1.4. ルートパスワードの変更</h3></div></div></div><div class="para">
		CloudStack のインストール中は、ルート管理者としてログオンしています。このアカウントを使用して、物理インフラストラクチャを含めて CloudStack 環境を管理します。ルート管理者は、構成設定を変更して基本機能を変更したり、ユーザーアカウントを作成または削除したり、権限を持つ人物のみが実行する必要のある多くの措置を取ることができます。初回の CloudStack インストールの際はデフォルトのパスワードである password を新しい固有の値に変更してください。
	</div><div class="orderedlist"><ol><li class="listitem"><div class="para">
				お好みのウェブブラウザーを開き URL を入力します。代わりに管理サーバーの IP アドレスを入力することもできます。
			</div><pre class="programlisting">http://&lt;management-server-ip-address&gt;:8080/client</pre></li><li class="listitem"><div class="para">
				現在のルートユーザーの ID とパスワードで CloudStack ユーザーインターフェイスにログオンします。デフォルトは admin および password です。
			</div></li><li class="listitem"><div class="para">
				[Accounts]をクリックします。
			</div></li><li class="listitem"><div class="para">
				管理者のアカウント名をクリックします。
			</div></li><li class="listitem"><div class="para">
				[View Users]をクリックします。
			</div></li><li class="listitem"><div class="para">
				管理者のユーザー名をクリックします。
			</div></li><li class="listitem"><div class="para">
				[Change Password]アイコンをクリックします。 
				<span class="inlinemediaobject"><img src="./images/change-password.png" alt="change-password.png: button to change a user's password" /></span>
			</div></li><li class="listitem"><div class="para">
				新しいパスワードを入力して[OK]をクリックします。
			</div></li></ol></div></div></div><div xml:lang="ja-JP" class="section" id="using-sshkeys" lang="ja-JP"><div class="titlepage"><div><div><h2 class="title" id="using-sshkeys">5.2. Using SSH Keys for Authentication</h2></div></div></div><div class="para">
		In addition to the username and password authentication, CloudStack supports using SSH keys to log in to the cloud infrastructure for additional security. You can use the createSSHKeyPair API to generate the SSH keys.
	</div><div class="para">
		Because each cloud user has their own SSH key, one cloud user cannot log in to another cloud user's instances unless they share their SSH key files. Using a single SSH key pair, you can manage multiple instances.
	</div><div class="section" id="create-ssh-template"><div class="titlepage"><div><div><h3 class="title" id="create-ssh-template">5.2.1.  Creating an Instance Template that Supports SSH Keys</h3></div></div></div><div class="para">
			Create a instance template that supports SSH Keys.
		</div><div class="orderedlist"><ol><li class="listitem"><div class="para">
					Create a new instance by using the template provided by cloudstack.
				</div><div class="para">
					For more information on creating a new instance, see
				</div></li><li class="listitem"><div class="para">
					Download the cloudstack script from <a href="http://sourceforge.net/projects/cloudstack/files/SSH%20Key%20Gen%20Script/">The SSH Key Gen Script</a>to the instance you have created.
				</div><pre class="programlisting">wget http://downloads.sourceforge.net/project/cloudstack/SSH%20Key%20Gen%20Script/cloud-set-guest-sshkey.in?r=http%3A%2F%2Fsourceforge.net%2Fprojects%2Fcloudstack%2Ffiles%2FSSH%2520Key%2520Gen%2520Script%2F&amp;ts=1331225219&amp;use_mirror=iweb</pre></li><li class="listitem"><div class="para">
					Copy the file to /etc/init.d.
				</div><pre class="programlisting">cp cloud-set-guest-sshkey.in /etc/init.d/</pre></li><li class="listitem"><div class="para">
					Give the necessary permissions on the script:
				</div><pre class="programlisting">chmod +x /etc/init.d/cloud-set-guest-sshkey.in</pre></li><li class="listitem"><div class="para">
					Run the script while starting up the operating system:
				</div><pre class="programlisting">chkconfig --add cloud-set-guest-sshkey.in</pre></li><li class="listitem"><div class="para">
					Stop the instance.
				</div></li></ol></div></div><div class="section" id="create-ssh-keypair"><div class="titlepage"><div><div><h3 class="title" id="create-ssh-keypair">5.2.2. Creating the SSH Keypair</h3></div></div></div><div class="para">
			You must make a call to the createSSHKeyPair api method. You can either use the CloudStack Python API library or the curl commands to make the call to the cloudstack api.
		</div><div class="para">
			For example, make a call from the cloudstack server to create a SSH keypair called "keypair-doc" for the admin account in the root domain:
		</div><div class="note"><div class="admonition_header"><h2>注記</h2></div><div class="admonition"><div class="para">
				Ensure that you adjust these values to meet your needs. If you are making the API call from a different server, your URL/PORT will be different, and you will need to use the API keys.
			</div></div></div><div class="orderedlist"><ol><li class="listitem"><div class="para">
					Run the following curl command:
				</div><pre class="programlisting">curl --globoff "http://localhost:8096/?command=createSSHKeyPair&amp;name=keypair-doc&amp;account=admin&amp;domainid=5163440e-c44b-42b5-9109-ad75cae8e8a2"</pre><div class="para">
					The output is something similar to what is given below:
				</div><pre class="programlisting">&lt;?xml version="1.0" encoding="ISO-8859-1"?&gt;&lt;createsshkeypairresponse cloud-stack-version="3.0.0.20120228045507"&gt;&lt;keypair&gt;&lt;name&gt;keypair-doc&lt;/name&gt;&lt;fingerprint&gt;f6:77:39:d5:5e:77:02:22:6a:d8:7f:ce:ab:cd:b3:56&lt;/fingerprint&gt;&lt;privatekey&gt;-----BEGIN RSA PRIVATE KEY-----
MIICXQIBAAKBgQCSydmnQ67jP6lNoXdX3noZjQdrMAWNQZ7y5SrEu4wDxplvhYci
dXYBeZVwakDVsU2MLGl/K+wefwefwefwefwefJyKJaogMKn7BperPD6n1wIDAQAB
AoGAdXaJ7uyZKeRDoy6wA0UmF0kSPbMZCR+UTIHNkS/E0/4U+6lhMokmFSHtu
mfDZ1kGGDYhMsdytjDBztljawfawfeawefawfawfawQQDCjEsoRdgkduTy
QpbSGDIa11Jsc+XNDx2fgRinDsxXI/zJYXTKRhSl/LIPHBw/brW8vzxhOlSOrwm7
VvemkkgpAkEAwSeEw394LYZiEVv395ar9MLRVTVLwpo54jC4tsOxQCBlloocK
lYaocpk0yBqqOUSBawfIiDCuLXSdvBo1Xz5ICTM19vgvEp/+kMuECQBzm
nVo8b2Gvyagqt/KEQo8wzH2THghZ1qQ1QRhIeJG2aissEacF6bGB2oZ7Igim5L14
4KR7OeEToyCLC2k+02UCQQCrniSnWKtDVoVqeK/zbB32JhW3Wullv5p5zUEcd
KfEEuzcCUIxtJYTahJ1pvlFkQ8anpuxjSEDp8x/18bq3
-----END RSA PRIVATE KEY-----
&lt;/privatekey&gt;&lt;/keypair&gt;&lt;/createsshkeypairresponse&gt;</pre></li><li class="listitem"><div class="para">
					Copy the key data into a file. The file looks like this:
				</div><pre class="programlisting">-----BEGIN RSA PRIVATE KEY-----
MIICXQIBAAKBgQCSydmnQ67jP6lNoXdX3noZjQdrMAWNQZ7y5SrEu4wDxplvhYci
dXYBeZVwakDVsU2MLGl/K+wefwefwefwefwefJyKJaogMKn7BperPD6n1wIDAQAB
AoGAdXaJ7uyZKeRDoy6wA0UmF0kSPbMZCR+UTIHNkS/E0/4U+6lhMokmFSHtu
mfDZ1kGGDYhMsdytjDBztljawfawfeawefawfawfawQQDCjEsoRdgkduTy
QpbSGDIa11Jsc+XNDx2fgRinDsxXI/zJYXTKRhSl/LIPHBw/brW8vzxhOlSOrwm7
VvemkkgpAkEAwSeEw394LYZiEVv395ar9MLRVTVLwpo54jC4tsOxQCBlloocK
lYaocpk0yBqqOUSBawfIiDCuLXSdvBo1Xz5ICTM19vgvEp/+kMuECQBzm
nVo8b2Gvyagqt/KEQo8wzH2THghZ1qQ1QRhIeJG2aissEacF6bGB2oZ7Igim5L14
4KR7OeEToyCLC2k+02UCQQCrniSnWKtDVoVqeK/zbB32JhW3Wullv5p5zUEcd
KfEEuzcCUIxtJYTahJ1pvlFkQ8anpuxjSEDp8x/18bq3
-----END RSA PRIVATE KEY-----</pre></li><li class="listitem"><div class="para">
					Save the file.
				</div></li></ol></div></div><div class="section" id="creating-ssh-instance"><div class="titlepage"><div><div><h3 class="title" id="creating-ssh-instance">5.2.3. Creating an Instance</h3></div></div></div><div class="para">
			After you save the SSH keypair file, you must create an instance by using the template that you created at <a class="xref" href="#create-ssh-template">「 Creating an Instance Template that Supports SSH Keys」</a>. Ensure that you use the same SSH key name that you created at <a class="xref" href="#create-ssh-keypair">「Creating the SSH Keypair」</a>.
		</div><div class="note"><div class="admonition_header"><h2>注記</h2></div><div class="admonition"><div class="para">
				You cannot create the instance by using the GUI at this time and associate the instance with the newly created SSH keypair.
			</div></div></div><div class="para">
			A sample curl command to create a new instance is:
		</div><pre class="programlisting">curl --globoff http://localhost:&lt;port number&gt;/?command=deployVirtualMachine\&amp;zoneId=1\&amp;serviceOfferingId=18727021-7556-4110-9322-d625b52e0813\&amp;templateId=e899c18a-ce13-4bbf-98a9-625c5026e0b5\&amp;securitygroupids=ff03f02f-9e3b-48f8-834d-91b822da40c5\&amp;account=admin\&amp;domainid=1\&amp;keypair=keypair-doc</pre><div class="para">
			Substitute the template, service offering and security group IDs (if you are using the security group feature) that are in your cloud environment.
		</div></div><div class="section" id="logging-in-ssh"><div class="titlepage"><div><div><h3 class="title" id="logging-in-ssh">5.2.4. Logging In Using the SSH Keypair</h3></div></div></div><div class="para">
			To test your SSH key generation is successful, check whether you can log in to the cloud setup.
		</div><div class="para">
			For exaple, from a Linux OS, run:
		</div><pre class="programlisting">ssh -i ~/.ssh/keypair-doc &lt;ip address&gt;</pre><div class="para">
			The -i parameter tells the ssh client to use a ssh key found at ~/.ssh/keypair-doc.
		</div></div><div class="section" id="reset-ssh"><div class="titlepage"><div><div><h3 class="title" id="reset-ssh">5.2.5. Resetting SSH Keys</h3></div></div></div><div class="para">
			With the API command resetSSHKeyForVirtualMachine, a user can set or reset the SSH keypair assigned to a virtual machine. A lost or compromised SSH keypair can be changed, and the user can access the VM by using the new keypair. Just create or register a new keypair, then call resetSSHKeyForVirtualMachine.
		</div></div></div></div><div xml:lang="ja-JP" class="chapter" id="projects" lang="ja-JP"><div class="titlepage"><div><div><h2 class="title">第6章 プロジェクトによるユーザーとリソースの組織化</h2></div></div></div><div class="toc"><dl><dt><span class="section"><a href="#projects-overview">6.1. プロジェクトの概要</a></span></dt><dt><span class="section"><a href="#configuring-projects">6.2. プロジェクトの構成</a></span></dt><dd><dl><dt><span class="section"><a href="#set-up-invitations">6.2.1. 招待状のセットアップ</a></span></dt><dt><span class="section"><a href="#set-resource-limits-for-projects">6.2.2. Setting Resource Limits for Projects</a></span></dt><dt><span class="section"><a href="#set-projects-creator-permissions">6.2.3. プロジェクト作成者の権限の設定</a></span></dt></dl></dd><dt><span class="section"><a href="#create-new-projects">6.3. 新しいプロジェクトの作成</a></span></dt><dt><span class="section"><a href="#add-members-to-projects">6.4. プロジェクトへのメンバーの追加</a></span></dt><dd><dl><dt><span class="section"><a href="#send-projects-membership-invitation">6.4.1. プロジェクトメンバーになるための招待状の送信</a></span></dt><dt><span class="section"><a href="#add-projects-members-from-ui">6.4.2. ユーザーインターフェイスでのメンバーの追加</a></span></dt></dl></dd><dt><span class="section"><a href="#accept-membership-invite">6.5. メンバー招待の受理</a></span></dt><dt><span class="section"><a href="#suspend-project">6.6. プロジェクトの一時停止または削除</a></span></dt><dt><span class="section"><a href="#use-project-view">6.7. プロジェクトビューの使用方法</a></span></dt></dl></div><div xml:lang="ja-JP" class="section" id="projects-overview" lang="ja-JP"><div class="titlepage"><div><div><h2 class="title" id="projects-overview">6.1. プロジェクトの概要</h2></div></div></div><div class="para">
		CloudStackユーザーはプロジェクトチームを組織して協力し合い、仮想マシン、スナップショット、テンプレート、データディスク、およびIPアドレスなどの仮想リソースを共有することができます。CloudStackによってプロジェクトおよびユーザーごとのリソース使用状況が追跡されるため、ユーザーアカウントまたはプロジェクト単位で使用料を請求することができます。たとえば、ソフトウェア会社の品質保証部門のすべてのメンバーを、プライベートクラウド内の1つのプロジェクトに割り当てます。プロジェクトメンバーは同じクラウドのほかのユーザーの作業から自分たちの作業を簡単に分離できる一方で、会社はテストに使用されるリソースを追跡することができます。
	</div><div class="para">
		どのユーザーも新しいプロジェクトを作成できるように構成したり、この機能をCloudStack管理者のみに制限したりすることができます。プロジェクトを作成すると、自身がそのプロジェクトの管理者になり、自分のドメイン内のほかのユーザーをプロジェクトに追加できます。ユーザーをプロジェクトに直接追加できるようにするか、招待状の送信を必須とするようにCloudStackをセットアップできます。招待状を必須とする場合は、受信者はこの招待状を承諾する必要があります。プロジェクトメンバーは、プロジェクト内のどのユーザーが作成した仮想リソースも表示および管理できます(たとえば、共有仮想マシンなど)。ユーザーがメンバーになれるプロジェクトの数に制限はありません。CloudStackユーザーインターフェイスのビューを切り替えれば、プロジェクト仮想マシン、仲間のプロジェクトメンバー、プロジェクト関連のアラートなど、プロジェクトに関する情報のみを表示することができます。
	</div><div class="para">
		プロジェクト管理者は、その役割を別のプロジェクトメンバーに委任できます。また、プロジェクト管理者は、さらにメンバーを追加したり、メンバーをプロジェクトから削除したり、(CloudStack管理者が設定するグローバルデフォルト以下であることが条件ですが)新しいリソース制限を設定したり、プロジェクトを削除したりすることもできます。管理者がメンバーをプロジェクトから削除すると、そのユーザーが作成した仮想マシンインスタンスなどのリソースはプロジェクトと共に残ります。これにより、リソースの所有権と、どのリソースをプロジェクトで使用できるかという問題が生じます。
	</div><div class="para">
		プロジェクト内で作成されたリソースは、特定のCloudStackアカウントではなく、プロジェクトによって所有され、プロジェクト内のみで使用できます。プロジェクトに属するユーザーは、プロジェクトの外にもリソースを作成できます。そのようなリソースはユーザーのアカウントに属し、プロジェクトの使用状況やリソース制限の対象にはなりません。プロジェクトレベルのネットワークを作成して、プロジェクト内のトラフィックを分離し、ポート転送、負荷分散、VPN、静的NATなどのネットワークサービスを提供できます。プロジェクトでは、特定の種類のリソースが共有されている場合には、プロジェクトの外からそのリソースを利用することもできます。たとえば、共有ネットワークまたはパブリックテンプレートは、ドメイン内のどのプロジェクトでも使用できます。テンプレートの所有者が許可すれば、プロジェクトでプライベートテンプレートにアクセスできます。プロジェクトでは、そのドメインで使用できるどのサービスオファリングまたはディスクオファリングも使用できますが、プロジェクトレベルではプライベートサービスオファリングもディスクオファリングも作成できません。
	</div></div><div xml:lang="ja-JP" class="section" id="configuring-projects" lang="ja-JP"><div class="titlepage"><div><div><h2 class="title" id="configuring-projects">6.2. プロジェクトの構成</h2></div></div></div><div class="para">
		CloudStack ユーザーがプロジェクトを使用する前に、CloudStack 管理者はプロジェクトをサポートするためにさまざまなシステムをセットアップする必要があります。これには、プロジェクトメンバーになるための招待状、プロジェクトのリソース制限、プロジェクトを作成できるユーザーの制御が含まれます。
	</div><div xml:lang="ja-JP" class="section" id="set-up-invitations" lang="ja-JP"><div class="titlepage"><div><div><h3 class="title" id="set-up-invitations">6.2.1. 招待状のセットアップ</h3></div></div></div><div class="para">
		プロジェクト管理者がユーザーをプロジェクトに直接追加できるようにするか、招待状の送信を必須とするように CloudStack をセットアップできます。招待状を必須とする場合は、受信者はこの招待状を承諾する必要があります。招待状は電子メールまたはユーザーの CloudStack アカウントから送信できます。管理者が招待状を使用してプロジェクトにメンバーを追加する設定にする場合は、CloudStack の招待状機能を有効にしてセットアップします。
	</div><div class="orderedlist"><ol><li class="listitem"><div class="para">
				管理者としてCloudStack ユーザーインターフェイスにログオンします。
			</div></li><li class="listitem"><div class="para">
				左側のナビゲーションバーで [Global Settings] をクリックします。
			</div></li><li class="listitem"><div class="para">
				検索ボックスに「project」と入力して検索ボタンをクリックします。
				<span class="inlinemediaobject"><img src="./images/search-button.png" alt="searchbutton.png: Searches projects" /></span>
			</div></li><li class="listitem"><div class="para">
				検索結果には、招待状の動作を制御するために設定が必要なほかのパラメーターがいくつか含まれています。次の表に、プロジェクトの招待状に関連するグローバル構成パラメーターを示します。各パラメーターを 設定するには[Edit]アイコンをクリックします。
			</div><div class="informaltable"><table border="1"><colgroup><col width="50%" /><col width="50%" /></colgroup><thead><tr><th align="left">
								<div class="para">
									設定パラメーター
								</div>
							</th><th align="left">
								<div class="para">
									説明
								</div>
							</th></tr></thead><tbody><tr><td align="left">
								<div class="para">
									project.invite.required
								</div>
							</td><td align="left">
								<div class="para">
									招待状機能を有効にするには true に設定します。
								</div>
							</td></tr><tr><td align="left">
								<div class="para">
									project.email.sender
								</div>
							</td><td align="left">
								<div class="para">
									招待状の電子メールの差出人フィールドに表示される電子メールアドレスで す。
								</div>
							</td></tr><tr><td align="left">
								<div class="para">
									project.invite.timeout
								</div>
							</td><td align="left">
								<div class="para">
									新しいメンバーが招待状に返信するまでの猶予期間です。
								</div>
							</td></tr><tr><td align="left">
								<div class="para">
									project.smtp.host
								</div>
							</td><td align="left">
								<div class="para">
									招待状を処理する電子メールサーバーとして機能するホストの名前です。
								</div>
							</td></tr><tr><td align="left">
								<div class="para">
									project.smtp.password
								</div>
							</td><td align="left">
								<div class="para">
									(オプション)SMTP サーバーが要求するパスワードです。 project.smtp.username を指定して、project.smtp.useAuth を true に設定する必要もあります。
								</div>
							</td></tr><tr><td align="left">
								<div class="para">
									project.smtp.port
								</div>
							</td><td align="left">
								<div class="para">
									SMTP サーバーのリッスンポートです。
								</div>
							</td></tr><tr><td align="left">
								<div class="para">
									project.smtp.useAuth
								</div>
							</td><td align="left">
								<div class="para">
									SMTP サーバーがユーザー名とパスワードを要求する場合は true に設定し ます。
								</div>
							</td></tr><tr><td align="left">
								<div class="para">
									project.smtp.username
								</div>
							</td><td align="left">
								<div class="para">
									(オプション)SMTP サーバーが認証のために要求するユーザー名です。 project.smtp.password を指定して、project.smtp.useAuth を true に設定する必要もあります。
								</div>
							</td></tr></tbody></table></div></li><li class="listitem"><div class="para">
				管理サーバーを再起動します:
			</div><pre class="programlisting">service cloudstack-management restart</pre></li></ol></div></div><div xml:lang="ja-JP" class="section" id="set-resource-limits-for-projects" lang="ja-JP"><div class="titlepage"><div><div><h3 class="title" id="set-resource-limits-for-projects">6.2.2. Setting Resource Limits for Projects</h3></div></div></div><div class="para">
		The CloudStack administrator can set global default limits to control the amount of resources that can be owned by each project in the cloud. This serves to prevent uncontrolled usage of resources such as snapshots, IP addresses, and virtual machine instances. Domain administrators can override these resource limits for individual projects with their domains, as long as the new limits are below the global defaults set by the CloudStack root administrator. The root administrator can also set lower resource limits for any project in the cloud
	</div><div xml:lang="ja-JP" class="section" id="set-per-project-resource-limits" lang="ja-JP"><div class="titlepage"><div><div><h4 class="title" id="set-per-project-resource-limits">6.2.2.1. プロジェクトごとのリソース制限の設定</h4></div></div></div><div class="para">
		CloudStack ルート管理者またはプロジェクトが存在するドメインのドメイン管理者は、個別のプロジェクトに新しいリソース制限を設定できます。プロジェクト所有者は、ドメイン管理者またはルート管理者でもある場合にのみ、リソース制限を設定できます。
	</div><div class="para">
		新しい制限は、CloudStack 管理者が設定するグローバルなデフォルト制限未満である必要があります(<a class="xref" href="#set-resource-limits-for-projects">「Setting Resource Limits for Projects」</a>を参照)。特定の種類のリソースが新しい上限を既に超えているプロジェクトについては、 既存のリソースは影響を受けません。ただし、リソース量が上限値未満になるまで、そのプロジェクトにはその種類のリソースを追加できなくなります。
	</div><div class="orderedlist"><ol><li class="listitem"><div class="para">
				管理者としてCloudStack ユーザーインターフェイスにログオンします。
			</div></li><li class="listitem"><div class="para">
				左側のナビゲーションバーで [Projects] をクリックします。
			</div></li><li class="listitem"><div class="para">
				[Select view] ボックスの一覧で [Projects] を選択します。
			</div></li><li class="listitem"><div class="para">
				設定するプロジェクトの名前をクリックします。
			</div></li><li class="listitem"><div class="para">
				[Resources]タブをクリックします。このタブには、プロジェクトで所有を許可されている現在の最大数が、リソースの種類ごとに一覧表示されます。
			</div></li><li class="listitem"><div class="para">
				リソースの新しい値を入力します。
			</div></li><li class="listitem"><div class="para">
				「適用」をクリックします。
			</div></li></ol></div></div><div xml:lang="ja-JP" class="section" id="set-global-project-resource-limits" lang="ja-JP"><div class="titlepage"><div><div><h4 class="title" id="set-global-project-resource-limits">6.2.2.2. プロジェクトのグローバルなリソース制限の設定</h4></div></div></div><div class="orderedlist"><ol><li class="listitem"><div class="para">
				管理者としてCloudStack ユーザーインターフェイスにログインします。
			</div></li><li class="listitem"><div class="para">
				左側のナビゲーションバーで [Global Settings] をクリックします。
			</div></li><li class="listitem"><div class="para">
				検索ボックスに「max.project」と入力して検索ボタンをクリックします。
			</div></li><li class="listitem"><div class="para">
				検索結果には、クラウド内のすべてのプロジェクトに適用される、プロジェクトごとの最大リソース量を設定するためのパラメーターが含まれています。どのプロジェクトでもこれらの設定を超えるリソースは使用できませんが、個別のプロジェクトの制限をより低くすることはできます。各パラメーターを設定するには[Edit]アイコンをクリックします。
				<span class="inlinemediaobject"><img src="./images/edit-icon.png" alt="editbutton.png: Edits parameters" /></span>
			</div><div class="informaltable"><table border="1"><colgroup><col width="50%" /><col width="50%" /></colgroup><tbody><tr><td align="left">
								<div class="para">
									max.project.public.ips
								</div>
							</td><td align="left">
								<div class="para">
									クラウド内のどのプロジェクトでも所有できる、パブリック IP アドレス数の上限です。「パブリック IP アドレスについて」を参照してください。
								</div>
							</td></tr><tr><td align="left">
								<div class="para">
									max.project.snapshots
								</div>
							</td><td align="left">
								<div class="para">
									クラウド内のどのプロジェクトでも所有できる、スナップショット数の上限です。 「スナップショットに関わる作業」を参照してください。
								</div>
							</td></tr><tr><td align="left">
								<div class="para">
									max.project.templates
								</div>
							</td><td align="left">
								<div class="para">
									クラウド内のどのプロジェクトでも所有できる、テンプレート数の上限です。「テンプレートに関わる作業」を参照してください。
								</div>
							</td></tr><tr><td align="left">
								<div class="para">
									max.project.uservms
								</div>
							</td><td align="left">
								<div class="para">
									クラウド内のどのプロジェクトでも所有できる、ゲスト仮想マシン数の上限で す。「仮想マシンの操作」を参照してください。
								</div>
							</td></tr><tr><td align="left">
								<div class="para">
									max.project.volumes
								</div>
							</td><td align="left">
								<div class="para">
									クラウド内のどのプロジェクトでも所有できる、データボリューム数の上限です。「ボリュームについて」を参照してください。
								</div>
							</td></tr></tbody></table></div></li><li class="listitem"><div class="para">
				管理サーバーを再起動します。
			</div><pre class="programlisting"># service cloudstack-management restart</pre></li></ol></div></div></div><div xml:lang="ja-JP" class="section" id="set-projects-creator-permissions" lang="ja-JP"><div class="titlepage"><div><div><h3 class="title" id="set-projects-creator-permissions">6.2.3. プロジェクト作成者の権限の設定</h3></div></div></div><div class="para">
		どのユーザーも新しいプロジェクトを作成できる構成にすることも、この機能を CloudStack 管理者のみに制限することもで きます。
	</div><div class="orderedlist"><ol><li class="listitem"><div class="para">
				管理者としてCloudStack ユーザーインターフェイスにログオンします。
			</div></li><li class="listitem"><div class="para">
				左側のナビゲーションバーで [Global Settings] をクリックします。
			</div></li><li class="listitem"><div class="para">
				検索ボックスに「allow.user.create.projects」と入力します。
			</div></li><li class="listitem"><div class="para">
				パラメーターを設定するには[Edit]アイコンをクリックします。
				<span class="inlinemediaobject"><img src="./images/edit-icon.png" alt="editbutton.png: Edits parameters" /></span>
			</div><div class="informaltable"><table border="1"><colgroup><col width="50%" /><col width="50%" /></colgroup><tbody><tr><td align="left">
								<div class="para">
									allow.user.create.projects
								</div>
							</td><td align="left">
								<div class="para">
									エンドユーザーがプロジェクトを作成できるようにするには true に設定します。 CloudStack ルート管理者とドメイン管理者のみがプロジェクトを作成できるようにするには false に設定します。
								</div>
							</td></tr></tbody></table></div></li><li class="listitem"><div class="para">
				管理サーバーを再起動します。
			</div><pre class="programlisting"># service cloudstack-management restart</pre></li></ol></div></div></div><div xml:lang="ja-JP" class="section" id="create-new-projects" lang="ja-JP"><div class="titlepage"><div><div><h2 class="title" id="create-new-projects">6.3. 新しいプロジェクトの作成</h2></div></div></div><div class="para">
		CloudStack 管理者とドメイン管理者はプロジェクトを作成することができます。グローバル構成パラメーターの allow.user.create.projects が true に設定されている場合は、エンドユーザーもプロジェクトを作成できます。
	</div><div class="orderedlist"><ol><li class="listitem"><div class="para">
				CloudStack ユーザーインターフェイスにログオンします。
			</div></li><li class="listitem"><div class="para">
				左側のナビゲーションバーで［Projects］をクリックします。
			</div></li><li class="listitem"><div class="para">
				[Select view] ボックスの一覧で [Projects] を選択します。
			</div></li><li class="listitem"><div class="para">
				[New Project] をクリックします。
			</div></li><li class="listitem"><div class="para">
				ユーザーに表示される名前と説明を入力して、[Create Project] をクリックします。
			</div></li><li class="listitem"><div class="para">
				プロジェクトにメンバーを直ちに追加できる画面が開きます。これはオプションです。続行する準備ができたら [Next] をクリックします。
			</div></li><li class="listitem"><div class="para">
				[Save] をクリックします。
			</div></li></ol></div></div><div xml:lang="ja-JP" class="section" id="add-members-to-projects" lang="ja-JP"><div class="titlepage"><div><div><h2 class="title" id="add-members-to-projects">6.4. プロジェクトへのメンバーの追加</h2></div></div></div><div class="para">
		新しいメンバーをプロジェクトに追加できるのは、プロジェクト管理者、プロジェクトの存在するドメインまたは親ドメインのドメイン管理者、または CloudStack ルート管理者です。CloudStack にメンバーを追加する方法は 2 つありますが、一度に有効にできるのは 1 つの方法のみです。
	</div><div class="itemizedlist"><ul><li class="listitem"><div class="para">
				招待状機能が有効な場合は、新しいメンバーに招待状を送信できます。
			</div></li><li class="listitem"><div class="para">
				招待状機能が無効な場合は、ユーザーインターフェイスでメンバーを直接追加できます。
			</div></li></ul></div><div xml:lang="ja-JP" class="section" id="send-projects-membership-invitation" lang="ja-JP"><div class="titlepage"><div><div><h3 class="title" id="send-projects-membership-invitation">6.4.1. プロジェクトメンバーになるための招待状の送信</h3></div></div></div><div class="para">
		クラウドで招待状機能が有効になっている場合は（<a class="xref" href="#set-up-invitations">「招待状のセットアップ」</a>）、次の手順に従ってプロジェクトに新しいメンバーを追加します。招待状機能が無効な場合は、ユーザーインターフェイスでメンバーを追加します。
	</div><div class="orderedlist"><ol><li class="listitem"><div class="para">
				CloudStackユーザーインターフェイスにログオンします。
			</div></li><li class="listitem"><div class="para">
				左側のナビゲーションバーで［Projects］をクリックします。
			</div></li><li class="listitem"><div class="para">
				［Select view］ボックスの一覧で［Projects］を選択します。
			</div></li><li class="listitem"><div class="para">
				設定するプロジェクトの名前をクリックします。
			</div></li><li class="listitem"><div class="para">
				［Invitations］タブをクリックします。
			</div></li><li class="listitem"><div class="para">
				［Add by］で次のどちらかを選択します。
			</div><div class="orderedlist"><ol><li class="listitem"><div class="para">
						Account – ユーザーのプロジェクトビューの［Invitations］タブに招待状が表示されます。「プロジェクトビューの使用方法」を参照してください。
					</div></li><li class="listitem"><div class="para">
						Email – ユーザーの電子メールアドレス宛てに招待状が送信されます。この機能は、SMTPサーバー関連のグローバルパラメーターが設定されている場合にのみ機能します。「招待状のセットアップ」を参照してください。
					</div></li></ol></div></li><li class="listitem"><div class="para">
				追加する新しいメンバーのCloudStackユーザー名または電子メールアドレスを入力して、［Invite］をクリックします。前のステップでAccountを選択した場合にはCloudStackユーザー名を、Emailを選択した場合は電子メールアドレスを入力します。このクラウドの、プロジェクトの存在するドメインにアカウントを持つユーザーのみを招待できます。
			</div></li><li class="listitem"><div class="para">
				送信済みの招待状を表示し管理するには、このタブを開きます。招待状が承諾されると、新しいメンバーがプロジェクトの［Accounts］タブに表示されます。
			</div></li></ol></div></div><div xml:lang="ja-JP" class="section" id="add-projects-members-from-ui" lang="ja-JP"><div class="titlepage"><div><div><h3 class="title" id="add-projects-members-from-ui">6.4.2. ユーザーインターフェイスでのメンバーの追加</h3></div></div></div><div class="para">
		クラウドで招待状機能が無効な場合は、次の手順に従ってプロジェクトに新しいメンバーを追加します。 <a class="xref" href="#set-up-invitations">「招待状のセットアップ」</a> に記述されている方法によりクラウドで招待状機能が有効になっている場合は <a class="xref" href="#send-projects-membership-invitation">「プロジェクトメンバーになるための招待状の送信」</a> の手順に従います。
	</div><div class="orderedlist"><ol><li class="listitem"><div class="para">
				CloudStackユーザーインターフェイスにログオンします。
			</div></li><li class="listitem"><div class="para">
				左側のナビゲーションバーで [Projects] をクリックします。
			</div></li><li class="listitem"><div class="para">
				[Select view] ボックスの一覧で [Projects] を選択します。
			</div></li><li class="listitem"><div class="para">
				設定するプロジェクトの名前をクリックします。
			</div></li><li class="listitem"><div class="para">
				[Accounts] タブをクリックします。現在のプロジェクトメンバーが一覧表示されます。
			</div></li><li class="listitem"><div class="para">
				追加する新しいメンバーのアカウント名を入力して、[Add Account] をクリックします。このクラウドの、プロジェクトの\n存在するドメインにアカウントを持つユーザーのみを追加できます。
			</div></li></ol></div></div></div><div xml:lang="ja-JP" class="section" id="accept-membership-invite" lang="ja-JP"><div class="titlepage"><div><div><h2 class="title" id="accept-membership-invite">6.5. メンバー招待の受理</h2></div></div></div><div class="para">
		もし、CloudStack プロジェクトへの招待を受け取り、またそれを受理したい場合次の手順でおこないます。
	</div><div class="orderedlist"><ol><li class="listitem"><div class="para">
				CloudStackユーザーインターフェイスにログオンします。
			</div></li><li class="listitem"><div class="para">
				左側のナビゲーションバーで［Projects］をクリックします。
			</div></li><li class="listitem"><div class="para">
				セレクトビューで招待を選択します。
			</div></li><li class="listitem"><div class="para">
				画面上に招待がリスト表示されたら、[Accept] をクリックします。
			</div><div class="para">
				画面上にリスト表示された招待は利用している CloudStack のアカウント名に対して送られています。
			</div></li><li class="listitem"><div class="para">
				招待メールを受信した際は [Enter Token] をクリックし、メールからプロジェクト ID と ユニークな ID コード(トークン) を入力してください。
			</div></li></ol></div></div><div xml:lang="ja-JP" class="section" id="suspend-project" lang="ja-JP"><div class="titlepage"><div><div><h2 class="title" id="suspend-project">6.6. プロジェクトの一時停止または削除</h2></div></div></div><div class="para">
		プロジェクトを一時停止にすると、その所有するリソースは保持されますが使用できなくなります。一時停止のプロジェクトに新しいリソースまたはメンバーを追加することはできません。
	</div><div class="para">
		プロジェクトを削除すると、そのリソースは破棄され、プロジェクトからメンバーアカウントが削除されます。プロジェクトの状態は「Disabled pending final deletion」と表示されます。
	</div><div class="para">
		プロジェクトを一時停止または削除できるのは、プロジェクト管理者、プロジェクトの存在するドメインまたは親ドメインのド メイン管理者、または CloudStack ルート管理者です。
	</div><div class="orderedlist"><ol><li class="listitem"><div class="para">
				CloudStackユーザーインターフェイスにログオンします。
			</div></li><li class="listitem"><div class="para">
				左側のナビゲーションバーで [Projects] をクリックします。
			</div></li><li class="listitem"><div class="para">
				[Select view] ボックスの一覧で [Projects] を選択します。
			</div></li><li class="listitem"><div class="para">
				プロジェクトの名前をクリックします。
			</div></li><li class="listitem"><div class="para">
				次のどちらかをクリックします。
			</div><div class="para">
				削除するには [Delete project] をクリックしてください。
				<span class="inlinemediaobject"><img src="./images/delete-button.png" alt="deletebutton.png: Removes a project" /></span>
			</div><div class="para">
				一時停止するには [Suspend project] をクリックしてください。
				<span class="inlinemediaobject"><img src="./images/suspend-icon.png" alt="deletebutton.png: suspends a project" /></span>
			</div></li></ol></div></div><div xml:lang="ja-JP" class="section" id="use-project-view" lang="ja-JP"><div class="titlepage"><div><div><h2 class="title" id="use-project-view">6.7. プロジェクトビューの使用方法</h2></div></div></div><div class="para">
		プロジェクトメンバーは CloudStack のプロジェクトビューを使用して、プロジェクトメンバーや消費リソースなどを表示できます。プロジェクトビューには、1 つのプロジェクトに関連する情報のみが表示されます。ほかの情報を除外できるので、1 つのプロジェクトの状態とリソースに集中することができます。
	</div><div class="orderedlist"><ol><li class="listitem"><div class="para">
				CloudStackユーザーインターフェイスにログオンします。
			</div></li><li class="listitem"><div class="para">
				[Project View] をクリックします。
			</div></li><li class="listitem"><div class="para">
				プロジェクトダッシュボードが開きます。ここには、プロジェクトの仮想マシン、ボリューム、ユーザー、イベント、ネット ワーク設定などが表示されます。ダッシュボードでは次のタスクを実行できます。
			</div><div class="itemizedlist"><ul><li class="listitem"><div class="para">
						[Accounts] タブをクリックして、プロジェクトメンバーを表示し管理する。プロジェクト管理者は、新しいメンバーを追加し、メンバーを削除し、メンバーの役割をユーザーから管理者に変更できます。一度に管理者になれるメ ンバーは 1 人であるため、ほかのユーザーを管理者に設定すると、設定したユーザーは通常のユーザーに変わります。
					</div></li><li class="listitem"><div class="para">
						(招待状機能が有効な場合) [Invitations] タブをクリックして、新しいプロジェクトメンバーに送信済みかつ未承諾の招待状を表示し管理する。保留の招待状は、新しいメンバーが承諾するか、招待状がタイムアウトするか、 管理者が招待状をキャンセルするまで、この一覧に表示されたままになります。
					</div></li></ul></div></li></ol></div></div></div><div xml:lang="ja-JP" class="chapter" id="provisioning-steps" lang="ja-JP"><div class="titlepage"><div><div><h2 class="title">第7章 Steps to Provisioning Your Cloud Infrastructure</h2></div></div></div><div class="toc"><dl><dt><span class="section"><a href="#provisioning-steps-overview">7.1. プロビジョニングの概要</a></span></dt><dt><span class="section"><a href="#region-add">7.2. Adding Regions (optional)</a></span></dt><dd><dl><dt><span class="section"><a href="#region-first">7.2.1. The First Region: The Default Region</a></span></dt><dt><span class="section"><a href="#region-add-2">7.2.2. Adding a Region</a></span></dt><dt><span class="section"><a href="#region-add-n">7.2.3. Adding Third and Subsequent Regions</a></span></dt><dt><span class="section"><a href="#region-delete">7.2.4. Deleting a Region</a></span></dt></dl></dd><dt><span class="section"><a href="#zone-add">7.3. ゾーンの追加</a></span></dt><dd><dl><dt><span class="section"><a href="#basic-zone-configuration">7.3.1. 基本ゾーンの構成</a></span></dt><dt><span class="section"><a href="#advanced-zone-configuration">7.3.2. 拡張ゾーンの構成</a></span></dt></dl></dd><dt><span class="section"><a href="#pod-add">7.4. ポッドの追加</a></span></dt><dt><span class="section"><a href="#cluster-add">7.5. クラスタの追加</a></span></dt><dd><dl><dt><span class="section"><a href="#add-clusters-kvm-xenserver">7.5.1. クラスターの追加:KVM または XenServer</a></span></dt><dt><span class="section"><a href="#add-clusters-vsphere">7.5.2. クラスターの追加:vSphere</a></span></dt></dl></dd><dt><span class="section"><a href="#host-add">7.6. ホストの追加</a></span></dt><dd><dl><dt><span class="section"><a href="#host-add-xenserver-kvm-ovm">7.6.1. ホストの追加(XenServer または KVM)</a></span></dt><dt><span class="section"><a href="#host-add-vsphere">7.6.2. ホストの追加 (vSphere)</a></span></dt></dl></dd><dt><span class="section"><a href="#primary-storage-add">7.7. プライマリストレージの追加</a></span></dt><dd><dl><dt><span class="section"><a href="#sys-require-primary-storage">7.7.1. プライマリストレージのシステム要件</a></span></dt><dt><span class="section"><a href="#adding-primary-storage">7.7.2. プライマリストレージの追加</a></span></dt></dl></dd><dt><span class="section"><a href="#secondary-storage-add">7.8. セカンダリストレージの追加</a></span></dt><dd><dl><dt><span class="section"><a href="#sys-require-secondary-storage">7.8.1. セカンダリストレージのシステム要件</a></span></dt><dt><span class="section"><a href="#adding-secondary-storage">7.8.2. セカンダリストレージの追加</a></span></dt></dl></dd><dt><span class="section"><a href="#initialize-and-test">7.9. 初期化とテスト</a></span></dt></dl></div><div class="para">
		This section tells how to add regions, zones, pods, clusters, hosts, storage, and networks to your cloud. If you are unfamiliar with these entities, please begin by looking through <a class="xref" href="#cloud-infrastructure-concepts">2章<em>クラウドインフラストラクチャのプロビジョニング</em></a>.
	</div><div xml:lang="ja-JP" class="section" id="provisioning-steps-overview" lang="ja-JP"><div class="titlepage"><div><div><h2 class="title" id="provisioning-steps-overview">7.1. プロビジョニングの概要</h2></div></div></div><div class="para">
		管理サーバーのインストールや稼働後、新しいコンピューティングリソースを管理のために追加することができます。CloudStack クラウドインストラクチャがどのように組織化されるかに関しては <a class="xref" href="#cloud-infrastructure-overview">「クラウドインフラストラクチャの概要」</a> を参照してください。
	</div><div class="para">
		クラウドインフラストラクチャを展開する、必要な時にスケールアップするには以下の手順に従ってください。
	</div><div class="orderedlist"><ol><li class="listitem"><div class="para">
				Define regions (optional). See <a class="xref" href="#region-add">「Adding Regions (optional)」</a>.
			</div></li><li class="listitem"><div class="para">
				Add a zone to the region. See <a class="xref" href="#zone-add">「ゾーンの追加」</a>.
			</div></li><li class="listitem"><div class="para">
				Add more pods to the zone (optional). See <a class="xref" href="#pod-add">「ポッドの追加」</a>.
			</div></li><li class="listitem"><div class="para">
				Add more clusters to the pod (optional). See <a class="xref" href="#cluster-add">「クラスタの追加」</a>.
			</div></li><li class="listitem"><div class="para">
				Add more hosts to the cluster (optional). See <a class="xref" href="#host-add">「ホストの追加」</a>.
			</div></li><li class="listitem"><div class="para">
				Add primary storage to the cluster. See <a class="xref" href="#primary-storage-add">「プライマリストレージの追加」</a>.
			</div></li><li class="listitem"><div class="para">
				Add secondary storage to the zone. See <a class="xref" href="#secondary-storage-add">「セカンダリストレージの追加」</a>.
			</div></li><li class="listitem"><div class="para">
				新規クラウドの作成、テストに関しては <a class="xref" href="#initialize-and-test">「初期化とテスト」</a> を参照してください。
			</div></li></ol></div><div class="para">
		これらの手順が完了したら、以下の一般的な構成を参考に展開することができます。
	</div><div class="mediaobject"><img src="./images/provisioning-overview.png" width="444" alt="provisioning-overview.png: Conceptual overview of a basic deployment" /></div></div><div xml:lang="ja-JP" class="section" id="region-add" lang="ja-JP"><div class="titlepage"><div><div><h2 class="title" id="region-add">7.2. Adding Regions (optional)</h2></div></div></div><div class="para">
		Grouping your cloud resources into geographic regions is an optional step when provisioning the cloud. For an overview of regions, see <a class="xref" href="#about-regions">「About Regions」</a>.
	</div><div class="section" id="region-first"><div class="titlepage"><div><div><h3 class="title" id="region-first">7.2.1. The First Region: The Default Region</h3></div></div></div><div class="para">
			If you do not take action to define regions, then all the zones in your cloud will be automatically grouped into a single default region. This region is assigned the region ID of 1.
		</div><div class="para">
			You can change the name or URL of the default region by using the API command updateRegion. For example:
		</div><pre class="programlisting">http://&lt;IP_of_Management_Server&gt;:8080/client/api?command=updateRegion&amp;id=1&amp;name=Northern&amp;endpoint=http://&lt;region_1_IP_address_here&gt;:8080/client&amp;apiKey=miVr6X7u6bN_sdahOBpjNejPgEsT35eXq-jB8CG20YI3yaxXcgpyuaIRmFI_EJTVwZ0nUkkJbPmY3y2bciKwFQ&amp;signature=Lxx1DM40AjcXU%2FcaiK8RAP0O1hU%3D</pre></div><div class="section" id="region-add-2"><div class="titlepage"><div><div><h3 class="title" id="region-add-2">7.2.2. Adding a Region</h3></div></div></div><div class="para">
			Use these steps to add a second region in addition to the default region.
		</div><div class="orderedlist"><ol><li class="listitem"><div class="para">
					Each region has its own CloudStack instance. Therefore, the first step of creating a new region is to install the Management Server software, on one or more nodes, in the geographic area where you want to set up the new region. Use the steps in the Installation guide. When you come to the step where you set up the database, use the additional command-line flag <code class="code">-r &lt;region_id&gt;</code> to set a region ID for the new region. The default region is automatically assigned a region ID of 1, so your first additional region might be region 2.
				</div><pre class="programlisting">cloudstack-setup-databases cloud:&lt;dbpassword&gt;@localhost --deploy-as=root:&lt;password&gt; -e &lt;encryption_type&gt; -m &lt;management_server_key&gt; -k &lt;database_key&gt; -r &lt;region_id&gt;</pre></li><li class="listitem"><div class="para">
					By the end of the installation procedure, the Management Server should have been started. Be sure that the Management Server installation was successful and complete.
				</div></li><li class="listitem"><div class="para">
					Add region 2 to region 1. Use the API command addRegion. (For information about how to make an API call, see the Developer's Guide.)
				</div><pre class="programlisting">http://&lt;IP_of_region_1_Management_Server&gt;:8080/client/api?command=addRegion&amp;id=2&amp;name=Western&amp;endpoint=http://&lt;region_2_IP_address_here&gt;:8080/client&amp;apiKey=miVr6X7u6bN_sdahOBpjNejPgEsT35eXq-jB8CG20YI3yaxXcgpyuaIRmFI_EJTVwZ0nUkkJbPmY3y2bciKwFQ&amp;signature=Lxx1DM40AjcXU%2FcaiK8RAP0O1hU%3D</pre></li><li class="listitem"><div class="para">
					Now perform the same command in reverse, adding region 1 to region 2.
				</div><pre class="programlisting">http://&lt;IP_of_region_2_Management_Server&gt;:8080/client/api?command=addRegion&amp;id=1&amp;name=Northern&amp;endpoint=http://&lt;region_1_IP_address_here&gt;:8080/client&amp;apiKey=miVr6X7u6bN_sdahOBpjNejPgEsT35eXq-jB8CG20YI3yaxXcgpyuaIRmFI_EJTVwZ0nUkkJbPmY3y2bciKwFQ&amp;signature=Lxx1DM40AjcXU%2FcaiK8RAP0O1hU%3D</pre></li><li class="listitem"><div class="para">
					Copy the account, user, and domain tables from the region 1 database to the region 2 database.
				</div><div class="para">
					In the following commands, it is assumed that you have set the root password on the database, which is a CloudStack recommended best practice. Substitute your own MySQL root password.
				</div><div class="orderedlist"><ol class="loweralpha"><li class="listitem"><div class="para">
							First, run this command to copy the contents of the database:
						</div><pre class="programlisting"># mysqldump -u root -p&lt;mysql_password&gt; -h &lt;region1_db_host&gt; cloud account user domain &gt; region1.sql</pre></li><li class="listitem"><div class="para">
							Then run this command to put the data onto the region 2 database:
						</div><pre class="programlisting"># mysql -u root -p&lt;mysql_password&gt; -h &lt;region2_db_host&gt; cloud &lt; region1.sql</pre></li></ol></div></li><li class="listitem"><div class="para">
					Remove project accounts. Run these commands on the region 2 database:
				</div><pre class="programlisting">mysql&gt; delete from account where type = 5;</pre></li><li class="listitem"><div class="para">
					Set the default zone as null:
				</div><pre class="programlisting">mysql&gt; update account set default_zone_id = null;</pre></li><li class="listitem"><div class="para">
					Restart the Management Servers in region 2.
				</div></li></ol></div></div><div class="section" id="region-add-n"><div class="titlepage"><div><div><h3 class="title" id="region-add-n">7.2.3. Adding Third and Subsequent Regions</h3></div></div></div><div class="para">
			To add the third region, and subsequent additional regions, the steps are similar to those for adding the second region. However, you must repeat certain steps additional times for each additional region:
		</div><div class="orderedlist"><ol><li class="listitem"><div class="para">
					Install CloudStack in each additional region. Set the region ID for each region during the database setup step.
				</div><pre class="programlisting">cloudstack-setup-databases cloud:&lt;dbpassword&gt;@localhost --deploy-as=root:&lt;password&gt; -e &lt;encryption_type&gt; -m &lt;management_server_key&gt; -k &lt;database_key&gt; -r &lt;region_id&gt;</pre></li><li class="listitem"><div class="para">
					Once the Management Server is running, add your new region to all existing regions by repeatedly calling the API command addRegion. For example, if you were adding region 3:
				</div><pre class="programlisting">http://&lt;IP_of_region_1_Management_Server&gt;:8080/client/api?command=addRegion&amp;id=3&amp;name=Eastern&amp;endpoint=http://&lt;region_3_IP_address_here&gt;:8080/client&amp;apiKey=miVr6X7u6bN_sdahOBpjNejPgEsT35eXq-jB8CG20YI3yaxXcgpyuaIRmFI_EJTVwZ0nUkkJbPmY3y2bciKwFQ&amp;signature=Lxx1DM40AjcXU%2FcaiK8RAP0O1hU%3D

http://&lt;IP_of_region_2_Management_Server&gt;:8080/client/api?command=addRegion&amp;id=3&amp;name=Eastern&amp;endpoint=http://&lt;region_3_IP_address_here&gt;:8080/client&amp;apiKey=miVr6X7u6bN_sdahOBpjNejPgEsT35eXq-jB8CG20YI3yaxXcgpyuaIRmFI_EJTVwZ0nUkkJbPmY3y2bciKwFQ&amp;signature=Lxx1DM40AjcXU%2FcaiK8RAP0O1hU%3D</pre></li><li class="listitem"><div class="para">
					Repeat the procedure in reverse to add all existing regions to the new region. For example, for the third region, add the other two existing regions:
				</div><pre class="programlisting">http://&lt;IP_of_region_3_Management_Server&gt;:8080/client/api?command=addRegion&amp;id=1&amp;name=Northern&amp;endpoint=http://&lt;region_1_IP_address_here&gt;:8080/client&amp;apiKey=miVr6X7u6bN_sdahOBpjNejPgEsT35eXq-jB8CG20YI3yaxXcgpyuaIRmFI_EJTVwZ0nUkkJbPmY3y2bciKwFQ&amp;signature=Lxx1DM40AjcXU%2FcaiK8RAP0O1hU%3D

http://&lt;IP_of_region_3_Management_Server&gt;:8080/client/api?command=addRegion&amp;id=2&amp;name=Western&amp;endpoint=http://&lt;region_2_IP_address_here&gt;:8080/client&amp;apiKey=miVr6X7u6bN_sdahOBpjNejPgEsT35eXq-jB8CG20YI3yaxXcgpyuaIRmFI_EJTVwZ0nUkkJbPmY3y2bciKwFQ&amp;signature=Lxx1DM40AjcXU%2FcaiK8RAP0O1hU%3D</pre></li><li class="listitem"><div class="para">
					Copy the account, user, and domain tables from any existing region's database to the new region's database.
				</div><div class="para">
					In the following commands, it is assumed that you have set the root password on the database, which is a CloudStack recommended best practice. Substitute your own MySQL root password.
				</div><div class="orderedlist"><ol class="loweralpha"><li class="listitem"><div class="para">
							First, run this command to copy the contents of the database:
						</div><pre class="programlisting"># mysqldump -u root -p&lt;mysql_password&gt; -h &lt;region1_db_host&gt; cloud account user domain &gt; region1.sql</pre></li><li class="listitem"><div class="para">
							Then run this command to put the data onto the new region's database. For example, for region 3:
						</div><pre class="programlisting"># mysql -u root -p&lt;mysql_password&gt; -h &lt;region3_db_host&gt; cloud &lt; region1.sql</pre></li></ol></div></li><li class="listitem"><div class="para">
					Remove project accounts. Run these commands on the region 2 database:
				</div><pre class="programlisting">mysql&gt; delete from account where type = 5;</pre></li><li class="listitem"><div class="para">
					Set the default zone as null:
				</div><pre class="programlisting">mysql&gt; update account set default_zone_id = null;</pre></li><li class="listitem"><div class="para">
					Restart the Management Servers in the new region.
				</div></li></ol></div></div><div class="section" id="region-delete"><div class="titlepage"><div><div><h3 class="title" id="region-delete">7.2.4. Deleting a Region</h3></div></div></div><div class="para">
			To delete a region, use the API command removeRegion. Repeat the call to remove the region from all other regions. For example, to remove the 3rd region in a three-region cloud:
		</div><pre class="programlisting">http://&lt;IP_of_region_1_Management_Server&gt;:8080/client/api?command=removeRegion&amp;id=3&amp;apiKey=miVr6X7u6bN_sdahOBpjNejPgEsT35eXq-jB8CG20YI3yaxXcgpyuaIRmFI_EJTVwZ0nUkkJbPmY3y2bciKwFQ&amp;signature=Lxx1DM40AjcXU%2FcaiK8RAP0O1hU%3D

http://&lt;IP_of_region_2_Management_Server&gt;:8080/client/api?command=removeRegion&amp;id=3&amp;apiKey=miVr6X7u6bN_sdahOBpjNejPgEsT35eXq-jB8CG20YI3yaxXcgpyuaIRmFI_EJTVwZ0nUkkJbPmY3y2bciKwFQ&amp;signature=Lxx1DM40AjcXU%2FcaiK8RAP0O1hU%3D</pre></div></div><div xml:lang="ja-JP" class="section" id="zone-add" lang="ja-JP"><div class="titlepage"><div><div><h2 class="title" id="zone-add">7.3. ゾーンの追加</h2></div></div></div><div class="para">
		次の手順は、CloudStack ユーザーインターフェイスにログオン済みであることを前提としています(<a class="xref" href="#log-in">「UIへのログイン」</a>を参照)。
	</div><div class="orderedlist"><ol><li class="listitem"><div class="para">
				(オプション)クラウド全体のセカンダリストレージとして Swift を使用する場合は、ゾーンを追加する前に Swift を追加する必要があります。
			</div><div class="orderedlist"><ol class="loweralpha"><li class="listitem"><div class="para">
						CloudStackユーザーインターフェイスに管理者としてログオンします。
					</div></li><li class="listitem"><div class="para">
						初めてユーザーインターフェイスを使用する場合は、ガイドツアーのスプラッシュページが開きます。\n[Experienced user]を選択します。ダッシュボードが開きます。
					</div></li><li class="listitem"><div class="para">
						左側のナビゲーションバーで[Global Settings]をクリックします。
					</div></li><li class="listitem"><div class="para">
						検索ボックスに「swift.enable」と入力して検索ボタンをクリックします。
					</div></li><li class="listitem"><div class="para">
						[Edit]アイコンをクリックして swift.enable を true に設定します。 
						<span class="inlinemediaobject"><img src="./images/edit-icon.png" alt="edit-icon.png: button to modify data" /></span>
					</div></li><li class="listitem"><div class="para">
						管理サーバーを再起動します。
					</div><pre class="programlisting"># service cloudstack-management restart</pre></li><li class="listitem"><div class="para">
						CloudStack ユーザーインターフェイスが表示されている Web ブラウザータブを更新して再度ログオンします。
					</div></li></ol></div></li><li class="listitem"><div class="para">
				左側のナビゲーションバーで[Infrastructure]をクリックします。
			</div></li><li class="listitem"><div class="para">
				[Zones]で[View More]をクリックします。
			</div></li><li class="listitem"><div class="para">
				(オプション)Swift ストレージを使用する場合は、[Edit Swift]をクリックします。次の情報を指定します。
			</div><div class="itemizedlist"><ul><li class="listitem"><div class="para">
						<span class="bold bold"><strong>URL :</strong></span> Swift URL です。
					</div></li><li class="listitem"><div class="para">
						<span class="bold bold"><strong>Account :</strong></span> Swift アカウントです。
					</div></li><li class="listitem"><div class="para">
						<span class="bold bold"><strong>Username :</strong></span> Swift アカウントのユーザー名です。
					</div></li><li class="listitem"><div class="para">
						<span class="bold bold"><strong>Key :</strong></span> Swift キーです。
					</div></li></ul></div></li><li class="listitem"><div class="para">
				[Add Zone]をクリックします。ゾーンの作成ウィザードが開きます。
			</div></li><li class="listitem"><div class="para">
				次のどちらかのネットワークの種類を選択します。
			</div><div class="itemizedlist"><ul><li class="listitem"><div class="para">
						<span class="bold bold"><strong>Basic :</strong></span> AWS スタイルのネットワークシステムに対応します。単一のネットワークを提供します。このネットワークにより、各仮想マシンインスタンスに直接 IP アドレスが割り当てられます。セキュリティグループ(発信元 IP アド レスのフィルター)のようなレイヤー3 レベルの方法でゲストを分離できます。
					</div></li><li class="listitem"><div class="para">
						<span class="bold bold"><strong>Advanced :</strong></span> より高度なネットワークトポロジに対応します。このネットワークモデルでは、最も柔軟に、ゲストネットワークを定義し、ファイアウォール、VPN、負荷分散装置のサポートなどのカスタムネットワークオファリングを 提供できます。
					</div></li></ul></div><div class="para">
				ネットワークの種類について詳しくは、<a class="xref" href="#about-physical-networks">「物理ネットワークについて」</a> を参照してください。
			</div></li><li class="listitem"><div class="para">
				以降の手順は、[Basic]または[Advanced]のどちらを選択したかによって異なります。該当する手順を続行してください。
			</div><div class="itemizedlist"><ul><li class="listitem"><div class="para">
						<a class="xref" href="#basic-zone-configuration">「基本ゾーンの構成」</a>
					</div></li><li class="listitem"><div class="para">
						<a class="xref" href="#advanced-zone-configuration">「拡張ゾーンの構成」</a>
					</div></li></ul></div></li></ol></div><div xml:lang="ja-JP" class="section" id="basic-zone-configuration" lang="ja-JP"><div class="titlepage"><div><div><h3 class="title" id="basic-zone-configuration">7.3.1. 基本ゾーンの構成</h3></div></div></div><div class="orderedlist"><ol><li class="listitem"><div class="para">
				ゾーンの追加ウィザードで［Basic］を選択して［Next］をクリックすると、次の項目の入力を求められます。入力後、［Next］をクリックします。
			</div><div class="itemizedlist"><ul><li class="listitem"><div class="para">
						<span class="bold bold"><strong>Name:</strong></span> ゾーンの名前です。
					</div></li><li class="listitem"><div class="para">
						<span class="bold bold"><strong>DNS1およびDNS2:</strong></span> ゾーン内のゲスト仮想マシンで使用するDNSサーバーです。これらのDNSサーバーには、後で追加するパブリックネットワーク経由でアクセスします。ゾーンのパブリックIPアドレスから、ここで指定するDNSサーバーに通信できる必要があります。
					</div></li><li class="listitem"><div class="para">
						<span class="bold bold"><strong>Internal DNS1およびInternal DNS2：</strong></span>これらのDNSサーバーは、ゾーン内のシステム仮想マシン(仮想ルーター、コンソールプロキシ、およびセカンダリストレージ仮想マシンなど、CloudStackにより使用される仮想マシン)によって使用されます。これらのDNSサーバーは、システム仮想マシンの管理トラフィックネットワークインターフェイスを介してアクセスされます。ポッドのプライベートIPアドレスから、ここで指定する内部DNSサーバーに通信できる必要があります。
					</div></li><li class="listitem"><div class="para">
						<span class="bold bold"><strong>Hypervisor：</strong></span> (Version 3.0.1より)ゾーンの最初のクラスターのハイパーバイザーを選択します。ゾーンの追加後に、異なるハイパーバイザーを使用するクラスターを追加できます。
					</div></li><li class="listitem"><div class="para">
						<span class="bold bold"><strong>Network Offering：</strong></span>ここでの選択により、ゲスト仮想マシンのネットワークで使用できるネットワークサービスが決まります。
					</div><div class="informaltable"><table border="1"><colgroup><col align="left" class="c1" width="50%" /><col align="left" class="c2" width="50%" /></colgroup><thead><tr><th align="left">
										<div class="para">
											Network Offering
										</div>
									</th><th align="left">
										<div class="para">
											説明
										</div>
									</th></tr></thead><tbody><tr><td align="left">
										<div class="para">
											DefaultSharedNetworkOfferingWithSGService
										</div>
									</td><td align="left">
										<div class="para">
											ゲストトラフィックの分離のためにセキュリティグループを有効にする場合は、これを選択します(「セキュリティグループによる仮想マシンに対するトラフィックの制御」を参照)。
										</div>
									</td></tr><tr><td align="left">
										<div class="para">
											DefaultSharedNetworkOffering
										</div>
									</td><td align="left">
										<div class="para">
											セキュリティグループが必要ない場合は、これを選択します。
										</div>
									</td></tr><tr><td align="left">
										<div class="para">
											DefaultSharedNetscalerEIPandELBNetworkOffering
										</div>
									</td><td align="left">
										<div class="para">
											ゾーンネットワークの一部としてCitrix NetScalerアプライアンスを設置済みで、エラスティックIPおよびエラスティック負荷分散の機能を使用する場合は、これを選択します。エラスティックIPおよびエラスティック負荷分散の機能を使用すると、セキュリティグループが有効な基本ゾーンで1対1の静的NATおよび負荷分散を提供できます。
										</div>
									</td></tr></tbody></table></div></li><li class="listitem"><div class="para">
						<span class="bold bold"><strong>Network Domain：</strong></span>(オプション)ゲスト仮想マシンネットワークに特別なドメイン名を割り当てる場合は、DNSサフィックスを指定します。
					</div></li><li class="listitem"><div class="para">
						<span class="bold bold"><strong>Public：</strong></span>すべてのユーザーがパブリックゾーンを利用できます。パブリックではないゾーンは、特定のドメインに割り当てられます。そのドメイン内のユーザーだけが、このゾーンにゲスト仮想マシンを作成することを許可されます。
					</div></li></ul></div></li><li class="listitem"><div class="para">
				物理ネットワークにより伝送されるトラフィックの種類を選択します。
			</div><div class="para">
				トラフィックの種類は、管理、パブリック、ゲスト、およびストレージトラフィックです。種類について詳しくは、アイコンにマウスポインターを合わせてツールチップを表示するか、「基本ゾーンのネットワークトラフィックの種類」を参照してください。この画面は、いくつかのトラフィックの種類が既に割り当てられた状態で開きます。さらに追加するには、トラフィックの種類をネットワークにドラッグアンドドロップしてください。また、必要に応じてネットワーク名を変更することもできます。
			</div></li><li class="listitem"><div class="para">
				(3.0.1 より)物理ネットワーク上の各トラフィックの種類にネットワークトラフィックラベルを割り当てます。このラベルは、ハイパーバイザーホストに定義済みのラベルと一致する必要があります。各ラベルを割り当てるには、トラフィッ クの種類のアイコンの下の[Edit]をクリックします。ラベルを入力するダイアログボックスが開くので入力します。 [OK]をクリックします。
			</div><div class="para">
				これらのトラフィックラベルは、最初のクラスターに選択したハイパーバイザーのためにのみ定義します。ほかのすべてのハイパーバイザーについては、ゾーンを作成してからラベルを構成できます。
			</div></li><li class="listitem"><div class="para">
				［Next］をクリックします。
			</div></li><li class="listitem"><div class="para">
				(NetScalerのみ)NetScaler用のネットワークオファリングを選択する場合は、追加の表示画面があります。NetScalerのセットアップに必要な項目を入力したら、［Next］をクリックします。
			</div><div class="itemizedlist"><ul><li class="listitem"><div class="para">
						<span class="bold bold"><strong>IP address：</strong></span>NetScalerデバイスのNSIP(NetScaler IP)アドレスです。
					</div></li><li class="listitem"><div class="para">
						<span class="bold bold"><strong>UsernameおよびPassword：</strong></span>デバイスにアクセスするための認証資格情報です。CloudStackは、この資格情報を使用してデバイスにアクセスします。
					</div></li><li class="listitem"><div class="para">
						<span class="bold bold"><strong>Type：</strong></span>追加するNetScalerデバイスの種類です。［NetScaler VPX］、［NetScaler MPX］、または［NetScaler SDX］です。種類を比較するには、『CloudStack管理ガイド』を参照してください。
					</div></li><li class="listitem"><div class="para">
						<span class="bold bold"><strong>Public interface：</strong></span>パブリックネットワークの一部として構成されるNetScalerのインターフェイスです。
					</div></li><li class="listitem"><div class="para">
						<span class="bold bold"><strong>Private interface：</strong></span>プライベートネットワークの一部として構成されるNetScalerのインターフェイスです。
					</div></li><li class="listitem"><div class="para">
						<span class="bold bold"><strong>Number of retries：</strong></span>操作が失敗したとみなす前にデバイスに対してコマンドを試行する回数です。デフォルトは2です。
					</div></li><li class="listitem"><div class="para">
						<span class="bold bold"><strong>Capacity：</strong></span>このNetScalerデバイスを共有するゲストネットワーク/アカウントの数です。
					</div></li><li class="listitem"><div class="para">
						<span class="bold bold"><strong>Dedicated：</strong></span>専用のデバイスは単一のアカウント専用になります。［Dedicated］チェックボックスをオンにすると、［Capacity］ボックスの値は無視され、暗黙的に1であるとみなされます。
					</div></li></ul></div></li><li class="listitem"><div class="para">
				(NetScalerのみ)パブリックトラフィックのIPアドレスの範囲を構成します。この範囲内のIPアドレスは、EIPおよびELBが有効なNetScalerのネットワークオファリングを選択することによって有効にする、静的NAT機能に使用されます。次の詳細情報を入力し、［Add］をクリックします。必要に応じてこの手順を繰り返し、さらにIPアドレスの範囲を追加できます。完了したら［Next］をクリックします。
			</div><div class="itemizedlist"><ul><li class="listitem"><div class="para">
						<span class="bold bold"><strong>Gateway：</strong></span>これらのIPアドレスに使用するゲートウェイです。
					</div></li><li class="listitem"><div class="para">
						<span class="bold bold"><strong>Netmask：</strong></span>このIPアドレスの範囲に関連付けるネットマスクです。
					</div></li><li class="listitem"><div class="para">
						<span class="bold bold"><strong>VLAN：</strong></span>パブリックトラフィックに使用するVLANです。
					</div></li><li class="listitem"><div class="para">
						<span class="bold bold"><strong>Start IPおよびEnd IP：</strong></span>インターネットからアクセスできるとみなされるIPアドレスの範囲で、ゲスト仮想マシンへのアクセスのために割り当てます。
					</div></li></ul></div></li><li class="listitem"><div class="para">
				新しいゾーンでは、CloudStackにより最初のポッドが自動的に追加されます。後でさらにポッドを追加できます。ポッドの概要については、「ポッドについて」を参照してください。
			</div><div class="para">
				最初のポッドを構成するには、次の項目を入力して［Next］をクリックします。
			</div><div class="itemizedlist"><ul><li class="listitem"><div class="para">
						<span class="bold bold"><strong>Pod Name：</strong></span>ポッドの名前です。
					</div></li><li class="listitem"><div class="para">
						<span class="bold bold"><strong>Reserved system gateway：</strong></span>このポッド内のホストのゲートウェイです。
					</div></li><li class="listitem"><div class="para">
						<span class="bold bold"><strong>Reserved system netmask：</strong></span>ポッドのサブネットを定義するネットワークプレフィックスです。CIDR表記を使用します。
					</div></li><li class="listitem"><div class="para">
						<span class="bold bold"><strong>Start Reserved System IPおよびEnd Reserved System IP：</strong></span>セカンダリストレージ仮想マシン、コンソールプロキシ仮想マシン、およびDHCPなどのさまざまなシステム仮想マシンを管理するために、CloudStackで使用する管理ネットワーク内のIPアドレスの範囲です。詳しくは、「システムにより予約済みのIPアドレス」を参照してください。
					</div></li></ul></div></li><li class="listitem"><div class="para">
				ゲストトラフィック用のネットワークを構成します。次の情報を指定してから、［Next］をクリックします。
			</div><div class="itemizedlist"><ul><li class="listitem"><div class="para">
						<span class="bold bold"><strong>Guest gateway：</strong></span>ゲストが使用するゲートウェイです。
					</div></li><li class="listitem"><div class="para">
						<span class="bold bold"><strong>Guest netmask：</strong></span>ゲストの使用するサブネット上で使用されるネットマスクです。
					</div></li><li class="listitem"><div class="para">
						<span class="bold bold"><strong>Guest start IPおよびGuest end IP：</strong></span>CloudStackがゲストに割り当てられるIPアドレスの範囲を定義する、最初と最後のIPアドレスを入力します。
					</div><div class="itemizedlist"><ul><li class="listitem"><div class="para">
								複数のNICを使用することを強くお勧めします。複数のNICを使用する場合は、別のサブネットに存在するIPアドレスを入力できます。
							</div></li><li class="listitem"><div class="para">
								NICを1つ使用する場合は、これらのIPアドレスは、ポッドのCIDRと同じCIDRに存在する必要があります。
							</div></li></ul></div></li></ul></div></li><li class="listitem"><div class="para">
				新しいポッドでは、CloudStackにより最初のクラスターが自動的に追加されます。後でさらにクラスターを追加できます。クラスターの概要については、「クラスターについて」を参照してください。
			</div><div class="para">
				最初のクラスターを構成するには、次の項目を入力して［Next］をクリックします。
			</div><div class="itemizedlist"><ul><li class="listitem"><div class="para">
						<span class="bold bold"><strong>Hypervisor：</strong></span>(Version 3.0.0のみ。3.0.1では読み取り専用)このクラスター内のすべてのホストで実行される、ハイパーバイザーソフトウェアの種類を選択します。VMwareを選択すると追加のフィールドが表示され、vSphereクラスターに関する情報を指定できます。vSphereサーバーの場合は、vCenterでホストのクラスターを作成した後、クラスター全体をCloudStackに追加することをお勧めします。「クラスターの追加：vSphere」を参照してください。
					</div></li><li class="listitem"><div class="para">
						<span class="bold bold"><strong>Cluster name：</strong></span>クラスターの名前を入力します。任意の、CloudStackで使用されていないテキストを指定します。
					</div></li></ul></div></li><li class="listitem"><div class="para">
				新しいクラスターでは、CloudStackにより最初のホストが自動的に追加されます。後でさらにホストを追加できます。ホストの概要については、「ホストについて」を参照してください。
			</div><div class="note"><div class="admonition_header"><h2>注記</h2></div><div class="admonition"><div class="para">
					CloudStackを展開するときに、ハイパーバイザーに実行中の仮想マシンがあってはいけません。
				</div></div></div><div class="para">
				ホストを構成する前に、ハイパーバイザーソフトウェアをホストにインストールする必要があります。CloudStackがサポートするハイパーバイザーソフトウェアのバージョン、およびホストをCloudStackと連動させるために必要な追加構成を確認しておく必要があります。このインストールについて詳しくは、次のセクションを参照してください。
			</div><div class="itemizedlist"><ul><li class="listitem"><div class="para">
						Citrix XenServerのインストールと構成
					</div></li><li class="listitem"><div class="para">
						VMware vSphereのインストールと構成
					</div></li><li class="listitem"><div class="para">
						KVMのインストールと構成
					</div></li></ul></div><div class="para">
				最初のホストを構成するには、次の項目を入力して［Next］をクリックします。
			</div><div class="itemizedlist"><ul><li class="listitem"><div class="para">
						<span class="bold bold"><strong>Host Name：</strong></span>ホストのDNS名またはIPアドレスです。
					</div></li><li class="listitem"><div class="para">
						<span class="bold bold"><strong>Username：</strong></span>通常はrootです。
					</div></li><li class="listitem"><div class="para">
						<span class="bold bold"><strong>Password：</strong></span>上のユーザー名に対するパスワードです(XenServerまたはKVM側で指定したもの)。
					</div></li><li class="listitem"><div class="para">
						<span class="bold bold"><strong>Host Tags : </strong></span> (オプション)ホストを分類して保守を簡単にするために使用するラベルです。例としてクラウドのHAタグを設定できます(ha.tag をグローバル 設定パラメーターに設定します)。もしこのホスト上で仮想マシンを「高可用性」機能を有効化したうえで利用したい場合、管理者ガイドの「HAホスト上での仮想マシンでのHAの有効化」を参照してください。
					</div></li></ul></div></li><li class="listitem"><div class="para">
				新しいクラスターでは、CloudStack により最初のプライマリストレージサーバーが自動的に追加されます。後でさらにサーバーを追加できます。プライマリストレージの概要については、「プライマリストレージについて」を参照してください。
			</div><div class="para">
				最初のプライマリストレージサーバーを構成するには、次の項目を入力して［Next］をクリックします。
			</div><div class="itemizedlist"><ul><li class="listitem"><div class="para">
						<span class="bold bold"><strong>Name：</strong></span>ストレージデバイスの名前です。
					</div></li><li class="listitem"><div class="para">
						<span class="bold bold"><strong>Protocol :</strong></span> XenServer の場合は、[NFS]、[iSCSI]、または[PreSetup]を選択します。KVM の場合は、[NFS]、[SharedMountPoint]、[CLVM]または[RBD]を選択します。vSphere の場合は、[VMFS](iSCSI またはファイバーチャネル)または [NFS]を選択します。画面のそのほかのフィールドは、ここで選択したものにより異なります。
					</div></li></ul></div></li></ol></div></div><div xml:lang="ja-JP" class="section" id="advanced-zone-configuration" lang="ja-JP"><div class="titlepage"><div><div><h3 class="title" id="advanced-zone-configuration">7.3.2. 拡張ゾーンの構成</h3></div></div></div><div class="orderedlist"><ol><li class="listitem"><div class="para">
				ゾーンの追加ウィザードで[Advanced]を選択して[Next]をクリックすると、次の詳細の入力を求められます。入力後、[Next]をクリックします。
			</div><div class="itemizedlist"><ul><li class="listitem"><div class="para">
						<span class="bold bold"><strong> Name : </strong></span> ゾーンの名前です。
					</div></li><li class="listitem"><div class="para">
						<span class="bold bold"><strong> DNS1およびDNS2 : </strong></span>ゾーン内のゲスト仮想マシンで使用するDNSサーバーです。これらのDNSサーバーには、後で追加するパブリックネットワーク経由でアクセスします。ゾーンのパブリックIPアドレスから、ここで指定するDNSサーバーに通信できる必要があります。
					</div></li><li class="listitem"><div class="para">
						<span class="bold bold"><strong> Internal DNS1 および Internal DNS2 : </strong></span>これらの DNS サーバーは、ゾーン内のシステム仮想マシン(仮想ルーター、 コンソールプロキシ、およびセカンダリストレージ仮想マシンなど、CloudStack により使用される仮想マシン)に よって使用されます。これらの DNS サーバーは、システム仮想マシンの管理トラフィックネットワークインターフェイスを介してアクセスされます。ポッドのプライベート IP アドレスから、ここで指定する内部 DNS サーバーに通信できる必要があります。
					</div></li><li class="listitem"><div class="para">
						<span class="bold bold"><strong> Network Domain : </strong></span>(オプション)ゲスト仮想マシンネットワークに特別なドメイン名を割り当てる場合は、DNSサフィックスを指定します。
					</div></li><li class="listitem"><div class="para">
						<span class="bold bold"><strong> Guest CIDR : </strong></span>このゾーンのゲスト仮想ネットワークで使用される IP アドレスを記述する CIDR です。これはたとえば、10.1.1.0/24 です。ゾーンごとに異なる CIDR を設定することをお勧めします。これにより、異なるゾーンのネットワーク間で簡単に VPN をセットアップできるようになります。
					</div></li><li class="listitem"><div class="para">
						<span class="bold bold"><strong> Hypervisor : </strong></span> (Version 3.0.1より) ゾーンの最初のクラスターのハイパーバイザーを選択します。ゾーンの追加後に、異なるハイパーバイザーを使用するクラスターを追加できます。
					</div></li><li class="listitem"><div class="para">
						<span class="bold bold"><strong> Public : </strong></span>すべてのユーザーがパブリックゾーンを利用できます。パブリックではないゾーンは、特定のドメインに割り当てられます。そのドメイン内のユーザーだけが、このゾーンにゲスト仮想マシンを作成することを許可されます。
					</div></li></ul></div></li><li class="listitem"><div class="para">
				物理ネットワークにより伝送されるトラフィックの種類を選択します。
			</div><div class="para">
				トラフィックの種類は、管理、パブリック、ゲスト、およびストレージトラフィックです。種類について詳しくは、アイコンにマウスポインターを合わせてツールチップを表示するか、<a class="xref" href="#advanced-zone-network-traffic-types">「拡張ゾーンのネットワークトラフィックの種類」</a> を参照してください。この画面が表示される時点で、1 つのネットワークが既に構成されています。複数の物理ネットワークがある場合は、ネットワークを追加する必要があります。トラフィックの種類をドラッグして非アクティブなネットワークにドロップすると、ネットワークがアクティブになります。トラフィックアイコンをネットワーク間で移動でき ます。たとえば、Network 1 に表示されているデフォルトのトラフィックの種類が実際の設定と一致しない場合は、トラフィックの種類を移動できます。また、必要に応じてネットワーク名を変更することもできます。
			</div></li><li class="listitem"><div class="para">
				(Version 3.0.1 より)各物理ネットワーク上の各トラフィックの種類にネットワークトラフィックラベルを割り当てます。このラベルは、ハイパーバイザーホストに定義済みのラベルと一致する必要があります。各ラベルを割り当てるには、各物理ネットワーク内のトラフィックの種類のアイコンの下の[Edit] をクリックします。ラベルを入力するダイアログボック スが開くので入力します。[OK] をクリックします。
			</div><div class="para">
				これらのトラフィックラベルは、最初のクラスターに選択したハイパーバイザーのためにのみ定義します。ほかのすべてのハイパーバイザーについては、ゾーンを作成してからラベルを構成できます。
			</div></li><li class="listitem"><div class="para">
				［Next］をクリックします。
			</div></li><li class="listitem"><div class="para">
				パブリックインターネットトラフィックの IP アドレスの範囲を構成します。次の詳細情報を入力し、[Add]をクリックしま す。必要に応じてこの手順を繰り返し、さらにパブリックインターネットの IP アドレスの範囲を追加できます。完了し たら[Next]をクリックします。
			</div><div class="itemizedlist"><ul><li class="listitem"><div class="para">
						<span class="bold bold"><strong> Gateway : </strong></span>これらのIPアドレスに使用するゲートウェイです。
					</div></li><li class="listitem"><div class="para">
						<span class="bold bold"><strong> Netmask : </strong></span>このIPアドレスの範囲に関連付けるネットマスクです。
					</div></li><li class="listitem"><div class="para">
						<span class="bold bold"><strong> VLAN : </strong></span>パブリックトラフィックに使用するVLANです。
					</div></li><li class="listitem"><div class="para">
						<span class="bold bold"><strong> Start IP および End IP : </strong></span> インターネットからアクセスできるとみなされる IP アドレスの範囲で、ゲストネットワークへのアクセスのために割り当てます。
					</div></li></ul></div></li><li class="listitem"><div class="para">
				新しいゾーンでは、CloudStackにより最初のポッドが自動的に追加されます。後でさらにポッドを追加できます。ポッドの概要については、<a class="xref" href="#about-pods">「ポッドについて」</a> を参照してください。
			</div><div class="para">
				最初のポッドを構成するには、次の項目を入力して［Next］をクリックします。
			</div><div class="itemizedlist"><ul><li class="listitem"><div class="para">
						<span class="bold bold"><strong> Pod Name : </strong></span>ポッドの名前です。
					</div></li><li class="listitem"><div class="para">
						<span class="bold bold"><strong> Reserved system gateway : </strong></span>このポッド内のホストのゲートウェイです。
					</div></li><li class="listitem"><div class="para">
						<span class="bold bold"><strong> Reserved system netmask : </strong></span>ポッドのサブネットを定義するネットワークプレフィックスです。CIDR表記を使用します。
					</div></li><li class="listitem"><div class="para">
						<span class="bold bold"><strong> Start Reserved System IP および End Reserved System IP : </strong></span> セカンダリストレージ仮想マシン、コンソールプロキシ仮想マシン、および DHCP などのさまざまなシステム仮想マシンを管理するために、CloudStack で使用する管理ネットワーク内の IP アドレスの範囲です。詳しくは、<a class="xref" href="#system-reserved-ip-addresses">「システムにより予約済みの IP アドレス」</a> を 参照してください。
					</div></li></ul></div></li><li class="listitem"><div class="para">
				各物理ネットワークのゲストトラフィックを伝送する VLAN ID の範囲を指定して(「VLAN 割り当ての例」)、[Next] をクリックします。
			</div></li><li class="listitem"><div class="para">
				新しいポッドでは、CloudStack により最初のクラスターが自動的に追加されます。後でさらにクラスターを追加できます。クラスターの概要については、<a class="xref" href="#about-clusters">「クラスタについて」</a> を参照してください。
			</div><div class="para">
				最初のクラスターを構成するには、次の項目を入力して［Next］をクリックします。
			</div><div class="itemizedlist"><ul><li class="listitem"><div class="para">
						<span class="bold bold"><strong> Hypervisor : </strong></span> (Version 3.0.0 のみ。3.0.1 では読み取り専用)このクラスター内のすべてのホストで実行される、ハイパーバイザーソフトウェアの種類を選択します。VMware を選択すると追加のフィールドが表示され、vSphere クラスターに関する情報を指定できます。vSphere サーバーの場合は、vCenter でホストのクラスターを作成した後、クラスター全体を CloudStack に追加することをお勧めします。「クラスターの追加:vSphere」 参照してください。
					</div></li><li class="listitem"><div class="para">
						<span class="bold bold"><strong>Cluster name : </strong></span>クラスターの名前を入力します。任意の、CloudStackで使用されていないテキストを指定します。
					</div></li></ul></div></li><li class="listitem"><div class="para">
				新しいクラスターでは、CloudStack により最初のホストが自動的に追加されます。後でさらにホストを追加できます。\nホストの概要については、<a class="xref" href="#about-hosts">「ホストについて」</a> を参照してください。
			</div><div class="note"><div class="admonition_header"><h2>注記</h2></div><div class="admonition"><div class="para">
					CloudStack を展開するときに、ハイパーバイザーに実行中の仮想マシンがあってはいけません。
				</div></div></div><div class="para">
				ホストを構成する前に、ハイパーバイザーソフトウェアをホストにインストールする必要があります。CloudStackがサポートするハイパーバイザーソフトウェアのバージョン、およびホストをCloudStackと連動させるために必要な追加構成を確認しておく必要があります。このインストールについて詳しくは、次のセクションを参照してください。
			</div><div class="itemizedlist"><ul><li class="listitem"><div class="para">
						CloudStackのためのCitrix XenServerのインストール
					</div></li><li class="listitem"><div class="para">
						VMware vSphereのインストールと設定
					</div></li><li class="listitem"><div class="para">
						KVMのインストールと設定
					</div></li></ul></div><div class="para">
				最初のホストを構成するには、次の項目を入力して［Next］をクリックします。
			</div><div class="itemizedlist"><ul><li class="listitem"><div class="para">
						<span class="bold bold"><strong>Host Name : </strong></span>ホストのDNS名またはIPアドレスです。
					</div></li><li class="listitem"><div class="para">
						<span class="bold bold"><strong> Username : </strong></span> 通常は root です。
					</div></li><li class="listitem"><div class="para">
						<span class="bold bold"><strong>Password : </strong></span>上のユーザー名に対するパスワードです(XenServerまたはKVM側で指定したもの)。
					</div></li><li class="listitem"><div class="para">
						Host Tags:(オプション)ホストを分類して保守を簡単にするために使用するラベルです。例としてクラウドのHAタグを設定できます(ha.tag をグローバル設定パラメーターに設定します)。もしこのホスト上で仮想マシンを「高可用性」機能を有効化したうえで利用したい場合、管理者ガイドの「HAホスト上での仮想マシンでのHAの有効化」を参照してください。
					</div></li></ul></div></li><li class="listitem"><div class="para">
				新しいクラスターでは、CloudStack により最初のプライマリストレージサーバーが自動的に追加されます。後でさらにサーバーを追加できます。プライマリストレージの概要については、<a class="xref" href="#about-primary-storage">「プライマリストレージについて」</a> を参照してください。
			</div><div class="para">
				最初のプライマリストレージサーバーを構成するには、次の項目を入力して［Next］をクリックします。
			</div><div class="itemizedlist"><ul><li class="listitem"><div class="para">
						<span class="bold bold"><strong> Name : </strong></span>ストレージデバイスの名前です。
					</div></li><li class="listitem"><div class="para">
						<span class="bold bold"><strong>Protocol :</strong></span> XenServer の場合は、[NFS]、[iSCSI]、または[PreSetup]を選択します。KVM の場合は、[NFS]、[SharedMountPoint]、[CLVM]または[RBD]を選択します。vSphere の場合は、[VMFS](iSCSI またはファイバーチャネル)または [NFS]を選択します。画面のそのほかのフィールドは、ここで選択したものにより異なります。
					</div><div class="informaltable"><table border="1"><colgroup><col align="left" class="c1" width="50%" /><col align="left" class="c2" width="50%" /></colgroup><tbody><tr><td align="left">
										<div class="para">
											NFS
										</div>
									</td><td align="left">
										<div class="itemizedlist"><ul><li class="listitem"><div class="para">
													<span class="bold bold"><strong> Server : </strong></span>ストレージデバイスの IP アドレスまたは DNS 名です。
												</div></li><li class="listitem"><div class="para">
													<span class="bold bold"><strong> Path : </strong></span> サーバーからエクスポートされたパスです。
												</div></li><li class="listitem"><div class="para">
													<span class="bold bold"><strong> Tags(オプション) : </strong></span> このストレージデバイス用のタグをコンマで区切って指定し ます。ディスクオファリングのタグと同等、またはそのスーパーセットである必要があります。
												</div></li></ul></div>
										 <div class="para">
											プライマリストレージのタグセットは、ゾーン内のクラスター間で同一である必要があります。たとえば、クラスターA でプライマリストレージのタグが T1 および T2 の場合は、同じゾーン内のほかのすべてのクラスターでもプライマリス トレージのタグを T1 および T2 にする必要があります。
										</div>

									</td></tr><tr><td align="left">
										<div class="para">
											iSCSI
										</div>
									</td><td align="left">
										<div class="itemizedlist"><ul><li class="listitem"><div class="para">
													<span class="bold bold"><strong> Server : </strong></span>ストレージデバイスの IP アドレスまたは DNS 名です。
												</div></li><li class="listitem"><div class="para">
													<span class="bold bold"><strong> Target IQN : </strong></span> ターゲットの IQN です。たとえば、「iqn.1986-03.com.sun:02:01ec9bb549-1271378984」とします。
												</div></li><li class="listitem"><div class="para">
													<span class="bold bold"><strong>LUN : </strong></span> LUN 番号です。たとえば、「3」とします。
												</div></li><li class="listitem"><div class="para">
													<span class="bold bold"><strong> Tags(オプション) : </strong></span> このストレージデバイス用のタグをコンマで区切って指定し ます。ディスクオファリングのタグと同等、またはそのスーパーセットである必要があります。
												</div></li></ul></div>
										 <div class="para">
											プライマリストレージのタグセットは、ゾーン内のクラスター間で同一である必要があります。たとえば、クラスターA でプライマリストレージのタグが T1 および T2 の場合は、同じゾーン内のほかのすべてのクラスターでもプライマリス トレージのタグを T1 および T2 にする必要があります。
										</div>

									</td></tr><tr><td align="left">
										<div class="para">
											事前セットアップ
										</div>
									</td><td align="left">
										<div class="itemizedlist"><ul><li class="listitem"><div class="para">
													<span class="bold bold"><strong> Server : </strong></span>ストレージデバイスの IP アドレスまたは DNS 名です。
												</div></li><li class="listitem"><div class="para">
													<span class="bold bold"><strong>SR Name-Label : </strong></span> CloudStack の外部にセットアップしたストレージリポジトリの名前ラベルを入力します。
												</div></li><li class="listitem"><div class="para">
													<span class="bold bold"><strong> Tags(オプション) : </strong></span> このストレージデバイス用のタグをコンマで区切って指定し ます。ディスクオファリングのタグと同等、またはそのスーパーセットである必要があります。
												</div></li></ul></div>
										 <div class="para">
											プライマリストレージのタグセットは、ゾーン内のクラスター間で同一である必要があります。たとえば、クラスターA でプライマリストレージのタグが T1 および T2 の場合は、同じゾーン内のほかのすべてのクラスターでもプライマリス トレージのタグを T1 および T2 にする必要があります。
										</div>

									</td></tr><tr><td align="left">
										<div class="para">
											共有マウントポイント
										</div>
									</td><td align="left">
										<div class="itemizedlist"><ul><li class="listitem"><div class="para">
													<span class="bold bold"><strong> Path : </strong></span> 各ホストのこのプライマリストレージがマウントされるパスです。たとえば、「/mnt/primary」とします。
												</div></li><li class="listitem"><div class="para">
													<span class="bold bold"><strong> Tags(オプション) : </strong></span> このストレージデバイス用のタグをコンマで区切って指定し ます。ディスクオファリングのタグと同等、またはそのスーパーセットである必要があります。
												</div></li></ul></div>
										 <div class="para">
											プライマリストレージのタグセットは、ゾーン内のクラスター間で同一である必要があります。たとえば、クラスターA でプライマリストレージのタグが T1 および T2 の場合は、同じゾーン内のほかのすべてのクラスターでもプライマリス トレージのタグを T1 および T2 にする必要があります。
										</div>

									</td></tr><tr><td align="left">
										<div class="para">
											VMFS
										</div>
									</td><td align="left">
										<div class="itemizedlist"><ul><li class="listitem"><div class="para">
													<span class="bold bold"><strong> Server : </strong></span> vCenter サーバーの IP アドレスまたは DNS 名です。
												</div></li><li class="listitem"><div class="para">
													<span class="bold bold"><strong> Path : </strong></span> データセンター名とデータストア名の組み合わせです。形式は、「/データセンター名/データストア名」です。たとえば、「/cloud.dc.VM/cluster1datastore」とします。
												</div></li><li class="listitem"><div class="para">
													<span class="bold bold"><strong> Tags(オプション) : </strong></span> このストレージデバイス用のタグをコンマで区切って指定し ます。ディスクオファリングのタグと同等、またはそのスーパーセットである必要があります。
												</div></li></ul></div>
										 <div class="para">
											プライマリストレージのタグセットは、ゾーン内のクラスター間で同一である必要があります。たとえば、クラスターA でプライマリストレージのタグが T1 および T2 の場合は、同じゾーン内のほかのすべてのクラスターでもプライマリス トレージのタグを T1 および T2 にする必要があります。
										</div>

									</td></tr></tbody></table></div></li></ul></div></li><li class="listitem"><div class="para">
				新しいゾーンでは、CloudStack により最初のセカンダリストレージサーバーが自動的に追加されます。セカンダリストレージの概要については、<a class="xref" href="#about-secondary-storage">「セカンダリストレージについて」</a> を参照してください。
			</div><div class="para">
				この画面に入力する前に、NFS 共有をセットアップして最新の CloudStack システム仮想マシンテンプレートをインストールし、セカンダリストレージを準備する必要があります。「セカンダリストレージの追加」を参照してください。
			</div><div class="itemizedlist"><ul><li class="listitem"><div class="para">
						<span class="bold bold"><strong>NFS Server.</strong></span> The IP address of the server or fully qualified domain name of the server.
					</div></li><li class="listitem"><div class="para">
						<span class="bold bold"><strong> Path : </strong></span> サーバーからエクスポートされたパスです。
					</div></li></ul></div></li><li class="listitem"><div class="para">
				[Launch] をクリックします。
			</div></li></ol></div></div></div><div xml:lang="ja-JP" class="section" id="pod-add" lang="ja-JP"><div class="titlepage"><div><div><h2 class="title" id="pod-add">7.4. ポッドの追加</h2></div></div></div><div class="para">
		新しいゾーンを作成すると、CloudStack により最初のポッドが自動的に追加されます。このセクションの手順に従って、 ポッドをいつでも追加できます。
	</div><div class="orderedlist"><ol><li class="listitem"><div class="para">
				CloudStack ユーザーインターフェイスにログインします。<a class="xref" href="#log-in">「UIへのログイン」</a> を参照してください。
			</div></li><li class="listitem"><div class="para">
				左側のナビゲーションバーで[Infrastructure]をクリックします。[Zones]で[View More]をクリックし、ポッドを追加するゾーンを選択します。
			</div></li><li class="listitem"><div class="para">
				[Compute and Storage]タブをクリックします。ダイアグラムの[Pods]ノードの[View All]をクリックします。
			</div></li><li class="listitem"><div class="para">
				[Add Pod]をクリックします。
			</div></li><li class="listitem"><div class="para">
				ダイアログボックスに次の詳細情報を入力します。
			</div><div class="itemizedlist"><ul><li class="listitem"><div class="para">
						<span class="bold bold"><strong>Name: </strong></span>ポッドの名前です。
					</div></li><li class="listitem"><div class="para">
						<span class="bold bold"><strong>Gateway: </strong></span>このポッド内のホストのゲートウェイです。
					</div></li><li class="listitem"><div class="para">
						<span class="bold bold"><strong>Netmask: </strong></span>ポッドのサブネットを定義するネットワークプレフィックスです。CIDR 表記を使用します。
					</div></li><li class="listitem"><div class="para">
						<span class="bold bold"><strong>Start Reserved System IPおよびEnd Reserved System IP: </strong></span>セカンダリストレージ仮想マシン、コンソールプロキシ仮想マシン、およびDHCPなどのさまざまなシステム仮想マシンを管理するために、CloudStack で使用する管理ネットワーク内のIPアドレスの範囲です。詳しくは、「システムにより予約済みのIPアドレス」を参照してください。
					</div></li></ul></div></li><li class="listitem"><div class="para">
				[OK]をクリックします。
			</div></li></ol></div></div><div xml:lang="ja-JP" class="section" id="cluster-add" lang="ja-JP"><div class="titlepage"><div><div><h2 class="title" id="cluster-add">7.5. クラスタの追加</h2></div></div></div><div class="para">
		CloudStack に管理対象のホストを認識させる必要があります。ホストはクラスター内にあるため、ホストをクラウドに追加するには少なくとも 1 つのクラスターを追加する必要があります。
	</div><div xml:lang="ja-JP" class="section" id="add-clusters-kvm-xenserver" lang="ja-JP"><div class="titlepage"><div><div><h3 class="title" id="add-clusters-kvm-xenserver">7.5.1. クラスターの追加:KVM または XenServer</h3></div></div></div><div class="para">
		次の手順は、ハイパーバイザーをホストにインストール済みで CloudStack ユーザーインターフェイスにログイン済みであることを前提としています。
	</div><div class="orderedlist"><ol><li class="listitem"><div class="para">
				左側のナビゲーションバーで[Infrastructure]をクリックします。[Zones]で[View More]をクリックし、クラスターを追加するゾーンを選択します。
			</div></li><li class="listitem"><div class="para">
				[Compute] タブをクリックします。
			</div></li><li class="listitem"><div class="para">
				ダイアグラムの[Clusters]ノードの[View All]をクリックします。
			</div></li><li class="listitem"><div class="para">
				[Add Cluster]をクリックします。
			</div></li><li class="listitem"><div class="para">
				このクラスターのハイパーバイザーの種類を選択します。
			</div></li><li class="listitem"><div class="para">
				クラスターを作成するポッドを選択します。
			</div></li><li class="listitem"><div class="para">
				クラスターの名前を入力します。任意の、CloudStack で使用されていないテキストを指定します。
			</div></li><li class="listitem"><div class="para">
				[OK]をクリックします。
			</div></li></ol></div></div><div xml:lang="ja-JP" class="section" id="add-clusters-vsphere" lang="ja-JP"><div class="titlepage"><div><div><h3 class="title" id="add-clusters-vsphere">7.5.2. クラスターの追加:vSphere</h3></div></div></div><div class="para">
		vSphere のホスト管理は、vCenter および CloudStack の管理者ユーザーインターフェイスを組み合わせて行います。CloudStack では、すべてのホストが CloudStack クラスターにあることが必要ですが、クラスターを単一のホストで構成することもできます。管理者はクラスターに 1 台のホストを使用するか、複数のホストを使用するかを決定する必要があります。 複数ホストのクラスターでは、ライブマイグレーションのような機能を使用できます。クラスターには、NFS または iSCSI のような共有ストレージも必要です。
	</div><div class="para">
		vSphere サーバーの場合は、vCenter でホストのクラスターを作成した後、クラスター全体を CloudStack に追加することをお勧めします。次の要件に従ってください。
	</div><div class="itemizedlist"><ul><li class="listitem"><div class="para">
				vSphere クラスターに配置するホストは 8 台までにしてください。
			</div></li><li class="listitem"><div class="para">
				ハイパーバイザーホストに実行中の仮想マシンがないことを確認してから、CloudStack に追加してください。
			</div></li></ul></div><div class="para">
		vSphere クラスターを CloudStack に追加するには
	</div><div class="orderedlist"><ol><li class="listitem"><div class="para">
				vCenter でホストのクラスターを作成します。vCenter の指示に従って、これを実行します。クラスターを作成すると、 vCenter には次のように表示されます。
			</div><div class="mediaobject"><img src="./images/vsphere-client.png" width="444" alt="vsphereclient.png: vSphere client" /></div></li><li class="listitem"><div class="para">
				ユーザーインターフェイスにログインします。
			</div></li><li class="listitem"><div class="para">
				左側のナビゲーションバーで[Infrastructure]をクリックします。[Zones]で[View More]をクリックし、クラスターを追加するゾーンを選択します。
			</div></li><li class="listitem"><div class="para">
				[Compute]タブをクリックし、[Pods]の[View All]をクリックします。クラスターを追加するポッドを選択します。
			</div></li><li class="listitem"><div class="para">
				[View Clusters]をクリックします。
			</div></li><li class="listitem"><div class="para">
				[Add Cluster]をクリックします。
			</div></li><li class="listitem"><div class="para">
				[Hypervisor]ボックスの一覧で、[VMware]を選択します。
			</div></li><li class="listitem"><div class="para">
				ダイアログボックスに次の情報を入力します。次のフィールドによって、vCenter 側の値を参照できるようになりま す。
			</div><div class="itemizedlist"><ul><li class="listitem"><div class="para">
						Cluster Name: vCenter で作成したクラスターの名前を入力します。たとえば、「cloud.cluster.2.2.1」とします。
					</div></li><li class="listitem"><div class="para">
						vCenter Host: vCenter サーバーのホスト名または IP アドレスを入力します。
					</div></li><li class="listitem"><div class="para">
						vCenter Username: CloudStack が vCenter への接続に使用するユーザー名を入力します。このユーザーにはすべての管理特権が必要です。
					</div></li><li class="listitem"><div class="para">
						vCenter Password: 上記のユーザー名に対するパスワードを入力します。
					</div></li><li class="listitem"><div class="para">
						vCenter Datacenter: クラスターが存在する vCenter データセンターを入力します。たとえば、「cloud.dc.VM」とします。
					</div></li><li class="listitem"><div class="mediaobject"><img src="./images/add-cluster.png" alt="addcluster.png: add cluster" /></div><div class="para">
						クラスターがプロビジョニングされる間、多少の遅延が発生する場合があります。ユーザーインターフェイスにクラスターが自動的に表示されます。
					</div></li></ul></div></li></ol></div></div></div><div xml:lang="ja-JP" class="section" id="host-add" lang="ja-JP"><div class="titlepage"><div><div><h2 class="title" id="host-add">7.6. ホストの追加</h2></div></div></div><div class="orderedlist"><ol><li class="listitem"><div class="para">
				CloudStack 構成としてホストを追加する前に選択したハイパーバイザーをホストにインストールする必要があります。CloudStack ホストを様々なハイパーバイザー下で動作する仮想マシンとともに管理することができます。
			</div><div class="para">
				CloudStack インストールガイドではそれぞれのサポートされるハイパーバイザーを CloudStack からどのように利用するかインストール方法や設定方法を提供しています。どのバージョンのハイパーバイザーがサポートされているか「インストールガイドの」適切なセクションを参照することは CloudStack でハイパーバイザーホストを構成するための重要なステップになります。
			</div><div class="warning"><div class="admonition_header"><h2>警告</h2></div><div class="admonition"><div class="para">
					それぞれのハイパーバイザーに対して「ハイパーバイザーのインストール」で述べられる CloudStack 特有の構成手順を確認してください。
				</div></div></div></li><li class="listitem"><div class="para">
				CloudStack に対しホストを追加します。関連する技術情報は利用するハイパーバイザーによって異なります。
			</div><div class="itemizedlist"><ul><li class="listitem"><div class="para">
						<a class="xref" href="#host-add-xenserver-kvm-ovm">「ホストの追加(XenServer または KVM)」</a>
					</div></li><li class="listitem"><div class="para">
						<a class="xref" href="#host-add-vsphere">「ホストの追加 (vSphere)」</a>
					</div></li></ul></div></li></ol></div><div xml:lang="ja-JP" class="section" id="host-add-xenserver-kvm-ovm" lang="ja-JP"><div class="titlepage"><div><div><h3 class="title" id="host-add-xenserver-kvm-ovm">7.6.1. ホストの追加(XenServer または KVM)</h3></div></div></div><div class="para">
		XenServer および KVM のホストは、いつでもクラスターに追加できます。
	</div><div class="section"><div class="titlepage"><div><div><h4 class="title" id="idm317368">7.6.1.1. XenServer および KVM ホストの要件</h4></div></div></div><div class="warning"><div class="admonition_header"><h2>警告</h2></div><div class="admonition"><div class="para">
				￼ハイパーバイザーホストに実行中の仮想マ シンがないことを確認してから、CloudStack に追加してください。
			</div></div></div><div class="para">
			構成要件
		</div><div class="itemizedlist"><ul><li class="listitem"><div class="para">
					各クラスターには同一のハイパーバイザーを使用するホストのみを含める必要があります。
				</div></li><li class="listitem"><div class="para">
					XenServer の場合は、クラスターに配置するホストは 8 台までにしてください。
				</div></li><li class="listitem"><div class="para">
					KVM の場合は、クラスターに配置するホストは 16 台までにしてください。
				</div></li></ul></div><div class="para">
			ハードウェア要件については、CloudStack インストールガイドのハイパーバイザー毎のインストールセクションを参照してください。
		</div><div class="section"><div class="titlepage"><div><div><h5 class="title" id="idp18851272">7.6.1.1.1. XenServer ホストの追加要件</h5></div></div></div><div class="para">
				ネットワークボンディングを使用する場合は、管理者はホストの配線を、クラスター内のほかのホストと完全に同じにする必要があります。
			</div><div class="para">
				クラスターに追加するすべてのホストに対して次のコマンドを実行します。これで、ホストが XenServer プールのマスターに加わります。
			</div><pre class="programlisting"># xe pool-join master-address=[master IP] master-username=root master-password=[your password]</pre><div class="note"><div class="admonition_header"><h2>注記</h2></div><div class="admonition"><div class="para">
					￼コマンドをコピーして実行するときは、単一の行として貼り付けたことを確認してください。一部のドキュメントビューアーでは、コピーしたテキストに不要な改行が含まれる可能性があります。
				</div></div></div><div class="para">
				XenServer プールにすべてのホストを追加したら、cloud-setup-bond スクリプトを実行します。このスクリプトにより、クラスター内の新しいホストのボンドの構成とセットアップを完了します。
			</div><div class="orderedlist"><ol><li class="listitem"><div class="para">
						/usr/lib64/cloud/common/scripts/vm/hypervisor/xenserver/cloud-setup-bonding.sh スクリプトを管理サーバーから マスターホストにコピーし、スクリプトが実行可能であることを確認します。
					</div></li><li class="listitem"><div class="para">
						次のスクリプトを実行します。
					</div><pre class="programlisting"># ./cloud-setup-bonding.sh</pre></li></ol></div></div><div class="section"><div class="titlepage"><div><div><h5 class="title" id="idp19522800">7.6.1.1.2. KVM ホストの追加要件</h5></div></div></div><div class="itemizedlist"><ul><li class="listitem"><div class="para">
						共有マウントポイントストレージを使用する場合は、管理者は新しいホストのすべてのマウントポイントを(マウントされたストレージも含めて)、クラスター内のほかのホストと完全に同じにする必要があります。
					</div></li><li class="listitem"><div class="para">
						新しいホストのネットワーク構成(ゲスト、プライベート、およびパブリックネットワーク)が、クラスター内のほかのホ ストと同じであることを確認してください。
					</div></li><li class="listitem"><div class="para">
						OpenVswitch のブリッジを利用している場合は CloudStack にホストを追加するまえに KVM ホストの agent.properties を編集し <span class="italic italic">network.bridge.type</span> パラメーターを <span class="italic italic">openvswitch</span> に設定してください。
					</div></li></ul></div></div></div><div class="section"><div class="titlepage"><div><div><h4 class="title" id="idm3310944">7.6.1.2. XenServer または KVM ホストの追加</h4></div></div></div><div class="itemizedlist"><ul><li class="listitem"><div class="para">
					ホストにハイパーバイザーソフトウェアをまだインストールしていない場合はインストールします。CloudStack がサポートするハイパーバイザーソフトウェアのバージョン、およびホストを CloudStack と連動させるために必要な追加構成を確認しておく必要があります。このインストールの詳細については、CloudStack インストールガイドからハイパーバイザー毎の適切なセクションを参照してください。
				</div></li><li class="listitem"><div class="para">
					CloudStackユーザーインターフェイスに管理者としてログオンします。
				</div></li><li class="listitem"><div class="para">
					左側のナビゲーションバーで[Infrastructure]をクリックします。[Zones]で[View More]をクリックし、ホストを追加するゾーンを選択します。
				</div></li><li class="listitem"><div class="para">
					[Compute]タブをクリックします。[Clusters]ノードの[View All]をクリックします。
				</div></li><li class="listitem"><div class="para">
					ホストを追加するクラスターを選択します。
				</div></li><li class="listitem"><div class="para">
					[View Hosts]をクリックします。
				</div></li><li class="listitem"><div class="para">
					[Add Host]をクリックします。
				</div></li><li class="listitem"><div class="para">
					次の情報を指定します。
				</div><div class="itemizedlist"><ul><li class="listitem"><div class="para">
							Host Name: ホストの DNS 名または IP アドレスです。
						</div></li><li class="listitem"><div class="para">
							Username: 通常は root です。
						</div></li><li class="listitem"><div class="para">
							Password: XenServer または KVM 側で指定した、上のユーザー名に対するパスワードです。
						</div></li><li class="listitem"><div class="para">
							Host Tags(オプション): ホストを分類して保守を簡単にするために使用するラベルです。たとえばホストに対し仮想マシンの高可用機能を有効化した場合、クラウドの HA タグ(グローバル設定で ha.tag に設定したパラメーター)を設定することができます。詳細な情報は 「仮想マシンでの高可用性の有効化」や「ホストの高可用性」を参照してください。
						</div></li></ul></div><div class="para">
					ホストがプロビジョニングされる間、多少の遅延が発生する場合があります。ユーザーインターフェイスにホストが自動的に表示されます。
				</div></li><li class="listitem"><div class="para">
					追加のホストについて、この手順を繰り返します。
				</div></li></ul></div></div></div><div xml:lang="ja-JP" class="section" id="host-add-vsphere" lang="ja-JP"><div class="titlepage"><div><div><h3 class="title" id="host-add-vsphere">7.6.2. ホストの追加 (vSphere)</h3></div></div></div><div class="para">
		vSphereサーバーに対してはvCenterでクラスターを作成し、クラスター全体をCloudStack に対し追加することを推奨します。詳しくはクラスターの追加(vSphere)を参照してください。
	</div></div></div><div xml:lang="ja-JP" class="section" id="primary-storage-add" lang="ja-JP"><div class="titlepage"><div><div><h2 class="title" id="primary-storage-add">7.7. プライマリストレージの追加</h2></div></div></div><div class="section" id="sys-require-primary-storage"><div class="titlepage"><div><div><h3 class="title" id="sys-require-primary-storage">7.7.1. プライマリストレージのシステム要件</h3></div></div></div><div class="para">
			ハードウェア要件:
		</div><div class="itemizedlist"><ul><li class="listitem"><div class="para">
					基になるハイパーバイザーでサポートされている標準準拠の任意の iSCSI または NFS サーバー。
				</div></li><li class="listitem"><div class="para">
					ストレージサーバーは、多数のディスクを備えたコンピューターである必要があります。ディスクは、ハードウェア RAID コントローラーで管理するのが理想的です。
				</div></li><li class="listitem"><div class="para">
					最小限必要な容量はニーズにより異なります。
				</div></li></ul></div><div class="para">
			プライマリストレージをセットアップするときには次の制限に従ってください。
		</div><div class="itemizedlist"><ul><li class="listitem"><div class="para">
					プライマリストレージは、ホストをクラスターに追加しなくては追加できません。
				</div></li><li class="listitem"><div class="para">
					共有プライマリストレージを準備しない場合は、グローバル構成パラメーターの system.vm.local.storage.required を true に設定する必要があります。設定しないと仮想マシンを起動できません。
				</div></li></ul></div></div><div class="section" id="adding-primary-storage"><div class="titlepage"><div><div><h3 class="title" id="adding-primary-storage">7.7.2. プライマリストレージの追加</h3></div></div></div><div class="para">
			新しいゾーンを作成するとき、手順の一部として最初のプライマリスト レージが追加されます。プライマリストレージサーバーは、新しいクラスターを追加するときや既存のクラスターにサーバーを追加するときなど、いつでも追加できます。
		</div><div class="warning"><div class="admonition_header"><h2>警告</h2></div><div class="admonition"><div class="para">
				サーバーに何も格納されていないことを確認 してください。CloudStack にサーバーを追加すると、既存のデータはすべて破棄されます。
			</div></div></div><div class="orderedlist"><ol><li class="listitem"><div class="para">
					CloudStack ユーザーインターフェイスにログインします(<a class="xref" href="#log-in">「UIへのログイン」</a> を参照)。
				</div></li><li class="listitem"><div class="para">
					左側のナビゲーションバーで [Infrastructure] をクリックします。[Zones] で [View More] をクリックし、プライマリストレージを追加するゾーンを選択します。
				</div></li><li class="listitem"><div class="para">
					[Compute] タブをクリックします。
				</div></li><li class="listitem"><div class="para">
					ダイアグラムの [Primary Storage] ノードの [View All] をクリックします。
				</div></li><li class="listitem"><div class="para">
					[Add Primary Storage] をクリックします。
				</div></li><li class="listitem"><div class="para">
					ダイアログボックスに次の情報を入力します。必要な情報は、選択するプロトコルによって異なります。
				</div><div class="itemizedlist"><ul><li class="listitem"><div class="para">
							<span class="bold bold"><strong>Pod: </strong></span>ストレージデバイスのポッドです。
						</div></li><li class="listitem"><div class="para">
							<span class="bold bold"><strong>Cluster: </strong></span>ストレージデバイスのクラスターです。
						</div></li><li class="listitem"><div class="para">
							<span class="bold bold"><strong> Name : </strong></span>ストレージデバイスの名前です。
						</div></li><li class="listitem"><div class="para">
							<span class="bold bold"><strong>Protocol: </strong></span>XenServer の場合は、[NFS]、[iSCSI]、または[PreSetup]を選択します。KVM の場合は、[NFS]ま たは[SharedMountPoint]を選択します。vSphere の場合は、[VMFS](iSCSI またはファイバーチャネル)または [NFS]を選択します。
						</div></li><li class="listitem"><div class="para">
							<span class="bold bold"><strong>Server(NFS、iSCSI、または PreSetup の場合): </strong></span>ストレージデバイスの IP アドレスまたは DNS 名です。
						</div></li><li class="listitem"><div class="para">
							<span class="bold bold"><strong>Server(VMFS の場合): </strong></span>vCenter サーバーの IP アドレスまたは DNS 名です。
						</div></li><li class="listitem"><div class="para">
							<span class="bold bold"><strong>Path(NFS の場合): </strong></span>NFS の場合、これはサーバーからエクスポートされたパスです。
						</div></li><li class="listitem"><div class="para">
							<span class="bold bold"><strong>Path(VMFS の場合): </strong></span>vSphere の場合、データセンター名とデータストア名の組み合わせです。形式は、「/データセンター名/データストア名」です。たとえば、「/cloud.dc.VM/cluster1datastore」とします。
						</div></li><li class="listitem"><div class="para">
							<span class="bold bold"><strong>Path(SharedMountPoint の場合): </strong></span>KVM の場合、各ホストのこのプライマリストレージがマウントされるパスです。 たとえば、「/mnt/primary」とします。
						</div></li><li class="listitem"><div class="para">
							<span class="bold bold"><strong>SR Name-Label(PreSetup の場合): </strong></span>CloudStack の外部にセットアップしたストレージリポジトリの名前ラベルを入力します。
						</div></li><li class="listitem"><div class="para">
							<span class="bold bold"><strong>Target IQN(iSCSI の場合): </strong></span>iSCSI の場合、ターゲットの IQN です。たとえば、 「iqn.1986-03.com.sun:02:01ec9bb549-1271378984」とします。
						</div></li><li class="listitem"><div class="para">
							<span class="bold bold"><strong>Lun 番号(iSCSI の場合): </strong></span>iSCSI の場合、LUN 番号です。たとえば、「3」とします。
						</div></li><li class="listitem"><div class="para">
							<span class="bold bold"><strong>Tags(オプション): </strong></span>このストレージデバイス用のタグをコンマで区切って指定します。ディスクオファリングのタグ\nと同等、またはそのスーパーセットである必要があります。
						</div></li></ul></div><div class="para">
					プライマリストレージのタグセットは、ゾーン内のクラスター間で同一である必要があります。たとえば、クラスターA でプライマリストレージのタグが T1 および T2 の場合は、同じゾーン内のほかのすべてのクラスターでもプライマリス トレージのタグを T1 および T2 にする必要があります。
				</div></li><li class="listitem"><div class="para">
					[OK]をクリックします。
				</div></li></ol></div></div></div><div xml:lang="ja-JP" class="section" id="secondary-storage-add" lang="ja-JP"><div class="titlepage"><div><div><h2 class="title" id="secondary-storage-add">7.8. セカンダリストレージの追加</h2></div></div></div><div class="section" id="sys-require-secondary-storage"><div class="titlepage"><div><div><h3 class="title" id="sys-require-secondary-storage">7.8.1. セカンダリストレージのシステム要件</h3></div></div></div><div class="itemizedlist"><ul><li class="listitem"><div class="para">
					NFS ストレージアプライアンスまたは Linux NFS サーバー
				</div></li><li class="listitem"><div class="para">
					(オプション)OpenStack Object Storage(Swift) (http://swift.openstack.org を参照してください)
				</div></li><li class="listitem"><div class="para">
					最小容量として 100GB
				</div></li><li class="listitem"><div class="para">
					セカンダリストレージデバイスは、そのストレージを使用するゲスト仮想マシンと同じゾーンに配置する必要があります。
				</div></li><li class="listitem"><div class="para">
					各セカンダリストレージサーバーは、ゾーン内のすべてのホストで使用できる必要があります。
				</div></li></ul></div></div><div class="section" id="adding-secondary-storage"><div class="titlepage"><div><div><h3 class="title" id="adding-secondary-storage">7.8.2. セカンダリストレージの追加</h3></div></div></div><div class="para">
			新しいゾーンを作成するとき、手順の一部として最初のセカンダリス トレージが追加されます。いつでもセカンダリストレージサーバーを 追加して、既存のゾーンにサーバーを追加することができます。
		</div><div class="warning"><div class="admonition_header"><h2>警告</h2></div><div class="admonition"><div class="para">
				サーバーに何も格納されていないことを確認 してください。CloudStack にサーバーを追加すると、既存のデータはすべて破棄されます。
			</div></div></div><div class="orderedlist"><ol><li class="listitem"><div class="para">
					クラウド全体のセカンダリストレージとして Swift を使用する場合は、ゾーンに対してローカルなセカンダリストレージサーバーを追加する前に、CloudStack に Swift ストレージを追加する必要があります。「ゾーンの追加」を参照してくだ さい。
				</div></li><li class="listitem"><div class="para">
					ゾーンに対してローカルなセカンダリストレージの準備のため、管理サーバーのインストール中に NFS 共有を作成しマウントしておく必要があります。 <span>インストールガイドの「NFS 共有の準備」</span> を参照してください。
				</div></li><li class="listitem"><div class="para">
					管理サーバーのインストール中にシステム仮想マシンテンプレートを準備したことを確認します。<span>インストールガイドの「システム仮想マシンテンプレートの準備」</span> を参照してください。
				</div></li><li class="listitem"><div class="para">
					これでゾーン単位のストレージとしてセカンダリストレージサーバーの準備ができたので、CloudStack に追加します。 新しいゾーンの追加手順の一部として、セカンダリストレージが追加されます。<a class="xref" href="#zone-add">「ゾーンの追加」</a> を参照してください。
				</div></li></ol></div></div></div><div xml:lang="ja-JP" class="section" id="initialize-and-test" lang="ja-JP"><div class="titlepage"><div><div><h2 class="title" id="initialize-and-test">7.9. 初期化とテスト</h2></div></div></div><div class="para">
		すべての構成が終わると、CloudStack が初期化されます。ネットワークの速度によっては、30 分以上かかる可能性があります。初期化が正常に完了すると、管理者のダッシュボードが CloudStack ユーザーインターフェイスに表示されます。
	</div><div class="orderedlist"><ol><li class="listitem"><div class="para">
				システムが準備完了状態であることを確認します。左側のナビゲーションバーで[Templates]をクリックします。 CentOS 5.5(64bit) no Gui(KVM)を選択します。状態が「Download Complete」であることを確認します。この状態になるまで、次の手順には進まないでください。
			</div></li><li class="listitem"><div class="para">
				[Instances]タブで、[Filter By]ボックスの一覧で[My Instances]を選択します。
			</div></li><li class="listitem"><div class="para">
				[Add Instance]をクリックして、ウィザードの指示に従います。
			</div><div class="orderedlist"><ol class="loweralpha"><li class="listitem"><div class="para">
						追加したばかりのゾーンを選択します。
					</div></li><li class="listitem"><div class="para">
						仮想マシンで使用するテンプレートを選択します。これが新規インストールの場合は、おそらく組み込みの CentOS テンプレートのみを使用できます。
					</div></li><li class="listitem"><div class="para">
						サービスオファリングを選択します。使用するハードウェアで、選択したサービスオファリングを開始できることを確認してください。
					</div></li><li class="listitem"><div class="para">
						必要に応じて、データディスクオファリングにもう 1 つデータディスクを追加します。これはゲストが使用できる 2 番目のボリュームですが、マウントはされません。たとえば、XenServer 上の Linux では、仮想マシンの再起動 後にゲストで/dev/xvdb が認識されます。PV が有効なオペレーティングシステムカーネルの場合は再起動が不 要です。
					</div></li><li class="listitem"><div class="para">
						デフォルトネットワークで、ゲストのプライマリネットワークを選択します。基本インストールでは、このオプションは 1 つしかありません。
					</div></li><li class="listitem"><div class="para">
						オプションで、仮想マシンに名前を付けてグループを割り当てます。仮想マシンを説明するお好みのテキストを使用します。
					</div></li><li class="listitem"><div class="para">
						Click Launch VM. Your VM will be created and started. It might take some time to download the template and complete the VM startup. You can watch the VMâ€™s progress in the Instances screen.
					</div></li></ol></div></li><li class="listitem"><div class="para">
				仮想マシンを使用するには[View Console]をクリックします。 
				<span class="inlinemediaobject"><img src="./images/console-icon.png" alt="ConsoleButton.png: button to launch a console" /></span>
			</div><div class="para">
				For more information about using VMs, including instructions for how to allow incoming network traffic to the VM, start, stop, and delete VMs, and move a VM from one host to another, see Working With Virtual Machines in the Administratorâ€™s Guide.
			</div></li></ol></div><div class="para">
		これで、CloudStack のインストールが完了しました。
	</div><div class="para">
		展開を拡張する場合は、さらにホスト、プライマリストレージ、ゾーン、ポッド、およびクラスターを追加できます。
	</div></div></div><div xml:lang="ja-JP" class="chapter" id="offerings" lang="ja-JP"><div class="titlepage"><div><div><h2 class="title">第8章 サービスオファリング</h2></div></div></div><div class="toc"><dl><dt><span class="section"><a href="#compute-disk-service-offerings">8.1. Compute and Disk Service Offerings</a></span></dt><dd><dl><dt><span class="section"><a href="#creating-compute-offerings">8.1.1. 新しいコンピューティングオファリングの作成</a></span></dt><dt><span class="section"><a href="#creating-disk-offerings">8.1.2. ディスクオファリングの作成</a></span></dt><dt><span class="section"><a href="#modify-delete-service-offerings">8.1.3. Modifying or Deleting a Service Offering</a></span></dt></dl></dd><dt><span class="section"><a href="#system-service-offerings">8.2. System Service Offerings</a></span></dt><dd><dl><dt><span class="section"><a href="#creating-system-service-offerings">8.2.1. Creating a New System Service Offering</a></span></dt></dl></dd><dt><span class="section"><a href="#network-rate">8.3. Network Throttling</a></span></dt><dt><span class="section"><a href="#sys-offering-sysvm">8.4. Changing the Default System Offering for System VMs</a></span></dt></dl></div><div class="para">
		この章ではコンピュート、ディスク、システムサービスオファリングについて述べています。ネットワークオファリングに関してはユーザー向けの「ネットワークの設定」にて述べられています。
	</div><div xml:lang="ja-JP" class="section" id="compute-disk-service-offerings" lang="ja-JP"><div class="titlepage"><div><div><h2 class="title" id="compute-disk-service-offerings">8.1. Compute and Disk Service Offerings</h2></div></div></div><div class="para">
		A service offering is a set of virtual hardware features such as CPU core count and speed, memory, and disk size. The CloudStack administrator can set up various offerings, and then end users choose from the available offerings when they create a new VM. A service offering includes the following elements:
	</div><div class="itemizedlist"><ul><li class="listitem"><div class="para">
				CPU, memory, and network resource guarantees
			</div></li><li class="listitem"><div class="para">
				How resources are metered
			</div></li><li class="listitem"><div class="para">
				How the resource usage is charged
			</div></li><li class="listitem"><div class="para">
				How often the charges are generated
			</div></li></ul></div><div class="para">
		For example, one service offering might allow users to create a virtual machine instance that is equivalent to a 1 GHz Intel® Core™ 2 CPU, with 1 GB memory at $0.20/hour, with network traffic metered at $0.10/GB. Based on the user’s selected offering, CloudStack emits usage records that can be integrated with billing systems. CloudStack separates service offerings into compute offerings and disk offerings. The computing service offering specifies:
	</div><div class="itemizedlist"><ul><li class="listitem"><div class="para">
				Guest CPU
			</div></li><li class="listitem"><div class="para">
				Guest RAM
			</div></li><li class="listitem"><div class="para">
				Guest Networking type (virtual or direct)
			</div></li><li class="listitem"><div class="para">
				Tags on the root disk
			</div></li></ul></div><div class="para">
		The disk offering specifies:
	</div><div class="itemizedlist"><ul><li class="listitem"><div class="para">
				Disk size (optional). An offering without a disk size will allow users to pick their own
			</div></li><li class="listitem"><div class="para">
				Tags on the data disk
			</div></li></ul></div><div xml:lang="ja-JP" class="section" id="creating-compute-offerings" lang="ja-JP"><div class="titlepage"><div><div><h3 class="title" id="creating-compute-offerings">8.1.1. 新しいコンピューティングオファリングの作成</h3></div></div></div><div class="para">
		新しいコンピューティングオファリングを作成するには
	</div><div class="orderedlist"><ol><li class="listitem"><div class="para">
				CloudStack ユーザーインターフェイスに管理者特権でログインします。
			</div></li><li class="listitem"><div class="para">
				左側のナビゲーションバーで[Service Offerings]をクリックします。
			</div></li><li class="listitem"><div class="para">
				[Select Offering]ボックスの一覧で[Compute Offering]を選択します。
			</div></li><li class="listitem"><div class="para">
				[Add Compute Offering]をクリックします。
			</div></li><li class="listitem"><div class="para">
				ダイアログボックスで次の選択を行います。
			</div><div class="itemizedlist"><ul><li class="listitem"><div class="para">
						<span class="bold bold"><strong>Name: </strong></span>サービスオファリングに指定する名前です。
					</div></li><li class="listitem"><div class="para">
						<span class="bold bold"><strong>Description: </strong></span>ユーザーに表示される、オファリングの短い説明です。
					</div></li><li class="listitem"><div class="para">
						<span class="bold bold"><strong>Storage type: </strong></span>ゲストに割り当てるディスクの種類です。[Local]を選択すると、ハイパーバイザーホストに直接アタッチされているストレージから割り当てます。[Shared]を選択すると、NFS 経由でアクセスできるストレージ から割り当てます。
					</div></li><li class="listitem"><div class="para">
						<span class="bold bold"><strong># of CPU cores: </strong></span>このオファリングを使用するインスタンスに割り当てるコアの数です。
					</div></li><li class="listitem"><div class="para">
						<span class="bold bold"><strong>CPU(in MHz): </strong></span>インスタンスに割り当てるコアの CPU 速度です。たとえば、2GHz クロックを提供する場合は\n「2000」と指定します。
					</div></li><li class="listitem"><div class="para">
						<span class="bold bold"><strong>Memory(in MB): </strong></span>インスタンスに割り当てるメモリの量(メガバイト単位)です。たとえば、2GB の RAM を提供す る場合は「2048」と指定します。
					</div></li><li class="listitem"><div class="para">
						<span class="bold bold"><strong>Network Rate: </strong></span>1 秒間に許可される MB 単位のデータ転送速度です。
					</div></li><li class="listitem"><div class="para">
						<span class="bold bold"><strong>Offer HA: </strong></span>オンにする場合は、ユーザーは監視対象であり可能な限り可用性の高い仮想マシンを選択できます。
					</div></li><li class="listitem"><div class="para">
						<span class="bold bold"><strong>Storage Tags: </strong></span>このディスクのプライマリストレージに関連付けるタグです。
					</div></li><li class="listitem"><div class="para">
						<span class="bold bold"><strong>Host Tags: </strong></span>(オプション)ホストの整理に使用するタグです。
					</div></li><li class="listitem"><div class="para">
						<span class="bold bold"><strong>CPU cap: </strong></span>使用率に余裕があっても、CPU 使用率に制限を設けるどうかを指定します。
					</div></li><li class="listitem"><div class="para">
						<span class="bold bold"><strong>Public: </strong></span>サービスオファリングを使用できるドメインが、すべてのドメインか一部のドメインのみかを示します。オ ンの場合は、すべてのドメインで使用できるようになります。オフの場合は、対象がサブドメインに制限されます。 サブドメインをボックスの一覧から選択します。
					</div></li></ul></div></li><li class="listitem"><div class="para">
				[Add]をクリックします。
			</div></li></ol></div></div><div xml:lang="ja-JP" class="section" id="creating-disk-offerings" lang="ja-JP"><div class="titlepage"><div><div><h3 class="title" id="creating-disk-offerings">8.1.2. ディスクオファリングの作成</h3></div></div></div><div class="para">
		システムサービスオファリングを作成します。
	</div><div class="orderedlist"><ol><li class="listitem"><div class="para">
				CloudStack ユーザーインターフェイスに管理者としてログインします。
			</div></li><li class="listitem"><div class="para">
				[Service Offerings]をクリックします。
			</div></li><li class="listitem"><div class="para">
				[Select Offering]ボックスの一覧で[Disk Offerings]を選択します。
			</div></li><li class="listitem"><div class="para">
				[Add Disk Offering]をクリックします。
			</div></li><li class="listitem"><div class="para">
				ダイアログボックスで次の選択を行います。
			</div><div class="itemizedlist"><ul><li class="listitem"><div class="para">
						Name: システムオファリングに指定する名前です。
					</div></li><li class="listitem"><div class="para">
						Description: ユーザーに表示される、オファリングの短い説明です。
					</div></li><li class="listitem"><div class="para">
						Custom Disk Size: オンにした場合は、ユーザーは独自のディスクサイズを設定できます。オフにした場合は、 ルート管理者が[Disk Size]ボックスに値を定義する必要があります。
					</div></li><li class="listitem"><div class="para">
						Disk Size: [Custom Disk Size]チェックボックスがオフの場合にのみ表示されます。ボリュームサイズを GB 単位 で定義します。
					</div></li><li class="listitem"><div class="para">
						Storage Tags(オプション): このディスクのプライマリストレージに関連付けるタグです。タグはストレージの属性をコンマで区切った一覧です。たとえば「ssd,blue」です。タグはプライマリストレージにも追加されます。 CloudStack により、ディスクオファリングのタグとストレージのタグが照合されます。ボリュームを準備するために、ディスクオファリングにタグが存在する場合は、そのタグはプライマリストレージにも存在する必要があります。そのようなプライマリストレージが存在しない場合は、このディスクオファリングからの割り当てに失敗します。
					</div></li><li class="listitem"><div class="para">
						Public: オファリングを使用できるドメインが、すべてのドメインか一部のドメインのみかを示します。オンの場合は、すべてのドメインで使用できるようになります。オフの場合は、対象がサブドメインに制限されます。CloudStack がサブドメイン名を表示するので対象となるサブドメインをボックスの一覧から選択します。
					</div></li></ul></div></li><li class="listitem"><div class="para">
				[Add]をクリックします。
			</div></li></ol></div></div><div xml:lang="ja-JP" class="section" id="modify-delete-service-offerings" lang="ja-JP"><div class="titlepage"><div><div><h3 class="title" id="modify-delete-service-offerings">8.1.3. Modifying or Deleting a Service Offering</h3></div></div></div><div class="para">
		Service offerings cannot be changed once created. This applies to both compute offerings and disk offerings.
	</div><div class="para">
		A service offering can be deleted. If it is no longer in use, it is deleted immediately and permanently. If the service offering is still in use, it will remain in the database until all the virtual machines referencing it have been deleted. After deletion by the administrator, a service offering will not be available to end users that are creating new instances.
	</div></div></div><div xml:lang="ja-JP" class="section" id="system-service-offerings" lang="ja-JP"><div class="titlepage"><div><div><h2 class="title" id="system-service-offerings">8.2. System Service Offerings</h2></div></div></div><div class="para">
		System service offerings provide a choice of CPU speed, number of CPUs, tags, and RAM size, just as other service offerings do. But rather than being used for virtual machine instances and exposed to users, system service offerings are used to change the default properties of virtual routers, console proxies, and other system VMs. System service offerings are visible only to the CloudStack root administrator. CloudStack provides default system service offerings. The CloudStack root administrator can create additional custom system service offerings.
	</div><div class="para">
		When CloudStack creates a virtual router for a guest network, it uses default settings which are defined in the system service offering associated with the network offering. You can upgrade the capabilities of the virtual router by applying a new network offering that contains a different system service offering. All virtual routers in that network will begin using the settings from the new service offering.
	</div><div xml:lang="ja-JP" class="section" id="creating-system-service-offerings" lang="ja-JP"><div class="titlepage"><div><div><h3 class="title" id="creating-system-service-offerings">8.2.1. Creating a New System Service Offering</h3></div></div></div><div class="para">
		システムサービスオファリングを作成します。
	</div><div class="orderedlist"><ol><li class="listitem"><div class="para">
				CloudStack ユーザーインターフェイスに管理者としてログインします。
			</div></li><li class="listitem"><div class="para">
				[Service Offerings]をクリックします。
			</div></li><li class="listitem"><div class="para">
				In Select Offering, choose System Offering.
			</div></li><li class="listitem"><div class="para">
				Click Add System Service Offering.
			</div></li><li class="listitem"><div class="para">
				ダイアログボックスで次の選択を行います。
			</div><div class="itemizedlist"><ul><li class="listitem"><div class="para">
						Name: システムオファリングに指定する名前です。
					</div></li><li class="listitem"><div class="para">
						Description: ユーザーに表示される、オファリングの短い説明です。
					</div></li><li class="listitem"><div class="para">
						System VM Type. Select the type of system virtual machine that this offering is intended to support.
					</div></li><li class="listitem"><div class="para">
						Storage type. The type of disk that should be allocated. Local allocates from storage attached directly to the host where the system VM is running. Shared allocates from storage accessible via NFS.
					</div></li><li class="listitem"><div class="para">
						# of CPU cores. The number of cores which should be allocated to a system VM with this offering
					</div></li><li class="listitem"><div class="para">
						CPU (in MHz). The CPU speed of the cores that the system VM is allocated. For example, "2000" would provide for a 2 GHz clock.
					</div></li><li class="listitem"><div class="para">
						Memory (in MB). The amount of memory in megabytes that the system VM should be allocated. For example, "2048" would provide for a 2 GB RAM allocation.
					</div></li><li class="listitem"><div class="para">
						Network Rate. Allowed data transfer rate in MB per second.
					</div></li><li class="listitem"><div class="para">
						Offer HA. If yes, the administrator can choose to have the system VM be monitored and as highly available as possible.
					</div></li><li class="listitem"><div class="para">
						Storage Tags. The tags that should be associated with the primary storage used by the system VM.
					</div></li><li class="listitem"><div class="para">
						Host Tags. (Optional) Any tags that you use to organize your hosts
					</div></li><li class="listitem"><div class="para">
						CPU cap. Whether to limit the level of CPU usage even if spare capacity is available.
					</div></li><li class="listitem"><div class="para">
						Public: オファリングを使用できるドメインが、すべてのドメインか一部のドメインのみかを示します。オンの場合は、すべてのドメインで使用できるようになります。オフの場合は、対象がサブドメインに制限されます。CloudStack がサブドメイン名を表示するので対象となるサブドメインをボックスの一覧から選択します。
					</div></li></ul></div></li><li class="listitem"><div class="para">
				[Add]をクリックします。
			</div></li></ol></div></div></div><div xml:lang="ja-JP" class="section" id="network-rate" lang="ja-JP"><div class="titlepage"><div><div><h2 class="title" id="network-rate">8.3. Network Throttling</h2></div></div></div><div class="para">
		Network throttling is the process of controlling the network access and bandwidth usage based on certain rules. CloudStack controls this behaviour of the guest networks in the cloud by using the network rate parameter. This parameter is defined as the default data transfer rate in Mbps (Megabits Per Second) allowed in a guest network. It defines the upper limits for network utilization. If the current utilization is below the allowed upper limits, access is granted, else revoked.
	</div><div class="para">
		You can throttle the network bandwidth either to control the usage above a certain limit for some accounts, or to control network congestion in a large cloud environment. The network rate for your cloud can be configured on the following:
	</div><div class="itemizedlist"><ul><li class="listitem"><div class="para">
				Network Offering
			</div></li><li class="listitem"><div class="para">
				Service Offering
			</div></li><li class="listitem"><div class="para">
				Global parameter
			</div></li></ul></div><div class="para">
		If network rate is set to NULL in service offering, the value provided in the vm.network.throttling.rate global parameter is applied. If the value is set to NULL for network offering, the value provided in the network.throttling.rate global parameter is considered.
	</div><div class="para">
		For the default public, storage, and management networks, network rate is set to 0. This implies that the public, storage, and management networks will have unlimited bandwidth by default. For default guest networks, network rate is set to NULL. In this case, network rate is defaulted to the global parameter value.
	</div><div class="para">
		The following table gives you an overview of how network rate is applied on different types of networks in CloudStack.
	</div><div class="informaltable"><table border="1"><colgroup><col width="50%" align="left" class="1" /><col width="50%" align="left" class="2" /></colgroup><thead><tr><th align="left">
						<div class="para">
							Networks
						</div>
					</th><th align="left">
						<div class="para">
							Network Rate Is Taken from
						</div>
					</th></tr></thead><tbody><tr><td align="left">
						<div class="para">
							Guest network of Virtual Router
						</div>
					</td><td align="left">
						<div class="para">
							Guest Network Offering
						</div>
					</td></tr><tr><td align="left">
						<div class="para">
							Public network of Virtual Router
						</div>
					</td><td align="left">
						<div class="para">
							Guest Network Offering
						</div>
					</td></tr><tr><td align="left">
						<div class="para">
							Storage network of Secondary Storage VM
						</div>
					</td><td align="left">
						<div class="para">
							System Network Offering
						</div>
					</td></tr><tr><td align="left">
						<div class="para">
							Management network of Secondary Storage VM
						</div>
					</td><td align="left">
						<div class="para">
							System Network Offering
						</div>
					</td></tr><tr><td align="left">
						<div class="para">
							Storage network of Console Proxy VM
						</div>
					</td><td align="left">
						<div class="para">
							System Network Offering
						</div>
					</td></tr><tr><td align="left">
						<div class="para">
							Management network of Console Proxy VM
						</div>
					</td><td align="left">
						<div class="para">
							System Network Offering
						</div>
					</td></tr><tr><td align="left">
						<div class="para">
							Storage network of Virtual Router
						</div>
					</td><td align="left">
						<div class="para">
							System Network Offering
						</div>
					</td></tr><tr><td align="left">
						<div class="para">
							Management network of Virtual Router
						</div>
					</td><td align="left">
						<div class="para">
							System Network Offering
						</div>
					</td></tr><tr><td align="left">
						<div class="para">
							Public network of Secondary Storage VM
						</div>
					</td><td align="left">
						<div class="para">
							System Network Offering
						</div>
					</td></tr><tr><td align="left">
						<div class="para">
							Public network of Console Proxy VM
						</div>
					</td><td align="left">
						<div class="para">
							System Network Offering
						</div>
					</td></tr><tr><td align="left">
						<div class="para">
							Default network of a guest VM
						</div>
					</td><td align="left">
						<div class="para">
							Compute Offering
						</div>
					</td></tr><tr><td align="left">
						<div class="para">
							Additional networks of a guest VM
						</div>
					</td><td align="left">
						<div class="para">
							Corresponding Network Offerings
						</div>
					</td></tr></tbody></table></div><div class="para">
		A guest VM must have a default network, and can also have many additional networks. Depending on various parameters, such as the host and virtual switch used, you can observe a difference in the network rate in your cloud. For example, on a VMware host the actual network rate varies based on where they are configured (compute offering, network offering, or both); the network type (shared or isolated); and traffic direction (ingress or egress).
	</div><div class="para">
		The network rate set for a network offering used by a particular network in CloudStack is used for the traffic shaping policy of a port group, for example: port group A, for that network: a particular subnet or VLAN on the actual network. The virtual routers for that network connects to the port group A, and by default instances in that network connects to this port group. However, if an instance is deployed with a compute offering with the network rate set, and if this rate is used for the traffic shaping policy of another port group for the network, for example port group B, then instances using this compute offering are connected to the port group B, instead of connecting to port group A.
	</div><div class="para">
		The traffic shaping policy on standard port groups in VMware only applies to the egress traffic, and the net effect depends on the type of network used in CloudStack. In shared networks, ingress traffic is unlimited for CloudStack, and egress traffic is limited to the rate that applies to the port group used by the instance if any. If the compute offering has a network rate configured, this rate applies to the egress traffic, otherwise the network rate set for the network offering applies. For isolated networks, the network rate set for the network offering, if any, effectively applies to the ingress traffic. This is mainly because the network rate set for the network offering applies to the egress traffic from the virtual router to the instance. The egress traffic is limited by the rate that applies to the port group used by the instance if any, similar to shared networks.
	</div><div class="para">
		For example:
	</div><div class="para">
		Network rate of network offering = 10 Mbps
	</div><div class="para">
		Network rate of compute offering = 200 Mbps
	</div><div class="para">
		In shared networks, ingress traffic will not be limited for CloudStack, while egress traffic will be limited to 200 Mbps. In an isolated network, ingress traffic will be limited to 10 Mbps and egress to 200 Mbps.
	</div></div><div xml:lang="ja-JP" class="section" id="sys-offering-sysvm" lang="ja-JP"><div class="titlepage"><div><div><h2 class="title" id="sys-offering-sysvm">8.4. Changing the Default System Offering for System VMs</h2></div></div></div><div class="para">
		You can manually change the system offering for a particular System VM. Additionally, as a CloudStack administrator, you can also change the default system offering used for System VMs.
	</div><div class="orderedlist"><ol><li class="listitem"><div class="para">
				Create a new system offering.
			</div><div class="para">
				For more information, see  <span>Creating a New System Service Offering</span>.
			</div></li><li class="listitem"><div class="para">
				データベースをバックアップします。
			</div><pre class="programlisting">mysqldump -u root -p cloud | bzip2 &gt; cloud_backup.sql.bz2</pre></li><li class="listitem"><div class="para">
				Open an MySQL prompt:
			</div><pre class="programlisting">mysql -u cloud -p cloud</pre></li><li class="listitem"><div class="para">
				Run the following queries on the cloud database.
			</div><div class="orderedlist"><ol class="loweralpha"><li class="listitem"><div class="para">
						In the disk_offering table, identify the original default offering and the new offering you want to use by default.
					</div><div class="para">
						Take a note of the ID of the new offering.
					</div><pre class="programlisting">select id,name,unique_name,type from disk_offering;</pre></li><li class="listitem"><div class="para">
						For the original default offering, set the value of unique_name to NULL.
					</div><pre class="programlisting"># update disk_offering set unique_name = NULL where id = 10;</pre><div class="para">
						Ensure that you use the correct value for the ID.
					</div></li><li class="listitem"><div class="para">
						For the new offering that you want to use by default, set the value of unique_name as follows:
					</div><div class="para">
						For the default Console Proxy VM (CPVM) offering,set unique_name to 'Cloud.com-ConsoleProxy'. For the default Secondary Storage VM (SSVM) offering, set unique_name to 'Cloud.com-SecondaryStorage'. For example:
					</div><pre class="programlisting">update disk_offering set unique_name = 'Cloud.com-ConsoleProxy' where id = 16;</pre></li></ol></div></li><li class="listitem"><div class="para">
				Restart CloudStack Management Server. Restarting is required because the default offerings are loaded into the memory at startup.
			</div><pre class="programlisting">service cloudstack-management restart</pre></li><li class="listitem"><div class="para">
				Destroy the existing CPVM or SSVM offerings and wait for them to be recreated. The new CPVM or SSVM are configured with the new offering.
			</div></li></ol></div></div></div><div xml:lang="ja-JP" class="chapter" id="set-up-network-for-users" lang="ja-JP"><div class="titlepage"><div><div><h2 class="title">第9章 Setting Up Networking for Users</h2></div></div></div><div class="toc"><dl><dt><span class="section"><a href="#networks-for-users-overview">9.1. Overview of Setting Up Networking for Users</a></span></dt><dt><span class="section"><a href="#about-virtual-networks">9.2. 仮想ネットワークについて</a></span></dt><dd><dl><dt><span class="section"><a href="#isolated-networks">9.2.1. 分離ネットワーク</a></span></dt><dt><span class="section"><a href="#shared-networks">9.2.2. 共有ネットワーク</a></span></dt><dt><span class="section"><a href="#runtime-allocation-virtual-network-resources">9.2.3. 仮想ネットワークリソースの実行時割り当て</a></span></dt></dl></dd><dt><span class="section"><a href="#network-service-providers">9.3. ネットワークサービスプロバイダー</a></span></dt><dt><span class="section"><a href="#network-offerings">9.4. ネットワークオファリング</a></span></dt><dd><dl><dt><span class="section"><a href="#creating-network-offerings">9.4.1. 新しいネットワークオファリングの作成</a></span></dt></dl></dd></dl></div><div xml:lang="ja-JP" class="section" id="networks-for-users-overview" lang="ja-JP"><div class="titlepage"><div><div><h2 class="title" id="networks-for-users-overview">9.1. Overview of Setting Up Networking for Users</h2></div></div></div><div class="para">
		People using cloud infrastructure have a variety of needs and preferences when it comes to the networking services provided by the cloud. As a CloudStack administrator, you can do the following things to set up networking for your users:
	</div><div class="itemizedlist"><ul><li class="listitem"><div class="para">
				Set up physical networks in zones
			</div></li><li class="listitem"><div class="para">
				Set up several different providers for the same service on a single physical network (for example, both Cisco and Juniper firewalls)
			</div></li><li class="listitem"><div class="para">
				Bundle different types of network services into network offerings, so users can choose the desired network services for any given virtual machine
			</div></li><li class="listitem"><div class="para">
				Add new network offerings as time goes on so end users can upgrade to a better class of service on their network
			</div></li><li class="listitem"><div class="para">
				Provide more ways for a network to be accessed by a user, such as through a project of which the user is a member
			</div></li></ul></div></div><div xml:lang="ja-JP" class="section" id="about-virtual-networks" lang="ja-JP"><div class="titlepage"><div><div><h2 class="title" id="about-virtual-networks">9.2. 仮想ネットワークについて</h2></div></div></div><div class="para">
		仮想ネットワークは、単一の物理ネットワーク上でマルチテナントを可能にする論理的な構成概念です。CloudStack では、 仮想ネットワークを共有したり、分離したりできます。
	</div><div xml:lang="ja-JP" class="section" id="isolated-networks" lang="ja-JP"><div class="titlepage"><div><div><h3 class="title" id="isolated-networks">9.2.1. 分離ネットワーク</h3></div></div></div><div class="para">
		分離ネットワークには単一アカウントの仮想マシンからのみアクセスできます。分離ネットワークには次の特性がありま す。
	</div><div class="itemizedlist"><ul><li class="listitem"><div class="para">
				VLAN などのリソースは動的に割り当てられ、ガベージコレクション処理が行われます。
			</div></li><li class="listitem"><div class="para">
				ネットワーク全体に対してネットワークオファリングが 1 つ存在します。
			</div></li><li class="listitem"><div class="para">
				ネットワークオファリングはアップグレードしたりダウングレードしたりできますが、ネットワーク全体が対象です。
			</div></li></ul></div></div><div xml:lang="ja-JP" class="section" id="shared-networks" lang="ja-JP"><div class="titlepage"><div><div><h3 class="title" id="shared-networks">9.2.2. 共有ネットワーク</h3></div></div></div><div class="para">
		A shared network can be accessed by virtual machines that belong to many different accounts. Network Isolation on shared networks is accomplished using techniques such as security groups (supported only in basic zones).
	</div><div class="itemizedlist"><ul><li class="listitem"><div class="para">
				共有ネットワークは、管理者によって作成されます。
			</div></li><li class="listitem"><div class="para">
				共有ネットワークは、特定のドメインに対して指定できます。
			</div></li><li class="listitem"><div class="para">
				マップ先の VLAN や物理ネットワークなどの共有ネットワークリソースは、管理者によって指定されます。
			</div></li><li class="listitem"><div class="para">
				共有ネットワークは、セキュリティグループによって分離されます。
			</div></li><li class="listitem"><div class="para">
				パブリックネットワークは、エンドユーザーに表示されない共有ネットワークです。
			</div></li></ul></div></div><div xml:lang="ja-JP" class="section" id="runtime-allocation-virtual-network-resources" lang="ja-JP"><div class="titlepage"><div><div><h3 class="title" id="runtime-allocation-virtual-network-resources">9.2.3. 仮想ネットワークリソースの実行時割り当て</h3></div></div></div><div class="para">
		When you define a new virtual network, all your settings for that network are stored in CloudStack. The actual network resources are activated only when the first virtual machine starts in the network. When all virtual machines have left the virtual network, the network resources are garbage collected so they can be allocated again. This helps to conserve network resources.
	</div></div></div><div xml:lang="ja-JP" class="section" id="network-service-providers" lang="ja-JP"><div class="titlepage"><div><div><h2 class="title" id="network-service-providers">9.3. ネットワークサービスプロバイダー</h2></div></div></div><div class="note"><div class="admonition_header"><h2>注記</h2></div><div class="admonition"><div class="para">
			CloudStack がサポートするネットワークサービスプロバイダーの最新の一覧については、CloudStack ユーザーインターフェイスを参照するか、 listNetworkServiceProviders を呼び出してください。
		</div></div></div><div class="para">
		サービスプロバイダー(ネットワーク要素とも呼ばれます)は、ネットワークサービスを可能にするハードウェアまたは仮想アプライアンスです。たとえば、ファイアウォールサービスを提供するために、ファイアウォールアプライアンスをクラウドに設置できます。単一ネットワーク上で、複数のプロバイダーが同じネットワークサービスを提供できます。たとえば、同じ物理ネットワーク内で Cisco および Juniper のデバイスを使用して、ファイアウォールサービスを提供できます。
	</div><div class="para">
		同じサービスプロバイダーの複数のインスタンスを 1 つのネットワークに持たせることができます。たとえば、複数の Juniper SRX デバイスです。
	</div><div class="para">
		ネットワーク上で異なるプロバイダーが同じサービスを提供するようにセットアップする場合は、ユーザーが(そのほかの選択肢と共に)使用するネットワークサービスプロバイダーを指定できるように、管理者はネットワークオファリングを作成できます。作成しない場合は、サービスが要求されるときは常に、CloudStack によって使用するプロバイダーが選択されます。
	</div><div class="formalpara"><h5 class="formalpara" id="idp29643672">サポートされるネットワークサービスプロバイダー</h5>
			CloudStack にはサポートされるサービスプロバイダーの内部一覧が同梱されます。ネットワークオファリングを作成するときはこの一覧から選択することになります。
		</div><div class="informaltable"><table border="1"><colgroup><col width="17%" align="left" class="c1" /><col width="17%" align="left" class="c2" /><col width="17%" align="left" class="c3" /><col width="17%" align="left" class="c4" /><col width="17%" align="left" class="c5" /><col width="17%" align="left" class="c6" /></colgroup><thead><tr><th align="left">
					</th><th align="left">
						<div class="para">
							仮想ルーター
						</div>
					</th><th align="left">
						<div class="para">
							Citrix NetScaler
						</div>
					</th><th align="left">
						<div class="para">
							Juniper SRX
						</div>
					</th><th align="left">
						<div class="para">
							F5 BigIP
						</div>
					</th><th align="left">
						<div class="para">
							Host based (KVM/Xen)
						</div>
					</th></tr></thead><tbody><tr><td align="left">
						<div class="para">
							Remote Access VPN
						</div>
					</td><td align="left">
						<div class="para">
							Yes
						</div>
					</td><td align="left">
						<div class="para">
							No
						</div>
					</td><td align="left">
						<div class="para">
							No
						</div>
					</td><td align="left">
						<div class="para">
							No
						</div>
					</td><td align="left">
						<div class="para">
							No
						</div>
					</td></tr><tr><td align="left">
						<div class="para">
							DNS/DHCP/User Data
						</div>
					</td><td align="left">
						<div class="para">
							Yes
						</div>
					</td><td align="left">
						<div class="para">
							No
						</div>
					</td><td align="left">
						<div class="para">
							No
						</div>
					</td><td align="left">
						<div class="para">
							No
						</div>
					</td><td align="left">
						<div class="para">
							No
						</div>
					</td></tr><tr><td align="left">
						<div class="para">
							ファイアウォール
						</div>
					</td><td align="left">
						<div class="para">
							Yes
						</div>
					</td><td align="left">
						<div class="para">
							No
						</div>
					</td><td align="left">
						<div class="para">
							Yes
						</div>
					</td><td align="left">
						<div class="para">
							No
						</div>
					</td><td align="left">
						<div class="para">
							No
						</div>
					</td></tr><tr><td align="left">
						<div class="para">
							負荷分散
						</div>
					</td><td align="left">
						<div class="para">
							Yes
						</div>
					</td><td align="left">
						<div class="para">
							Yes
						</div>
					</td><td align="left">
						<div class="para">
							No
						</div>
					</td><td align="left">
						<div class="para">
							Yes
						</div>
					</td><td align="left">
						<div class="para">
							No
						</div>
					</td></tr><tr><td align="left">
						<div class="para">
							Elastic IP
						</div>
					</td><td align="left">
						<div class="para">
							No
						</div>
					</td><td align="left">
						<div class="para">
							Yes
						</div>
					</td><td align="left">
						<div class="para">
							No
						</div>
					</td><td align="left">
						<div class="para">
							No
						</div>
					</td><td align="left">
						<div class="para">
							No
						</div>
					</td></tr><tr><td align="left">
						<div class="para">
							Elastic LB
						</div>
					</td><td align="left">
						<div class="para">
							No
						</div>
					</td><td align="left">
						<div class="para">
							Yes
						</div>
					</td><td align="left">
						<div class="para">
							No
						</div>
					</td><td align="left">
						<div class="para">
							No
						</div>
					</td><td align="left">
						<div class="para">
							No
						</div>
					</td></tr><tr><td align="left">
						<div class="para">
							送信元 NAT
						</div>
					</td><td align="left">
						<div class="para">
							Yes
						</div>
					</td><td align="left">
						<div class="para">
							No
						</div>
					</td><td align="left">
						<div class="para">
							Yes
						</div>
					</td><td align="left">
						<div class="para">
							No
						</div>
					</td><td align="left">
						<div class="para">
							No
						</div>
					</td></tr><tr><td align="left">
						<div class="para">
							静的 NAT
						</div>
					</td><td align="left">
						<div class="para">
							Yes
						</div>
					</td><td align="left">
						<div class="para">
							Yes
						</div>
					</td><td align="left">
						<div class="para">
							Yes
						</div>
					</td><td align="left">
						<div class="para">
							No
						</div>
					</td><td align="left">
						<div class="para">
							No
						</div>
					</td></tr><tr><td align="left">
						<div class="para">
							ポート転送
						</div>
					</td><td align="left">
						<div class="para">
							Yes
						</div>
					</td><td align="left">
						<div class="para">
							No
						</div>
					</td><td align="left">
						<div class="para">
							Yes
						</div>
					</td><td align="left">
						<div class="para">
							No
						</div>
					</td><td align="left">
						<div class="para">
							No
						</div>
					</td></tr></tbody></table></div></div><div xml:lang="ja-JP" class="section" id="network-offerings" lang="ja-JP"><div class="titlepage"><div><div><h2 class="title" id="network-offerings">9.4. ネットワークオファリング</h2></div></div></div><div class="note"><div class="admonition_header"><h2>注記</h2></div><div class="admonition"><div class="para">
			サポートされるネットワークサービスのリストに関するアップデートは CloudStack ユーザーインターフェイスか listNetworkServices の呼び出し結果を参照してください。
		</div></div></div><div class="para">
		ネットワークオファリングは、次のようなネットワークサービスのセットに名前を付けたものです。
	</div><div class="itemizedlist"><ul><li class="listitem"><div class="para">
				DHCP
			</div></li><li class="listitem"><div class="para">
				DNS
			</div></li><li class="listitem"><div class="para">
				送信元 NAT
			</div></li><li class="listitem"><div class="para">
				静的 NAT
			</div></li><li class="listitem"><div class="para">
				ポート転送
			</div></li><li class="listitem"><div class="para">
				負荷分散
			</div></li><li class="listitem"><div class="para">
				ファイアウォール
			</div></li><li class="listitem"><div class="para">
				VPN
			</div></li><li class="listitem"><div class="para">
				(オプション)ファイアウォール向けに Juniper など、特定のサービスに使用する、使用可能なプロバイダーのいずれかの名前
			</div></li><li class="listitem"><div class="para">
				(オプション)使用する物理ネットワークを指定するネットワークタグ
			</div></li></ul></div><div class="para">
		新しい仮想マシンの作成時に、ユーザーは使用できるネットワークオファリングの中から 1 つ選択します。これで仮想マシンで使用できるネットワークサービスが決定します。
	</div><div class="para">
		CloudStack 管理者は、CloudStack によって提供されるデフォルトのネットワークオファリングのほかに、カスタムネットワークオファリングをいくつでも作成できます。複数のカスタムネットワークオファリングを作成することによって、単一のマルチテナント物理ネットワーク上でさまざまなクラスのサービスを提供するようにクラウドをセットアップできます。 たとえば、基になる物理的な有線接続は同じであっても、テナント A に は Web サイト用に単純なファイアウォールの保護のみを提供し、テナント B にはデータベースのバックエンドにアクセスするために、Web サー バーファームを運用し、スケーラブルなファイアウォールソリューション、 負荷分散ソリューション、および代替ネットワークを提供することができ ます。
	</div><div class="note"><div class="admonition_header"><h2>注記</h2></div><div class="admonition"><div class="para">
			もし、負荷分散ルールを作成する際 NetScaler のような外部デバイスを含んだネットワークサービスオファリングを利用していた場合、また後にネットワークサービスオファリングを CloudStack の仮想ルーターを利用するよう変更を加える場合、継続して機能を利用するためには全ての負荷分散ルールに対しファイアウォールルールを追加しなければなりません。
		</div></div></div><div class="para">
		新しい仮想ネットワークを作成するとき、CloudStack 管理者はそのネッ トワークに対して有効にするネットワークオファリングを選択します。各\n仮想ネットワークは、1 つのネットワークオファリングに関連付けられます。仮想ネットワークは、その関連付けられたネットワークオファリングを変更することによって、アップグレードしたりダウングレードしたりできます。そうする場合は、合致する物理ネットワークを再プログラミングしてください。
	</div><div class="para">
		CloudStack には、CloudStack のシステム仮想マシンで使用する内部ネットワークオファリングもあります。これらのネットワークオファリングはユーザーには表示されませんが、管理者が変更できます。
	</div><div xml:lang="ja-JP" class="section" id="creating-network-offerings" lang="ja-JP"><div class="titlepage"><div><div><h3 class="title" id="creating-network-offerings">9.4.1. 新しいネットワークオファリングの作成</h3></div></div></div><div class="para">
		ネットワークオファリングを作成するには
	</div><div class="orderedlist"><ol><li class="listitem"><div class="para">
				CloudStack ユーザーインターフェイスに管理者特権でログオンします。
			</div></li><li class="listitem"><div class="para">
				左側のナビゲーションバーで[Service Offerings]をクリックします。
			</div></li><li class="listitem"><div class="para">
				[Select Offering]ボックスの一覧で[Network Offering]を選択します。
			</div></li><li class="listitem"><div class="para">
				[Add Network Offering]をクリックします。
			</div></li><li class="listitem"><div class="para">
				ダイアログボックスで次の選択を行います。
			</div><div class="itemizedlist"><ul><li class="listitem"><div class="para">
						<span class="bold bold"><strong>Name</strong></span>. Any desired name for the network offering.
					</div></li><li class="listitem"><div class="para">
						<span class="bold bold"><strong>Description</strong></span>. A short description of the offering that can be displayed to users.
					</div></li><li class="listitem"><div class="para">
						<span class="bold bold"><strong>Network Rate</strong></span>. Allowed data transfer rate in MB per second.
					</div></li><li class="listitem"><div class="para">
						<span class="bold bold"><strong>Guest Type</strong></span>. Choose whether the guest network is isolated or shared.
					</div><div class="para">
						For a description of this term, see <a class="xref" href="#about-virtual-networks">「仮想ネットワークについて」</a>.
					</div></li><li class="listitem"><div class="para">
						<span class="bold bold"><strong>Persistent</strong></span>. Indicate whether the guest network is persistent or not. The network that you can provision without having to deploy a VM on it is termed persistent network. For more information, see <a class="xref" href="#persistent-network">「Persistent Networks」</a>.
					</div></li><li class="listitem"><div class="para">
						<span class="bold bold"><strong>Specify VLAN</strong></span>. (Isolated guest networks only) Indicate whether a VLAN should be specified when this offering is used.
					</div></li><li class="listitem"><div class="para">
						<span class="bold bold"><strong>VPC</strong></span>. This option indicate whether the guest network is Virtual Private Cloud-enabled. A Virtual Private Cloud (VPC) is a private, isolated part of CloudStack. A VPC can have its own virtual network topology that resembles a traditional physical network. For more information on VPCs, see <a class="xref" href="#vpc">「VPC(Virtual Private Cloud) の概要」</a>.
					</div></li><li class="listitem"><div class="para">
						<span class="bold bold"><strong>Supported Services</strong></span>. Select one or more of the possible network services. For some services, you must also choose the service provider; for example, if you select Load Balancer, you can choose the CloudStack virtual router or any other load balancers that have been configured in the cloud. Depending on which services you choose, additional fields may appear in the rest of the dialog box.
					</div><div class="para">
						選択されたゲストネットワークタイプによって以下のサポートされるサービスが確認できます。
					</div><div class="informaltable"><table border="1"><colgroup><col width="25%" /><col width="25%" /><col width="25%" /><col width="25%" /></colgroup><thead><tr><th align="left">
										<div class="para">
											サポートされるサービス
										</div>
									</th><th align="left">
										<div class="para">
											説明
										</div>
									</th><th align="left">
										<div class="para">
											分離
										</div>
									</th><th align="left">
										<div class="para">
											共有
										</div>
									</th></tr></thead><tbody><tr><td align="left">
										<div class="para">
											DHCP
										</div>
									</td><td align="left">
										<div class="para">
											For more information, see <a class="xref" href="#dns-dhcp">「DNSとDHCP」</a>.
										</div>
									</td><td align="left">
										<div class="para">
											サポートされている
										</div>
									</td><td align="left">
										<div class="para">
											サポートされている
										</div>
									</td></tr><tr><td align="left">
										<div class="para">
											DNS
										</div>
									</td><td align="left">
										<div class="para">
											For more information, see <a class="xref" href="#dns-dhcp">「DNSとDHCP」</a>.
										</div>
									</td><td align="left">
										<div class="para">
											サポートされている
										</div>
									</td><td align="left">
										<div class="para">
											サポートされている
										</div>
									</td></tr><tr><td align="left">
										<div class="para">
											負荷分散
										</div>
									</td><td align="left">
										<div class="para">
											もし負荷分散を選択場合は CloudStack の仮想ルーターかクラウド上で設定された他の負荷分散装置を選択することができます。
										</div>
									</td><td align="left">
										<div class="para">
											サポートされている
										</div>
									</td><td align="left">
										<div class="para">
											サポートされている
										</div>
									</td></tr><tr><td align="left">
										<div class="para">
											ファイアウォール
										</div>
									</td><td align="left">
										<div class="para">
											For more information, see the Administration Guide.
										</div>
									</td><td align="left">
										<div class="para">
											サポートされている
										</div>
									</td><td align="left">
										<div class="para">
											サポートされている
										</div>
									</td></tr><tr><td align="left">
										<div class="para">
											送信元NAT
										</div>
									</td><td align="left">
										<div class="para">
											もし送信元NATを選択した場合、CloudStack の仮想ルーターかクラウド上で設定された他の送信元NAT機能を有したネットワーク機器を選択することができます。
										</div>
									</td><td align="left">
										<div class="para">
											サポートされている
										</div>
									</td><td align="left">
										<div class="para">
											サポートされている
										</div>
									</td></tr><tr><td align="left">
										<div class="para">
											静的NAT
										</div>
									</td><td align="left">
										<div class="para">
											もし送信元NATを選択した場合、CloudStack の仮想ルーターかクラウド上で設定された他の静的NAT機能を有したネットワーク機器を選択することができます。
										</div>
									</td><td align="left">
										<div class="para">
											サポートされている
										</div>
									</td><td align="left">
										<div class="para">
											サポートされている
										</div>
									</td></tr><tr><td align="left">
										<div class="para">
											ポート転送
										</div>
									</td><td align="left">
										<div class="para">
											もし送信元NATを選択した場合、CloudStack の仮想ルーターかクラウド上で設定された他のポート転送機能を有したネットワーク機器を選択することができます。
										</div>
									</td><td align="left">
										<div class="para">
											サポートされている
										</div>
									</td><td align="left">
										<div class="para">
											サポートされていない
										</div>
									</td></tr><tr><td align="left">
										<div class="para">
											VPN
										</div>
									</td><td align="left">
										<div class="para">
											For more information, see <a class="xref" href="#vpn">「VPN」</a>.
										</div>
									</td><td align="left">
										<div class="para">
											サポートされている
										</div>
									</td><td align="left">
										<div class="para">
											サポートされていない
										</div>
									</td></tr><tr><td align="left">
										<div class="para">
											ユーザーデータ
										</div>
									</td><td align="left">
										<div class="para">
											For more information, see <a class="xref" href="#user-data-and-meta-data">「ユーザーデータとメタデータ」</a>.
										</div>

									</td><td align="left">
										<div class="para">
											サポートされていない
										</div>
									</td><td align="left">
										<div class="para">
											サポートされている
										</div>
									</td></tr><tr><td align="left">
										<div class="para">
											Network ACL
										</div>
									</td><td align="left">
										<div class="para">
											For more information, see <a class="xref" href="#configure-acl">「Configuring Access Control List」</a>.
										</div>
									</td><td align="left">
										<div class="para">
											サポートされている
										</div>
									</td><td align="left">
										<div class="para">
											サポートされていない
										</div>
									</td></tr><tr><td align="left">
										<div class="para">
											セキュリティグループ
										</div>
									</td><td align="left">
										<div class="para">
											For more information, see <a class="xref" href="#add-security-group">「セキュリティグループの追加」</a>.
										</div>
									</td><td align="left">
										<div class="para">
											サポートされていない
										</div>
									</td><td align="left">
										<div class="para">
											サポートされている
										</div>
									</td></tr></tbody></table></div></li><li class="listitem"><div class="para">
						<span class="bold bold"><strong>System Offering</strong></span>. If the service provider for any of the services selected in Supported Services is a virtual router, the System Offering field appears. Choose the system service offering that you want virtual routers to use in this network. For example, if you selected Load Balancer in Supported Services and selected a virtual router to provide load balancing, the System Offering field appears so you can choose between the CloudStack default system service offering and any custom system service offerings that have been defined by the CloudStack root administrator.
					</div><div class="para">
						For more information, see <a class="xref" href="#system-service-offerings">「System Service Offerings」</a>.
					</div></li><li class="listitem"><div class="para">
						<span class="bold bold"><strong>Redundant router capability</strong></span>. Available only when Virtual Router is selected as the Source NAT provider. Select this option if you want to use two virtual routers in the network for uninterrupted connection: one operating as the master virtual router and the other as the backup. The master virtual router receives requests from and sends responses to the user’s VM. The backup virtual router is activated only when the master is down. After the failover, the backup becomes the master virtual router. CloudStack deploys the routers on different hosts to ensure reliability if one host is down.
					</div></li><li class="listitem"><div class="para">
						<span class="bold bold"><strong>Conserve mode</strong></span>. Indicate whether to use conserve mode. In this mode, network resources are allocated only when the first virtual machine starts in the network. When conservative mode is off, the public IP can only be used for a single service. For example, a public IP used for a port forwarding rule cannot be used for defining other services, such as StaticNAT or load balancing. When the conserve mode is on, you can define more than one service on the same public IP.
					</div><div class="note"><div class="admonition_header"><h2>注記</h2></div><div class="admonition"><div class="para">
							If StaticNAT is enabled, irrespective of the status of the conserve mode, no port forwarding or load balancing rule can be created for the IP. However, you can add the firewall rules by using the createFirewallRule command.
						</div></div></div></li><li class="listitem"><div class="para">
						<span class="bold bold"><strong>Tags</strong></span>. Network tag to specify which physical network to use.
					</div></li></ul></div></li><li class="listitem"><div class="para">
				[Add]をクリックします。
			</div></li></ol></div></div></div></div><div xml:lang="ja-JP" class="chapter" id="virtual-machines" lang="ja-JP"><div class="titlepage"><div><div><h2 class="title">第10章 仮想マシンの操作</h2></div></div></div><div class="toc"><dl><dt><span class="section"><a href="#about-working-with-vms">10.1. 仮想マシンの操作</a></span></dt><dt><span class="section"><a href="#best-practices-vm">10.2. Best Practices for Virtual Machines</a></span></dt><dt><span class="section"><a href="#vm-lifecycle">10.3. 仮想マシンのライフサイクル</a></span></dt><dt><span class="section"><a href="#creating-vms">10.4. VMの作成</a></span></dt><dt><span class="section"><a href="#accessing-vms">10.5. 仮想マシンへのアクセス</a></span></dt><dt><span class="section"><a href="#stopping-and-starting-vms">10.6. 仮想マシンの停止と起動</a></span></dt><dt><span class="section"><a href="#changing-vm-name-os-group">10.7. 仮想マシン、OS、グループの名前変更</a></span></dt><dt><span class="section"><a href="#changing-service-offering-for-vm">10.8. 仮想マシンのサービスオファリングの変更</a></span></dt><dt><span class="section"><a href="#manual-live-migration">10.9. ホスト間の仮想マシンの移動（手動ライブマイグレーション）</a></span></dt><dt><span class="section"><a href="#deleting-vms">10.10. VMの削除</a></span></dt><dt><span class="section"><a href="#working-with-iso">10.11. ISO に関わる作業</a></span></dt><dd><dl><dt><span class="section"><a href="#add-iso">10.11.1. ISO の追加</a></span></dt><dt><span class="section"><a href="#attach-iso-to-vm">10.11.2. 仮想マシンへのISOのアタッチ</a></span></dt></dl></dd></dl></div><div xml:lang="ja-JP" class="section" id="about-working-with-vms" lang="ja-JP"><div class="titlepage"><div><div><h2 class="title" id="about-working-with-vms">10.1. 仮想マシンの操作</h2></div></div></div><div class="para">
		CloudStackでは、クラウドで実行するすべてのゲスト仮想マシンのライフサイクルを管理者が完全に制御できます。CloudStackには、エンドユーザー用および管理者用のゲスト管理操作が複数用意されています。仮想マシンは、停止、開始、再起動、および破棄することができます。
	</div><div class="para">
		ゲストには名前とグループがあります。ゲスト名とグループはCloudStackにとって曖昧な情報で、エンドユーザーが自分の仮想マシンを整理するために使用できます。各仮想マシンには、異なるコンテキストで使用する3つの名前があります。これらの名前のうち、ユーザーが制御できるのは2つだけです。
	</div><div class="itemizedlist"><ul><li class="listitem"><div class="para">
				Instance name – a unique, immutable ID that is generated by CloudStack, and can not be modified by the user. This name conforms to the requirements in IETF RFC 1123.
			</div></li><li class="listitem"><div class="para">
				Display name – the name displayed in the CloudStack web UI. Can be set by the user. Defaults to instance name.
			</div></li><li class="listitem"><div class="para">
				Name – host name that the DHCP server assigns to the VM. Can be set by the user. Defaults to instance name
			</div></li></ul></div><div class="para">
		ゲストはHA（Highly Available：高可用性を持つ）に構成できます。HAが有効なゲストはシステムによって監視されます。ゲストがダウン状態であることが検出されると、場合によっては別のホスト上でゲストの再起動が試行されます。
	</div><div class="para">
		新しく作成したVMには、各々1つのパブリックIPアドレスが割り当たります。VMを起動するとき、CloudStack は自動的にパブリックIPアドレスとプライベートIPアドレスの間で静的NATを設定します。
	</div><div class="para">
		エラスティックIPを（NetScaler負荷分散装置と共に）使用する場合、新たに作成するVMはエラスティックとして初期設定されません。ユーザーは自動設定されたIPを明示的に取得したエラスティックIPに置き換え、静的NATのマッピングを新しいIPとVMのプライベートIPに対して行う必要があります。その際、VMの元のIPアドレスは解放され、利用可能なパブリックIPのプールに返却されます。
	</div><div class="para">
		CloudStackプラットフォームでは、予期せずに終了した仮想マシンと、ユーザーによって（たとえば、Linuxのshutdownコマンドで）シャットダウンされたゲスト仮想マシンを区別できません。HAが有効なゲストが仮想マシン内部でシャットダウンされた場合、CloudStackプラットフォームによってそのゲストが再起動されます。HAが有効なゲストをシャットダウンするには、ユーザーはCloudStackユーザーインターフェイスまたはAPIを使用する必要があります。
	</div></div><div xml:lang="ja-JP" class="section" id="best-practices-vm" lang="ja-JP"><div class="titlepage"><div><div><h2 class="title" id="best-practices-vm">10.2. Best Practices for Virtual Machines</h2></div></div></div><div class="para">
		The CloudStack administrator should monitor the total number of VM instances in each cluster, and disable allocation to the cluster if the total is approaching the maximum that the hypervisor can handle. Be sure to leave a safety margin to allow for the possibility of one or more hosts failing, which would increase the VM load on the other hosts as the VMs are automatically redeployed. Consult the documentation for your chosen hypervisor to find the maximum permitted number of VMs per host, then use CloudStack global configuration settings to set this as the default limit. Monitor the VM activity in each cluster at all times. Keep the total number of VMs below a safe level that allows for the occasional host failure. For example, if there are N hosts in the cluster, and you want to allow for one host in the cluster to be down at any given time, the total number of VM instances you can permit in the cluster is at most (N-1) * (per-host-limit). Once a cluster reaches this number of VMs, use the CloudStack UI to disable allocation of more VMs to the cluster.
	</div></div><div xml:lang="ja-JP" class="section" id="vm-lifecycle" lang="ja-JP"><div class="titlepage"><div><div><h2 class="title" id="vm-lifecycle">10.3. 仮想マシンのライフサイクル</h2></div></div></div><div class="para">
		仮想マシンがなる可能性のある状態は次のとおりです。
	</div><div class="mediaobject"><img src="./images/vm-lifecycle.png" width="444" alt="basic-deployment.png: Basic two-machine CloudStack deployment" /></div><div class="para">
		仮想マシンは、一度破棄すると復元できません。仮想マシンによって使用されたすべてのリソースは、システムによって再利用されます。これには仮想マシンのIPアドレスが含まれます。
	</div><div class="para">
		停止状態にすると、オペレーティングシステムの正常なシャットダウンが試行され、通常は実行中のすべてのアプリケーションが終了されます。オペレーティングシステムを停止できない場合は、強制終了させます。これは、物理マシンの電源コードを引き抜くのと同じ影響があります。
	</div><div class="para">
		再起動とは、停止してから開始することです。
	</div><div class="para">
		CloudStack では、仮想マシンのハードディスクの状態はマシンが破棄されるまで保存されます。
	</div><div class="para">
		ハードウェアまたはネットワークの問題が原因で、実行中の仮想マシンに障害が発生することがあります。障害が発生した仮想マシンはダウン状態になります。
	</div><div class="para">
		システムがハイパーバイザーから3分間ハートビートを受信しない場合は、仮想マシンはダウン状態になります。
	</div><div class="para">
		仮想マシンはダウン状態から手動で再起動できます。
	</div><div class="para">
		HAが有効であるとマークされている仮想マシンは、自動的にダウン状態から再起動されます。
	</div></div><div xml:lang="ja-JP" class="section" id="creating-vms" lang="ja-JP"><div class="titlepage"><div><div><h2 class="title" id="creating-vms">10.4. VMの作成</h2></div></div></div><div class="para">
		仮想マシンは通常、テンプレートから作成されます。空の仮想マシンを作成することもできます。空の仮想マシンとは、オペレーティングシステムのテンプレートを伴わない仮想マシンです。ユーザーはISOファイルをアタッチし、CD/DVD-ROMからオペレーティングシステムをインストールできます。
	</div><div class="note"><div class="admonition_header"><h2>注記</h2></div><div class="admonition"><div class="para">
			You can create a VM without starting it. You can determine whether the VM needs to be started as part of the VM deployment. A request parameter, startVM, in the deployVm API provides this feature. For more information, see the Developer's Guide
		</div></div></div><div class="para">
		テンプレートから仮想マシンを作成するには
	</div><div class="orderedlist"><ol><li class="listitem"><div class="para">
				管理者またはユーザーとしてCloudStackユーザーインターフェイスにログオンします。
			</div></li><li class="listitem"><div class="para">
				左側のナビゲーションバーで［Instances］をクリックします。
			</div></li><li class="listitem"><div class="para">
				［Add Instance］をクリックします。
			</div></li><li class="listitem"><div class="para">
				Select a zone.
			</div></li><li class="listitem"><div class="para">
				Select a template, then follow the steps in the wizard. For more information about how the templates came to be in this list, see <a class="xref" href="#working-with-templates">12章<em>テンプレートと動作</em></a>.
			</div></li><li class="listitem"><div class="para">
				使用するハードウェアで、選択したサービスオファリングを開始できることを確認してください。
			</div></li><li class="listitem"><div class="para">
				［Submit］をクリックし、仮想マシンを作成して開始します。
			</div><div class="note"><div class="admonition_header"><h2>注記</h2></div><div class="admonition"><div class="para">
					セキュリティ上の理由から、内部の仮想マシン名は root 管理者のみ閲覧できます。
				</div></div></div></li></ol></div><div class="para">
		ISOから仮想マシンを作成するには
	</div><div class="note"><div class="admonition_header"><h2>注記</h2></div><div class="admonition"><div class="para">
			(XenServer) Windows 仮想マシンを XenServer 上で動作させるにはテンプレートとして提供するか仮想マシンの作成後に追加する PV ドライバーが必要となります。管理サーバーでの追加ボリュームやISOイメージのマウント、ライブマイグレーション、グレースフルシャットダウンといった機能を利用するには PV ドライバーは必須となります。
		</div></div></div><div class="orderedlist"><ol><li class="listitem"><div class="para">
				管理者またはユーザーとしてCloudStackユーザーインターフェイスにログオンします。
			</div></li><li class="listitem"><div class="para">
				左側のナビゲーションバーで［Instances］をクリックします。
			</div></li><li class="listitem"><div class="para">
				［Add Instance］をクリックします。
			</div></li><li class="listitem"><div class="para">
				Select a zone.
			</div></li><li class="listitem"><div class="para">
				［ISO Boot］を選択し、ウィザードの手順に従います。
			</div></li><li class="listitem"><div class="para">
				［Submit］をクリックし、仮想マシンを作成して開始します。
			</div></li></ol></div></div><div xml:lang="ja-JP" class="section" id="accessing-vms" lang="ja-JP"><div class="titlepage"><div><div><h2 class="title" id="accessing-vms">10.5. 仮想マシンへのアクセス</h2></div></div></div><div class="para">
		各ユーザーはそれぞれの仮想マシンにアクセスすることができます。また、管理者はクラウド上の起動中の全ての仮想マシンにアクセスすることができます。
	</div><div class="para">
		CloudStack UIからの仮想マシンへのアクセス
	</div><div class="orderedlist"><ol><li class="listitem"><div class="para">
				ユーザーもしくは管理者として CloudStack UIからログインします。
			</div></li><li class="listitem"><div class="para">
				インスタンスをクリックし、起動中の仮想マシンの名前をクリックします。
			</div></li><li class="listitem"><div class="para">
				[View Console]アイコンをクリックします。 <img src="images/view-console-button.png" />.
			</div></li></ol></div><div class="para">
		ネットワークを介した仮想マシンへの直接アクセス:
	</div><div class="orderedlist"><ol><li class="listitem"><div class="para">
				The VM must have some port open to incoming traffic. For example, in a basic zone, a new VM might be assigned to a security group which allows incoming traffic. This depends on what security group you picked when creating the VM. In other cases, you can open a port by setting up a port forwarding policy. See <a class="xref" href="#ip-forwarding-firewalling">「IP Forwarding and Firewalling」</a>.
			</div></li><li class="listitem"><div class="para">
				ポートを開放していても仮想マシンへのsshを有効化していない場合、仮想マシンに対してsshを除くアクセスを許可することができます。これは仮想マシンの作成時にsshを有効化したテンプレートを利用するかによって異なります。仮想マシンのオペレーティングシステムにおいてssh越しのコマンド実行を許可している場合 CloudStack UIからのアクセスが可能となります。
			</div></li><li class="listitem"><div class="para">
				If the network has an external firewall device, you will need to create a firewall rule to allow access. See <a class="xref" href="#ip-forwarding-firewalling">「IP Forwarding and Firewalling」</a>.
			</div></li></ol></div></div><div xml:lang="ja-JP" class="section" id="stopping-and-starting-vms" lang="ja-JP"><div class="titlepage"><div><div><h2 class="title" id="stopping-and-starting-vms">10.6. 仮想マシンの停止と起動</h2></div></div></div><div class="para">
		Once a VM instance is created, you can stop, restart, or delete it as needed. In the CloudStack UI, click Instances, select the VM, and use the Stop, Start, Reboot, and Destroy links.
	</div></div><div xml:lang="ja-JP" class="section" id="changing-vm-name-os-group" lang="ja-JP"><div class="titlepage"><div><div><h2 class="title" id="changing-vm-name-os-group">10.7. 仮想マシン、OS、グループの名前変更</h2></div></div></div><div class="para">
		仮想マシンの作成後、表示名やオペレーティングシステム、グループの所属を変更することができます。
	</div><div class="para">
		CloudStack UIからの仮想マシンへのアクセス
	</div><div class="orderedlist"><ol><li class="listitem"><div class="para">
				ユーザーもしくは管理者として CloudStack UIからログインします。
			</div></li><li class="listitem"><div class="para">
				左側のナビゲーションから「インスタンス」をクリックします。
			</div></li><li class="listitem"><div class="para">
				変更したい仮想マシンを選択します。
			</div></li><li class="listitem"><div class="para">
				Click the Stop button to stop the VM. 
				<span class="inlinemediaobject"><img src="./images/stop-instance-icon.png" alt="StopButton.png: button to stop a VM" /></span>

			</div></li><li class="listitem"><div class="para">
				Click Edit. 
				<span class="inlinemediaobject"><img src="./images/edit-icon.png" alt="EditButton.png: button to edit the properties of a VM" /></span>
			</div></li><li class="listitem"><div class="para">
				変更したい以下項目の確認:
			</div></li><li class="listitem"><div class="para">
				<span class="bold bold"><strong>Display name</strong></span>: Enter a new display name if you want to change the name of the VM.
			</div></li><li class="listitem"><div class="para">
				<span class="bold bold"><strong>OS Type</strong></span>: Select the desired operating system.
			</div></li><li class="listitem"><div class="para">
				<span class="bold bold"><strong>Group</strong></span>: Enter the group name for the VM.
			</div></li><li class="listitem"><div class="para">
				「適用」をクリックします。
			</div></li></ol></div></div><div xml:lang="ja-JP" class="section" id="changing-service-offering-for-vm" lang="ja-JP"><div class="titlepage"><div><div><h2 class="title" id="changing-service-offering-for-vm">10.8. 仮想マシンのサービスオファリングの変更</h2></div></div></div><div class="para">
		仮想マシンに対してのコンピューティングリソースのレベルをアップグレード、ダウングレードするために仮想マシンのコンピュートオファリングを変更することができます。
	</div><div class="orderedlist"><ol><li class="listitem"><div class="para">
				ユーザーもしくは管理者として CloudStack UIからログインします。
			</div></li><li class="listitem"><div class="para">
				左側のナビゲーションから「インスタンス」をクリックします。
			</div></li><li class="listitem"><div class="para">
				削除したい仮想マシンを選択します。
			</div></li><li class="listitem"><div class="para">
				Click the Stop button to stop the VM.
				<span class="inlinemediaobject"><img src="./images/stop-instance-icon.png" alt="StopButton.png: button to stop a VM" /></span>

			</div></li><li class="listitem"><div class="para">
				Click the Change Service button.
				<span class="inlinemediaobject"><img src="./images/change-service-icon.png" alt="ChangeServiceButton.png: button to change the service of a VM" /></span>
			</div><div class="para">
				The Change service dialog box is displayed.
			</div></li><li class="listitem"><div class="para">
				Select the offering you want to apply to the selected VM.
			</div></li><li class="listitem"><div class="para">
				「OK」をクリックします。
			</div></li></ol></div></div><div xml:lang="ja-JP" class="section" id="manual-live-migration" lang="ja-JP"><div class="titlepage"><div><div><h2 class="title" id="manual-live-migration">10.9. ホスト間の仮想マシンの移動（手動ライブマイグレーション）</h2></div></div></div><div class="para">
		CloudStack管理者は、ユーザーへのサービスを中断させることも、保守モードにすることもなく、実行中の仮想マシンをあるホストから別のホストに移動できます。これを手動ライブマイグレーションと呼び、次の条件で実行できます。
	</div><div class="itemizedlist"><ul><li class="listitem"><div class="para">
				ルート管理者がログオンしていること。ドメイン管理者およびユーザーは仮想マシンの手動ライブマイグレーションを実行できません。
			</div></li><li class="listitem"><div class="para">
				仮想マシンが実行中であること。停止中の仮想マシンはライブマイグレーションできません。
			</div></li><li class="listitem"><div class="para">
				移行先ホストが移行元のホストと同じクラスターに存在すること。
			</div></li><li class="listitem"><div class="para">
				仮想マシンがローカルディスクストレージを使用していないこと。
			</div></li><li class="listitem"><div class="para">
				移行先ホストに十分な処理能力があること。そうでない場合は、仮想マシンはメモリが使用できるようになるまで「移行中」の状態のままになります。
			</div></li></ul></div><div class="para">
		仮想マシンを手動でライブマイグレーションするには
	</div><div class="orderedlist"><ol><li class="listitem"><div class="para">
				ユーザーもしくは管理者として CloudStack UIからログインします。
			</div></li><li class="listitem"><div class="para">
				左側のナビゲーションから「インスタンス」をクリックします。
			</div></li><li class="listitem"><div class="para">
				移行する仮想マシンを選択します。
			</div></li><li class="listitem"><div class="para">
				[Migrate Instance] ボタンをクリックします。
				<span class="inlinemediaobject"><img src="./images/migrate-instance.png" alt="Migrateinstance.png: button to migrate an instance" /></span>
			</div></li><li class="listitem"><div class="para">
				ホストの一覧から仮想マシンの移行先を選択します。
			</div></li><li class="listitem"><div class="para">
				[OK]をクリックします。
			</div></li></ol></div></div><div xml:lang="ja-JP" class="section" id="deleting-vms" lang="ja-JP"><div class="titlepage"><div><div><h2 class="title" id="deleting-vms">10.10. VMの削除</h2></div></div></div><div class="para">
		ユーザーは独自の仮想マシンを削除でき、起動中の仮想マシンの場合は削除前に停止されます。管理者は全ての仮想マシンを削除することができます。
	</div><div class="para">
		仮想マシンの削除方法:
	</div><div class="orderedlist"><ol><li class="listitem"><div class="para">
				ユーザーもしくは管理者として CloudStack UIからログインします。
			</div></li><li class="listitem"><div class="para">
				左側のナビゲーションから [Instances] をクリックします。
			</div></li><li class="listitem"><div class="para">
				削除したい仮想マシンを選択します。
			</div></li><li class="listitem"><div class="para">
				Click the Destroy Instance button. 
				<span class="inlinemediaobject"><img src="./images/destroy-instance.png" alt="Destroyinstance.png: button to destroy an instance" /></span>

			</div></li></ol></div></div><div xml:lang="ja-JP" class="section" id="working-with-iso" lang="ja-JP"><div class="titlepage"><div><div><h2 class="title" id="working-with-iso">10.11. ISO に関わる作業</h2></div></div></div><div class="para">
		CloudStack は、ISO および ISO のゲスト仮想マシンへのアタッチをサポートします。ISO は、ISO/CD-ROM 形式のファイルシステムの読み取り専用ファイルです。ユーザーは自分の ISO をアップロードして、自分のゲスト仮想マシンにマウントできます。
	</div><div class="para">
		ISO は、URL に基づいてアップロードされます。サポートされるプロトコルは HTTP です。ISO が HTTP 経由で利用できるようになったら、http://my.web.server/filename.iso のようなアップロード用の URL を指定します。
	</div><div class="para">
		テンプレートのように、ISO をパブリックまたはプライベートにすることができます。ISO はハイパーバイザー固有ではありません。つまり、vSphere のゲストは、KVM のゲストがマウントできるのとまったく同じイメージをマウントできます。
	</div><div class="para">
		ISO イメージは、システムに格納して、テンプレートと同様のプライバシーレベルを指定して使用することができます。ISO イメージは、起動可能または起動不可に分類されます。起動可能な ISO イメージは、オペレーティングシステムイメージを含むものです。CloudStack では、ユーザーが ISO イメージからゲスト仮想マシンを起動することができます。また、ユーザーは ISO イメージをゲスト仮想マシンにアタッチすることもできます。たとえば、これにより PV ドライバーを Windows にインストールできます。ISO イメージは、ハイパーバイザー固有ではありませ ん。
	</div><div xml:lang="ja-JP" class="section" id="add-iso" lang="ja-JP"><div class="titlepage"><div><div><h3 class="title" id="add-iso">10.11.1. ISO の追加</h3></div></div></div><div class="para">
		追加のオペレーティングシステムやほかのソフトウェアをゲスト仮想マシンで使用できるようにするために、ISO を追加できます。ISO は通常、オペレーティングシステムのイメージと考えられていますが、テンプレートの一部としてインストールするデスクトップアプリケーションなど、ほかの種類のソフトウェアの ISO を追加することもできます。
	</div><div class="orderedlist"><ol><li class="listitem"><div class="para">
				管理者またはユーザーとして CloudStack ユーザーインターフェイスにログオンします。
			</div></li><li class="listitem"><div class="para">
				左側のナビゲーションバーで[Templates]をクリックします。
			</div></li><li class="listitem"><div class="para">
				[Select view]ボックスの一覧で[ISOs]を選択します。
			</div></li><li class="listitem"><div class="para">
				[Add ISO]をクリックします。
			</div></li><li class="listitem"><div class="para">
				[Add ISO]ダイアログボックスで、次の情報を入力します。
			</div><div class="itemizedlist"><ul><li class="listitem"><div class="para">
						<span class="bold bold"><strong>Name </strong></span>: ISO イメージの短い名前です(例:CentOS 6.2 64 bit)。
					</div></li><li class="listitem"><div class="para">
						<span class="bold bold"><strong>Description </strong></span>: ISO イメージの表示テキストです(例:CentOS 6.2 64 bit)。
					</div></li><li class="listitem"><div class="para">
						<span class="bold bold"><strong>URL </strong></span>: ISO イメージをホストする URL です。管理サーバーは、HTTP 経由でこの場所にアクセスできる必要があり ます。必要に応じて、ISO イメージを直接管理サーバー上に配置することができます。
					</div></li><li class="listitem"><div class="para">
						<span class="bold bold"><strong>Zone </strong></span>: ISO を使用できるようにするゾーンを選択するか、[All Zones]を選択して CloudStack 全体で使用できるよ うにします。
					</div></li><li class="listitem"><div class="para">
						<span class="bold bold"><strong>Bootable </strong></span>: ゲストがこの ISO イメージから起動できるかどうかを指定します。たとえば、CentOS ISO は起動でき ますが、Microsoft Office ISO は起動できません。
					</div></li><li class="listitem"><div class="para">
						<span class="bold bold"><strong>OS Type </strong></span>: これは、CloudStack プラットフォームとハイパーバイザーで特定の処理を実行したり、想定に基づい てゲストのパフォーマンスを向上したりするのに役立ちます。次のいずれかのオプションを選択します。
					</div><div class="itemizedlist"><ul><li class="listitem"><div class="para">
								使用する ISO イメージのオペレーティングシステムが一覧にある場合は、それを選択します。
							</div></li><li class="listitem"><div class="para">
								ISO のオペレーティングシステムの種類が一覧にない、または ISO が起動不可である場合は、[Other]を選択します。
							</div></li><li class="listitem"><div class="para">
								(XenServer のみ)PV モードでこの ISO から起動する場合は、[Other PV(32-bit)]または[Other PV (64-bit)]を選択します。
							</div></li><li class="listitem"><div class="para">
								(KVM のみ)PV に対応するオペレーティングシステムを選択する場合は、その ISO から作成する仮想マシンのルートディスクは SCSI(virtio)になります。PV に対応しないオペレーティングシステムの場合は、仮想 マシンのルートディスクは IDE になります。PV に対応しているオペレーティングシステム:
							</div><div class="informaltable"><table border="1"><colgroup><col width="33%" /><col width="33%" /><col width="33%" /></colgroup><tbody><tr><td align="left">
												<div class="para">
													Fedora 13
												</div>
											</td><td align="left">
												<div class="para">
													Fedora 12
												</div>
											</td><td align="left">
												<div class="para">
													Fedora 11
												</div>
											</td></tr><tr><td align="left">
												<div class="para">
													Fedora 10
												</div>
											</td><td align="left">
												<div class="para">
													Fedora 9
												</div>
											</td><td align="left">
												<div class="para">
													Other PV
												</div>
											</td></tr><tr><td align="left">
												<div class="para">
													Debian GNU/Linux
												</div>
											</td><td align="left">
												<div class="para">
													CentOS 5.3
												</div>
											</td><td align="left">
												<div class="para">
													CentOS 5.4
												</div>
											</td></tr><tr><td align="left">
												<div class="para">
													CentOS 5.5
												</div>
											</td><td align="left">
												<div class="para">
													Red Hat Enterprise Linux 5.3
												</div>
											</td><td align="left">
												<div class="para">
													Red Hat Enterprise Linux 5.4
												</div>
											</td></tr><tr><td align="left">
												<div class="para">
													Red Hat Enterprise Linux 5.5
												</div>
											</td><td align="left">
												<div class="para">
													Red Hat Enterprise Linux 6
												</div>
											</td><td align="left">
											</td></tr></tbody></table></div></li></ul></div><div class="note"><div class="admonition_header"><h2>注記</h2></div><div class="admonition"><div class="para">
							注:通常は、イメージのオペレーティングシステムより古いバージョンを選択しないでください。たとえば、\nCentOS 6.2 イメージをサポートするために CentOS 5.4 を選択すると、通常は動作しません。このような場合は、 [Other]を選択する必要があります。
						</div></div></div></li><li class="listitem"><div class="para">
						<span class="bold bold"><strong>Extractable :</strong></span> ISO が抽出可能である必要がある場合は、このチェックボックスをオンにします。
					</div></li><li class="listitem"><div class="para">
						<span class="bold bold"><strong>Public :</strong></span> この ISO をほかのユーザーが使用できる必要がある場合は、このチェックボックスをオンにします。
					</div></li><li class="listitem"><div class="para">
						<span class="bold bold"><strong>Featured :</strong></span> ユーザーが ISO を選択するときに「おすすめの ISO」としてこの ISO を目立たせるには、このチェック ボックスをオンにします。ISO が[Featured ISOs]の一覧に表示されます。ISO をおすすめに設定できるのは管理者だけです。
					</div></li></ul></div></li><li class="listitem"><div class="para">
				「OK」をクリックします。
			</div><div class="para">
				管理サーバーが ISO をダウンロードします。ISO のサイズによっては、しばらく時間がかかることがあります。ISO が セカンダリストレージに正常にダウンロードされると、ISO の状態が準備完了になります。[Refresh]をクリックすると、 ダウンロードの進捗率が更新されます。
			</div></li><li class="listitem"><div class="para">
				<span class="bold bold"><strong>重要 :</strong></span> ISO のダウンロードが完了するまで次の操作をしないでください。次のタスクに進んで ISO をすぐ使用しようとすると、失敗します。CloudStack で ISO 全体を利用できるようになってから、操作する必要があります。
			</div></li></ol></div></div><div xml:lang="ja-JP" class="section" id="attach-iso-to-vm" lang="ja-JP"><div class="titlepage"><div><div><h3 class="title" id="attach-iso-to-vm">10.11.2. 仮想マシンへのISOのアタッチ</h3></div></div></div><div class="orderedlist"><ol><li class="listitem"><div class="para">
				左側のナビゲーションから「インスタンス」をクリックします。
			</div></li><li class="listitem"><div class="para">
				アタッチする仮想マシンの選択
			</div></li><li class="listitem"><div class="para">
				Click the Attach ISO button. 
				<span class="inlinemediaobject"><img src="./images/iso-icon.png" alt="iso.png: depicts adding an iso image" /></span>
			</div></li><li class="listitem"><div class="para">
				ISOアタッチのダイアログボックスで、アタッチしたいISOを選択します。
			</div></li><li class="listitem"><div class="para">
				[OK]をクリックします。
			</div></li></ol></div></div></div></div><div xml:lang="ja-JP" class="chapter" id="working-with-hosts" lang="ja-JP"><div class="titlepage"><div><div><h2 class="title">第11章 ホストの操作</h2></div></div></div><div class="toc"><dl><dt><span class="section"><a href="#adding-hosts">11.1. ホストの追加</a></span></dt><dt><span class="section"><a href="#scheduled-maintenance-maintenance-mode-hosts">11.2. ホストの計画保守と保守モード</a></span></dt><dd><dl><dt><span class="section"><a href="#vcenter-maintenance-mode">11.2.1. vCenter と保守モード</a></span></dt><dt><span class="section"><a href="#xenserver-maintenance-mode">11.2.2. XenServer と保守モード</a></span></dt></dl></dd><dt><span class="section"><a href="#disable-enable-zones-pods-clusters">11.3. ゾーン、ポッド、およびクラスターの無効化と有効化</a></span></dt><dt><span class="section"><a href="#removing-hosts">11.4. ホストの削除</a></span></dt><dd><dl><dt><span class="section"><a href="#removing-xenserver-kvm-hosts">11.4.1. XenServer および KVM ホストの削除</a></span></dt><dt><span class="section"><a href="#removing-vsphere-hosts">11.4.2. vSphere ホストの削除</a></span></dt></dl></dd><dt><span class="section"><a href="#re-install-hosts">11.5. Re-Installing Hosts</a></span></dt><dt><span class="section"><a href="#maintain-hypervisors-on-hosts">11.6. ハイパーバイザーホストの維持</a></span></dt><dt><span class="section"><a href="#change-host-password">11.7. Changing Host Password</a></span></dt><dt><span class="section"><a href="#host-allocation">11.8. ホストの割り当て</a></span></dt><dd><dl><dt><span class="section"><a href="#over-provisioning-service-offering-limits">11.8.1. オーバープロビジョニングとサービスオファリングの制限</a></span></dt></dl></dd><dt><span class="section"><a href="#vlan-provisioning">11.9. VLAN プロビジョニング</a></span></dt></dl></div><div class="section" id="adding-hosts"><div class="titlepage"><div><div><h2 class="title" id="adding-hosts">11.1. ホストの追加</h2></div></div></div><div class="para">
			ゲスト仮想マシンの処理能力を上げるため、いつでもホストを追加できます。要件と手順については、<a class="xref" href="#host-add">「ホストの追加」</a>を参照してください。
		</div></div><div xml:lang="ja-JP" class="section" id="scheduled-maintenance-maintenance-mode-hosts" lang="ja-JP"><div class="titlepage"><div><div><h2 class="title" id="scheduled-maintenance-maintenance-mode-hosts">11.2. ホストの計画保守と保守モード</h2></div></div></div><div class="para">
		ホストを保守モードにすることができます。保守モードがアクティブになると、ホストで新しいゲスト仮想マシンを処理できな くなります。そのホストで実行中のゲスト仮想マシンは、保守モードでない別のホストにシームレスに移行されます。この移行にはライブマイグレーション技術が使用され、ゲストの実行が中断されることはありません。
	</div><div xml:lang="ja-JP" class="section" id="vcenter-maintenance-mode" lang="ja-JP"><div class="titlepage"><div><div><h3 class="title" id="vcenter-maintenance-mode">11.2.1. vCenter と保守モード</h3></div></div></div><div class="para">
		vCenter ホストで保守モードを開始するには、vCenter と CloudStack が互いに連携して動作する必要があります。 CloudStack と vCenter には、緊密に連携する別々の保守モードがあります。
	</div><div class="orderedlist"><ol><li class="listitem"><div class="para">
				ホストを CloudStack の「計画保守」モードにします。これにより、vCenter の保守モードが開始されることはなく、ホストからの仮想マシンの移行が発生するだけです。
			</div><div class="para">
				CloudStack の保守モードが要求されると、まずホストは保守準備状態になります。この状態のホストは、新しいゲスト仮想マシンの起動対象になりません。次に、すべての仮想マシンがサーバーから移行されます。ライブマイグレーションを使用して、ホストから仮想マシンを移動します。これにより、ゲストの中断を伴わずに、ほかのホストにゲストを移行できます。この移行の完了後、ホストは保守準備完了モードになります。
			</div></li><li class="listitem"><div class="para">
				ユーザーインターフェイスに「保守準備完了」のインジケーターが表示されるのを待ちます。
			</div></li><li class="listitem"><div class="para">
				ここで vCenter を使用して、ホストの保守に必要な操作を実行します。この間、ホストは新しいゲスト仮想マシンの割り当て対象になりません。
			</div></li><li class="listitem"><div class="para">
				保守タスクを完了したら、次のようにホストの保守モードを解除します。
			</div><div class="orderedlist"><ol class="loweralpha"><li class="listitem"><div class="para">
						まず vCenter を使用して、vCenter の保守モードを終了します。
					</div><div class="para">
						これにより、CloudStack による再アクティブ化の準備がホスト側で整います。
					</div></li><li class="listitem"><div class="para">
						次に、CloudStack の管理者ユーザーインターフェイスを使用して、CloudStack の保守モードをキャンセルしま す。
					</div><div class="para">
						ホストがオンラインに戻ると、ホストから移行されていた仮想マシンがホストに戻り、新しい仮想マシンを追加で きるようになります。
					</div></li></ol></div></li></ol></div></div><div xml:lang="ja-JP" class="section" id="xenserver-maintenance-mode" lang="ja-JP"><div class="titlepage"><div><div><h3 class="title" id="xenserver-maintenance-mode">11.2.2. XenServer と保守モード</h3></div></div></div><div class="para">
		XenServer では XenCenter の保守モード機能を使うことで一時的にサーバーをオフラインにできます。サーバーを保守モードにした場合、全ての稼働中仮想マシンは自動的に同じプール上の別ホストにマイグレーションされます。サーバーがプールのマスターである場合、プールから新しいマスターが選出されます。サーバーが保守モード中は仮想マシンの作成や起動はできません。
	</div><div class="para">
		<span class="bold bold"><strong>サーバーを保守モードにするには: </strong></span>
	</div><div class="orderedlist"><ol><li class="listitem"><div class="para">
				[Resources]ペインからサーバーを選択し以下の作業を実施します。
			</div><div class="itemizedlist"><ul><li class="listitem"><div class="para">
						右クリックしてショートカットメニューから[Enter Maintenance Mode]をクリックします。
					</div></li><li class="listitem"><div class="para">
						On the Server menu, click Enter Maintenance Mode.
					</div></li></ul></div></li><li class="listitem"><div class="para">
				Click Enter Maintenance Mode.
			</div></li></ol></div><div class="para">
		[Resource]ペインのサーバー状態に全ての稼働中仮想マシンが正常に別サーバーにマイグレーションしたことが表示されます。
	</div><div class="para">
		<span class="bold bold"><strong>サーバーを保守モードから戻すには:</strong></span>
	</div><div class="orderedlist"><ol><li class="listitem"><div class="para">
				[Resources]ペインからサーバーを選択し以下の作業を実施します。
			</div><div class="itemizedlist"><ul><li class="listitem"><div class="para">
						右クリックしてショートカットメニューから[Exit Maintenance Mode]をクリックします。
					</div></li><li class="listitem"><div class="para">
						On the Server menu, click Exit Maintenance Mode.
					</div></li></ul></div></li><li class="listitem"><div class="para">
				Click Exit Maintenance Mode.
			</div></li></ol></div></div></div><div xml:lang="ja-JP" class="section" id="disable-enable-zones-pods-clusters" lang="ja-JP"><div class="titlepage"><div><div><h2 class="title" id="disable-enable-zones-pods-clusters">11.3. ゾーン、ポッド、およびクラスターの無効化と有効化</h2></div></div></div><div class="para">
		ゾーン、ポッド、またはクラスターは、クラウドから完全に削除することなく、有効または無効にできます。これは、保守のため、または問題が発生してクラウドインフラストラクチャの一部が信頼できなくなった場合に便利です。状態が有効に戻るまで、無効のゾーン、ポッド、またはクラスターに新しい割り当ては行われません。最初にゾーン、ポッド、またはクラスターがクラウドに追加されたときはデフォルトで無効になっています。
	</div><div class="para">
		ゾーン、ポッド、またはクラスターを無効または有効にするには
	</div><div class="orderedlist"><ol><li class="listitem"><div class="para">
				CloudStack ユーザーインターフェイスに管理者としてログオンします。
			</div></li><li class="listitem"><div class="para">
				左側のナビゲーションバーで [Infrastructure] をクリックします。
			</div></li><li class="listitem"><div class="para">
				[Zones] で [View More]をクリックします。
			</div></li><li class="listitem"><div class="para">
				ゾーンを有効化、無効化する場合はゾーンの名前をリストから探して [Enable/Disable] ボタンをクリックしてください。
				<span class="inlinemediaobject"><img src="./images/enable-disable.png" alt="enable-disable.png: button to enable or disable zone, pod, or cluster." /></span>
			</div></li><li class="listitem"><div class="para">
				ポッドまたはクラスターを無効または有効にするには、そのポッドまたはクラスターを含むゾーンの名前をクリックし ます。
			</div></li><li class="listitem"><div class="para">
				[Compute] タブをクリックします。
			</div></li><li class="listitem"><div class="para">
				ダイアグラムの [Pods] または [Clusters] ノードの [View All] をクリックします。
			</div></li><li class="listitem"><div class="para">
				一覧内のポッドまたはクラスターをクリックします。
			</div></li><li class="listitem"><div class="para">
				[Enable] または [Disable] アイコンをクリックします。
				<span class="inlinemediaobject"><img src="./images/enable-disable.png" /></span>
			</div></li></ol></div></div><div xml:lang="ja-JP" class="section" id="removing-hosts" lang="ja-JP"><div class="titlepage"><div><div><h2 class="title" id="removing-hosts">11.4. ホストの削除</h2></div></div></div><div class="para">
		ホストは必要に応じてクラウドから削除できます。ホストを削除する手順は、ハイパーバイザーの種類によって異なりま す。
	</div><div xml:lang="ja-JP" class="section" id="removing-xenserver-kvm-hosts" lang="ja-JP"><div class="titlepage"><div><div><h3 class="title" id="removing-xenserver-kvm-hosts">11.4.1. XenServer および KVM ホストの削除</h3></div></div></div><div class="para">
		ノードは、保守モードになるまでクラスターから削除できません。これによって、ノード上のすべての仮想マシンがほかのホストに確実に移行されます。ホストをクラウドから削除するには、次の手順に従います。
	</div><div class="orderedlist"><ol><li class="listitem"><div class="para">
				ノードを保守モードにします。
			</div><div class="para">
				<a class="xref" href="#scheduled-maintenance-maintenance-mode-hosts">「ホストの計画保守と保守モード」</a> を参照してください。
			</div></li><li class="listitem"><div class="para">
				For KVM, stop the cloudstack-agent service.
			</div></li><li class="listitem"><div class="para">
				ユーザーインターフェイスオプションを使用して、ノードを削除します。
			</div><div class="para">
				これで、ホストの電源を切り、その IP アドレスを再使用したり再インストールしたりできるようになりました。
			</div></li></ol></div></div><div xml:lang="ja-JP" class="section" id="removing-vsphere-hosts" lang="ja-JP"><div class="titlepage"><div><div><h3 class="title" id="removing-vsphere-hosts">11.4.2. vSphere ホストの削除</h3></div></div></div><div class="para">
		この種類のホストを削除するには、<a class="xref" href="#scheduled-maintenance-maintenance-mode-hosts">「ホストの計画保守と保守モード」</a> で説明されているように、まずホストを保守モードにします。次に、CloudStack を使用して、ホストを削除します。CloudStack を使用して削除されたホストに対して、 CloudStack はコマンドを実行しません。ただし、その場合でもホストは vCenter クラスター内に残しておくことができます。
	</div></div></div><div xml:lang="ja-JP" class="section" id="re-install-hosts" lang="ja-JP"><div class="titlepage"><div><div><h2 class="title" id="re-install-hosts">11.5. Re-Installing Hosts</h2></div></div></div><div class="para">
		You can re-install a host after placing it in maintenance mode and then removing it. If a host is down and cannot be placed in maintenance mode, it should still be removed before the re-install.
	</div></div><div xml:lang="ja-JP" class="section" id="maintain-hypervisors-on-hosts" lang="ja-JP"><div class="titlepage"><div><div><h2 class="title" id="maintain-hypervisors-on-hosts">11.6. ハイパーバイザーホストの維持</h2></div></div></div><div class="para">
		ハイパーバイザーソフトウェアをホスト上で動作させている場合、ハイパーバイザー製造元が提供するすべての Hotfix を適用したことを確認します。ハイパーバイザーの製造元のサポートチャ ネルを通じてパッチのリリース状況を確認し、パッチがリリースさ れたらできるだけ早く適用します。ハイパーバイザーの必須パッチについて CloudStack が自動的に通知することはありません。 ホストにハイパーバイザーの最新パッチを適用することは非常に 重要です。最新パッチが適用されていないシステムは、おそらくハイパーバイザーの製造元からサポートを受けられません。
	</div><div class="note"><div class="admonition_header"><h2>注記</h2></div><div class="admonition"><div class="para">
			最新の Hotfix を適用しないと、データの破損や仮想マシンの喪失が生じる可能性があります。
		</div></div></div><div class="para">
		(XenServer) For more information, see <a href="http://docs.cloudstack.org/Knowledge_Base/Possible_VM_corruption_if_XenServer_Hotfix_is_not_Applied/Highly_Recommended_Hotfixes_for_XenServer_5.6_SP2">Highly Recommended Hotfixes for XenServer in the CloudStack Knowledge Base</a>.
	</div></div><div xml:lang="ja-JP" class="section" id="change-host-password" lang="ja-JP"><div class="titlepage"><div><div><h2 class="title" id="change-host-password">11.7. Changing Host Password</h2></div></div></div><div class="para">
		The password for a XenServer Node, KVM Node, or vSphere Node may be changed in the database. Note that all Nodes in a Cluster must have the same password.
	</div><div class="para">
		To change a Node's password:
	</div><div class="orderedlist"><ol><li class="listitem"><div class="para">
				Identify all hosts in the cluster.
			</div></li><li class="listitem"><div class="para">
				Change the password on all hosts in the cluster. Now the password for the host and the password known to CloudStack will not match. Operations on the cluster will fail until the two passwords match.
			</div></li><li class="listitem"><div class="para">
				Get the list of host IDs for the host in the cluster where you are changing the password. You will need to access the database to determine these host IDs. For each hostname "h" (or vSphere cluster) that you are changing the password for, execute:
			</div><pre class="programlisting">mysql&gt; select id from cloud.host where name like '%h%';</pre></li><li class="listitem"><div class="para">
				This should return a single ID. Record the set of such IDs for these hosts.
			</div></li><li class="listitem"><div class="para">
				Update the passwords for the host in the database. In this example, we change the passwords for hosts with IDs 5, 10, and 12 to "password".
			</div><pre class="programlisting">mysql&gt; update cloud.host set password='password' where id=5 or id=10 or id=12;</pre></li></ol></div></div><div xml:lang="ja-JP" class="section" id="host-allocation" lang="ja-JP"><div class="titlepage"><div><div><h2 class="title" id="host-allocation">11.8. ホストの割り当て</h2></div></div></div><div class="para">
		システムは仮想マシンを動作させるために最も適切なホストを自動的に選択します。エンドユーザーは仮想マシンを作成するゾーンを指定することができますが仮想マシンインスタンスがどのホストで動作するかは制御することはできません。
	</div><div class="para">
		CloudStack 管理者はゲストインスタンタイプに対しパフォーマンスを確保するため特定のホストを指定することができます。たとえば管理者は Windows ゲストを動作させるだけのパフォーマンスを確保するためにホストを指定することができます。デフォルトのホスト割り当ては OS タイプによりどのホストに配置するかを試み、動作可能な処理能力を持つサーバー全てが対象になります。
	</div><div class="para">
		垂直割り当てと水平割り当ての両方が可能です。垂直割り当てでは、特定のホストのリソースをすべて消費した後で、次のホストにゲストを割り当てます。これにより、クラウドの消費電力が抑えられます。水平割り当てでは、ラウンドロビン方式で各ホストにゲストを配置します。これにより、ゲストのパフォーマンスが向上する場合があります。CloudStack では、管理者が構成するとおりに CPU オーバープロビジョニングの要素を許可することができます。オーバープロビジョニングを使用すると、ハードウェアで実際に使用できるよりも高い CPU サイクルをゲストに割り当てることができま す。
	</div><div class="para">
		また、CloudStack では、新しいアロケーターを追加するためのプラグ可能なインターフェイスも提供します。 これらのカスタムアロケーターを使用して、管理者が要求するどのようなポリシーにも対応できます。
	</div><div xml:lang="ja-JP" class="section" id="over-provisioning-service-offering-limits" lang="ja-JP"><div class="titlepage"><div><div><h3 class="title" id="over-provisioning-service-offering-limits">11.8.1. オーバープロビジョニングとサービスオファリングの制限</h3></div></div></div><div class="para">
		CloudStack では、管理者の構成するオーバープロビジョニング比率に基づいて、CPU オーバープロビジョニングを実行します。これは、「cpu.overprovisioning.factor」 グローバル構成変数によって定義されます。
	</div><div class="para">
		CloudStack では、管理者の構成するオーバープロビジョニング比率に基づいて、CPU オーバープロビジョニングを実行します。これは、「cpu.overprovisioning.factor」 グローバル構成変数によって定義されます。
	</div><div class="para">
		サービスオファリングの制限(たとえば、1GHz、1 コアなど)は、コア数に厳密に適用されます。たとえば、1 コアを提供するサービスオファリングを使用するゲストは、ホスト上のほかのアクティビティにかかわりなく、使用できるコアは 1 つだけで す。
	</div><div class="para">
		動作周波数に対するサービスオファリングの制限は、CPU リソースが競合する場合にのみ適用されます。たとえば、2GHz のコアを持つホスト上で 1GHz のサービスオファリングを使用するゲストを作成したとします。このゲストは、ホスト上で実行される唯一のゲストです。この場合は、ゲストは 2GHz すべてを使用できます。複数のゲストが CPU を使用しようとする場 合は、重み係数を使用して CPU リソースをスケジュールします。重みは、サービスオファリングのクロック速度に基づきま す。ゲストは、サービスオファリングの動作周波数に比例した CPU 割り当てを受けます。たとえば、2GHz のサービスオファリングで作成されたゲストは、1GHz のサービスオファリングで作成されたゲストの 2 倍の CPU 割り当てを受けます。
	</div></div></div><div xml:lang="ja-JP" class="section" id="vlan-provisioning" lang="ja-JP"><div class="titlepage"><div><div><h2 class="title" id="vlan-provisioning">11.9. VLAN プロビジョニング</h2></div></div></div><div class="para">
		CloudStack は、ホスト上に VLAN にブリッジするインターフェイスを自動的に作成し、破棄します。一般に、管理者はこのプ ロセスを管理する必要はありません。
	</div><div class="para">
		CloudStack は、ハイパーバイザーの種類に基づいて VLAN を別々に管理します。XenServer または KVM の場合は、VLAN は使用されるホスト上のみに作成され、VLAN を必要とするすべてのゲストが終了または別のホストに移動したときに破棄されます。
	</div><div class="para">
		vSphere の場合は、VLAN を必要とするゲストが特定のホストで実行されていなくても、VLAN がクラスター内のすべてのホストにプロビジョニングされます。そのため、管理者は移行先のホストに VLAN を作成しなくても、vCenter でライブマイグレーションなどの機能を実行できます。さらに、VLAN は必要がなくなっても、ホストから削除されません。
	</div><div class="para">
		You can use the same VLANs on different physical networks provided that each physical network has its own underlying layer-2 infrastructure, such as switches. For example, you can specify VLAN range 500 to 1000 while deploying physical networks A and B in an Advanced zone setup. This capability allows you to set up an additional layer-2 physical infrastructure on a different physical NIC and use the same set of VLANs if you run out of VLANs. Another advantage is that you can use the same set of IPs for different customers, each one with their own routers and the guest networks on different physical NICs.
	</div></div></div><div xml:lang="ja-JP" class="chapter" id="working-with-templates" lang="ja-JP"><div class="titlepage"><div><div><h2 class="title">第12章 テンプレートと動作</h2></div></div></div><div class="toc"><dl><dt><span class="section"><a href="#create-templates-overview">12.1. テンプレートの作成:概要</a></span></dt><dt><span class="section"><a href="#requirements-templates">12.2. テンプレートの要件</a></span></dt><dt><span class="section"><a href="#best-practices-templates">12.3. テンプレートのベストプラクティス</a></span></dt><dt><span class="section"><a href="#default-template">12.4. デフォルトのテンプレート</a></span></dt><dt><span class="section"><a href="#private-public-template">12.5. プライベートテンプレートとパブリックテンプレート</a></span></dt><dt><span class="section"><a href="#create-template-from-existing-vm">12.6. 既存の仮想マシンからのテンプレートの作成</a></span></dt><dt><span class="section"><a href="#create-template-from-snapshot">12.7. スナップショットからのテンプレートの作成</a></span></dt><dt><span class="section"><a href="#upload-template">12.8. テンプレートのアップロード</a></span></dt><dt><span class="section"><a href="#export-template">12.9. テンプレートのエクスポート</a></span></dt><dt><span class="section"><a href="#create-windows-template">12.10. Windows テンプレートの作成</a></span></dt><dd><dl><dt><span class="section"><a href="#sysprep-windows-server-2008R2">12.10.1. Windows Server 2008 R2 の Sysprep</a></span></dt><dt><span class="section"><a href="#sysprep-for-windows-server-2003R2">12.10.2. Windows Server 2003 R2 用 システム準備</a></span></dt></dl></dd><dt><span class="section"><a href="#import-ami">12.11. AMI のインポート</a></span></dt><dt><span class="section"><a href="#convert-hyperv-vm-to-template">12.12. Hyper-V 仮想マシンのテンプレートへの変換</a></span></dt><dt><span class="section"><a href="#add-password-management-to-templates">12.13. テンプレートへのパスワード管理機能の追加</a></span></dt><dd><dl><dt><span class="section"><a href="#linux-installation">12.13.1. Linux オペレーティングシステムのインストール</a></span></dt><dt><span class="section"><a href="#windows-installation">12.13.2. Window オペレーティングシステムのインストール</a></span></dt></dl></dd><dt><span class="section"><a href="#delete-templates">12.14. テンプレートの削除</a></span></dt></dl></div><div class="para">
		テンプレートは仮想マシンに対し再利用、再設定可能なものであり、ユーザーは仮想マシンを展開する際 CloudStack のテンプレートリストから選択できます。
	</div><div class="para">
		あるテンプレートは様々なオペレーティングシステムと仮想ディスクイメージを含んでおり、オフィスアプリケーションのようなソフトウェアや誰がテンプレートを利用するかといったアクセスコントロール設定も追加で含まれます。各々のテンプレートは特定のハイパーバイザーに割り当てられいつ CloudStack に追加されるかも決められています。
	</div><div class="para">
		CloudStack で提供されているデフォルトのテンプレートとは別に、ユーザーからの選択によっては CloudStack 管理者やユーザーは新規のテンプレートを作成し新たに CloudStack に追加することができます。
	</div><div xml:lang="ja-JP" class="section" id="create-templates-overview" lang="ja-JP"><div class="titlepage"><div><div><h2 class="title" id="create-templates-overview">12.1. テンプレートの作成:概要</h2></div></div></div><div class="para">
		CloudStack には、CentOS オペレーティングシステム用のデフォルトのテンプレートが同梱されています。テンプレートを追加するにはさまざまな方法があります。管理者とエンドユーザーがテンプレートを追加できます。一般的な手順は次のとお りです。
	</div><div class="orderedlist"><ol><li class="listitem"><div class="para">
				必要なオペレーティングシステムが動作する仮想マシンインスタンスを起動します。ほかに仮想マシンの構成を変更する必要がある場合は、変更します。
			</div></li><li class="listitem"><div class="para">
				仮想マシンを停止します。
			</div></li><li class="listitem"><div class="para">
				ボリュームをテンプレートに変換します。
			</div></li></ol></div><div class="para">
		There are other ways to add templates to CloudStack. For example, you can take a snapshot of the VM's volume and create a template from the snapshot, or import a VHD from another system into CloudStack.
	</div><div class="para">
		テンプレートを作成するさまざまな方法については、後続のいくつかのセクションで説明します。
	</div></div><div xml:lang="ja-JP" class="section" id="requirements-templates" lang="ja-JP"><div class="titlepage"><div><div><h2 class="title" id="requirements-templates">12.2. テンプレートの要件</h2></div></div></div><div class="itemizedlist"><ul><li class="listitem"><div class="para">
				XenServer では、作成する各テンプレートに PV ドライバー/XenServer Tools をインストールします。これにより、ライブマイグレーションと正常なゲストのシャットダウンを行うことができます。
			</div></li><li class="listitem"><div class="para">
				vSphere では、作成する各テンプレートに VMware Tools をインストールします。これにより、コンソールビューが適切に動作します。
			</div></li></ul></div></div><div xml:lang="ja-JP" class="section" id="best-practices-templates" lang="ja-JP"><div class="titlepage"><div><div><h2 class="title" id="best-practices-templates">12.3. テンプレートのベストプラクティス</h2></div></div></div><div class="para">
		大きなテンプレート(100GB 以上)を使用する計画の場合は、大きなテンプレートをサポートするために、10 ギガビットのネットワークを利用できることを確認してください。ネットワークの速度が遅いと、大きなテンプレートを使用したときに、タイムアウトなどのエラーが発生する可能性があります。
	</div></div><div xml:lang="ja-JP" class="section" id="default-template" lang="ja-JP"><div class="titlepage"><div><div><h2 class="title" id="default-template">12.4. デフォルトのテンプレート</h2></div></div></div><div class="para">
		CloudStack には、CentOS テンプレートが含まれています。このテンプレートは、プライマリストレージとセカンダリストレージを構成した後で、セカンダリストレージ仮想マシンでダウンロードします。このテンプレートを実稼働環境で使用することも、削除してカスタムテンプレートを使用することもできます。
	</div><div class="para">
		デフォルトのテンプレートのルートパスワードは、「password」です。
	</div><div class="para">
		デフォルトのテンプレートは、XenServer、KVM、および vSphere のそれぞれに提供されます。ダウンロードするテンプレートは、クラウドで利用できるハイパーバイザーの種類に応じて異なります。各テンプレートは、物理サイズで約 2.5GB です。
	</div><div class="para">
		デフォルトのテンプレートには標準の iptables の規則が含まれ、ssh を除いてほとんどのアクセスがブロックされます。
	</div><pre class="programlisting"># iptables --list
Chain INPUT (policy ACCEPT)
target     prot opt source               destination
RH-Firewall-1-INPUT  all  --  anywhere             anywhere

Chain FORWARD (policy ACCEPT)
target     prot opt source               destination
RH-Firewall-1-INPUT  all  --  anywhere             anywhere

Chain OUTPUT (policy ACCEPT)
target     prot opt source               destination

Chain RH-Firewall-1-INPUT (2 references)
target     prot opt source               destination
ACCEPT     all  --  anywhere             anywhere
ACCEPT     icmp --  anywhere        anywhere       icmp any
ACCEPT     esp  --  anywhere        anywhere
ACCEPT     ah   --  anywhere        anywhere
ACCEPT     udp  --  anywhere        224.0.0.251    udp dpt:mdns
ACCEPT     udp  --  anywhere        anywhere       udp dpt:ipp
ACCEPT     tcp  --  anywhere        anywhere       tcp dpt:ipp
ACCEPT     all  --  anywhere        anywhere       state RELATED,ESTABLISHED
ACCEPT     tcp  --  anywhere        anywhere       state NEW tcp dpt:ssh
REJECT     all  --  anywhere        anywhere       reject-with icmp-host-
</pre></div><div xml:lang="ja-JP" class="section" id="private-public-template" lang="ja-JP"><div class="titlepage"><div><div><h2 class="title" id="private-public-template">12.5. プライベートテンプレートとパブリックテンプレート</h2></div></div></div><div class="para">
		ユーザーがテンプレートを作成するとき、プライベートまたはパブリックに指定できます。
	</div><div class="para">
		プライベートテンプレートは、作成したユーザーのみが使用できます。デフォルトで、アップロードされたテンプレートはプライベートになります。
	</div><div class="para">
		ユーザーがテンプレートをパブリックに指定した場合は、ユーザーのドメイン内のすべてのアカウントのすべてのユーザー、 およびテンプレートが格納されているゾーンにアクセスできるほかのドメインのユーザーがそのテンプレートを使用できま す。ユーザーがゾーンにアクセスできるかどうかは、ゾーンがプライベートまたはパブリックのどちらに定義されているかに左右されます。プライベートゾーンは単一のドメインに割り当てられ、パブリックゾーンはどのドメインからもアクセスできます。パブリックテンプレートをプライベートゾーンで作成する場合は、そのゾーンに割り当てられたドメインのユーザーのみが使用できます。パブリックテンプレートをパブリックゾーンで作成する場合は、すべてのドメインのすべてのユーザーが利用できます。
	</div></div><div xml:lang="ja-JP" class="section" id="create-template-from-existing-vm" lang="ja-JP"><div class="titlepage"><div><div><h2 class="title" id="create-template-from-existing-vm">12.6. 既存の仮想マシンからのテンプレートの作成</h2></div></div></div><div class="para">
		少なくとも 1 台の仮想マシンを希望どおりにセットアップすれば、それをほかの仮想マシンのプロトタイプとして使用できま す。
	</div><div class="orderedlist"><ol><li class="listitem"><div class="para">
				<a class="xref" href="#creating-vms">「VMの作成」</a> の方法のどちらかを使用して、仮想マシンを作成して起動します。
			</div></li><li class="listitem"><div class="para">
				実行中の仮想マシンで必要な構成変更を行い、[Stop]をクリックします。
			</div></li><li class="listitem"><div class="para">
				仮想マシンが停止するのを待ちます。状態が停止済みになったら、次の手順に進みます。
			</div></li><li class="listitem"><div class="para">
				[Create Template]をクリックして、次の情報を入力します。
			</div><div class="itemizedlist"><ul><li class="listitem"><div class="para">
						<span class="bold bold"><strong>Name および Display Text :</strong></span> これらはユーザーインターフェイスに表示されるため、わかりやすい言葉を選択しま す。
					</div></li><li class="listitem"><div class="para">
						<span class="bold bold"><strong>OS Type :</strong></span> これは、CloudStack プラットフォームとハイパーバイザーで特定の処理を実行したり、想定に基づい てゲストのパフォーマンスを向上したりするのに役立ちます。次のいずれかのオプションを選択します。
					</div><div class="itemizedlist"><ul><li class="listitem"><div class="para">
								停止している仮想マシンのオペレーティングシステムが一覧にある場合は、それを選択します。
							</div></li><li class="listitem"><div class="para">
								停止している仮想マシンのオペレーティングシステムの種類が一覧にない場合は、[Other]を選択します。
							</div></li><li class="listitem"><div class="para">
								PV モードでこのテンプレートから起動する場合は、[Other PV(32-bit)]または[Other PV(64-bit)]を選択します。この選択肢は、XenServer でのみ使用できます。
							</div><div class="note"><div class="admonition_header"><h2>注記</h2></div><div class="admonition"><div class="para">
									注:通常は、イメージのオペレーティングシステムより古いバージョンを選択しないでください。たとえば、\nCentOS 6.2 イメージをサポートするために CentOS 5.4 を選択すると、通常は動作しません。このような場合は、 [Other]を選択する必要があります。
								</div></div></div></li></ul></div></li><li class="listitem"><div class="para">
						<span class="bold bold"><strong>Public :</strong></span> この CloudStack 環境のすべてのユーザーがこのテンプレートにアクセスできるようにするには、このチェックボックスをオンにします。テンプレートが [Community Templates] の一覧に表示されます。<a class="xref" href="#private-public-template">「プライベートテンプレートとパブリックテンプレート」</a>を参照してください。
					</div></li><li class="listitem"><div class="para">
						<span class="bold bold"><strong>Password Enabled</strong></span>: テンプレートに CloudStack プラットフォームのパスワード変更スクリプトがインストールされている場合は、このチェックボックスをオンにします。詳細は <a class="xref" href="#add-password-management-to-templates">「テンプレートへのパスワード管理機能の追加」</a> を参照してください。
					</div></li></ul></div></li><li class="listitem"><div class="para">
				[Add]をクリックします。
			</div></li></ol></div><div class="para">
		テンプレートの作成プロセスが完了すると、新しいテンプレートが[Templates]セクションに表示されます。このテンプレート\nは、新しい仮想マシンを作成するときに使用できます。
	</div></div><div xml:lang="ja-JP" class="section" id="create-template-from-snapshot" lang="ja-JP"><div class="titlepage"><div><div><h2 class="title" id="create-template-from-snapshot">12.7. スナップショットからのテンプレートの作成</h2></div></div></div><div class="para">
		[Create Template]メニュー項目を使用するために仮想マシンを停止したくない場合は(<a class="xref" href="#create-template-from-existing-vm">「既存の仮想マシンからのテンプレートの作成」</a>を参照)、CloudStack ユーザーインターフェイスを使用して、スナップショットからテンプレートを直接作成できます。
	</div></div><div xml:lang="ja-JP" class="section" id="upload-template" lang="ja-JP"><div class="titlepage"><div><div><h2 class="title" id="upload-template">12.8. テンプレートのアップロード</h2></div></div></div><div class="warning"><div class="admonition_header"><h2>vSphere テンプレートと ISO</h2></div><div class="admonition"><div class="para">
			vSphere Client を使用して作成したテンプレートをアップロードする場合は、OVA ファイルに ISO が含まれないことを確認してください。ISO が含まれていると、テンプレートから仮想マシンを展開できません。
		</div></div></div><div class="para">
		テンプレートは、URL に基づいてアップロードされます。サポートされるアクセスプロトコルは HTTP です。テンプレートは、 大きなファイルである場合がよくあります。オプションとして gzip 形式で圧縮し、アップロード時間を削減することができま す。
	</div><div class="para">
		テンプレートをアップロードするには
	</div><div class="orderedlist"><ol><li class="listitem"><div class="para">
				左側のナビゲーションバーで[Templates]をクリックします。
			</div></li><li class="listitem"><div class="para">
				Click Register Template.
			</div></li><li class="listitem"><div class="para">
				次の情報を指定します。
			</div><div class="itemizedlist"><ul><li class="listitem"><div class="para">
						<span class="bold bold"><strong>Name and Description</strong></span>. These will be shown in the UI, so choose something descriptive.
					</div></li><li class="listitem"><div class="para">
						<span class="bold bold"><strong>URL</strong></span>. The Management Server will download the file from the specified URL, such as http://my.web.server/filename.vhd.gz.
					</div></li><li class="listitem"><div class="para">
						<span class="bold bold"><strong>Zone</strong></span>. Choose the zone where you want the template to be available, or All Zones to make it available throughout CloudStack.
					</div></li><li class="listitem"><div class="para">
						<span class="bold bold"><strong>OS Type</strong></span>: This helps CloudStack and the hypervisor perform certain operations and make assumptions that improve the performance of the guest. Select one of the following:
					</div><div class="itemizedlist"><ul><li class="listitem"><div class="para">
								停止している仮想マシンのオペレーティングシステムが一覧にある場合は、それを選択します。
							</div></li><li class="listitem"><div class="para">
								停止している仮想マシンのオペレーティングシステムの種類が一覧にない場合は、[Other]を選択します。
							</div><div class="note"><div class="admonition_header"><h2>注記</h2></div><div class="admonition"><div class="para">
									通常は、イメージのオペレーティングシステムより古いバージョンを選択しないでください。たとえば、\nCentOS 6.2 イメージをサポートするために CentOS 5.4 を選択すると、通常は動作しません。このような場合は、 [Other]を選択する必要があります。
								</div></div></div></li></ul></div></li><li class="listitem"><div class="para">
						<span class="bold bold"><strong>Hypervisor</strong></span>: The supported hypervisors are listed. Select the desired one.
					</div></li><li class="listitem"><div class="para">
						<span class="bold bold"><strong>Format :</strong></span> VHD や OVA など、テンプレートのアップロードファイルの形式です。
					</div></li><li class="listitem"><div class="para">
						<span class="bold bold"><strong>Password Enabled :</strong></span> テンプレートに CloudStackのパスワード変更スクリプトがインストールされている場合は、このチェックボックスをオンにします。「テンプレートへのパスワード管理機能の追加」を参照してください。
					</div></li><li class="listitem"><div class="para">
						<span class="bold bold"><strong>Extractable :</strong></span> テンプレートを抽出可能にする場合、このチェックボックスをオンにします。エンドユーザーはテンプレートの全てのイメージをダウンロード可能になります。
					</div></li><li class="listitem"><div class="para">
						<span class="bold bold"><strong>Public :</strong></span> この CloudStack 環境のすべてのユーザーがこのテンプレートにアクセスできるようにするには、このチェックボックスをオンにします。テンプレートが [Community Templates] の一覧に表示されます。<a class="xref" href="#private-public-template">「プライベートテンプレートとパブリックテンプレート」</a>を参照してください。
					</div></li><li class="listitem"><div class="para">
						<span class="bold bold"><strong>Featured :</strong></span> ユーザーがテンプレートを選択するときに「おすすめのテンプレート」としてこのテンプレートを目立た せるには、このチェックボックスをオンにします。テンプレートが[Featured Templates]の一覧に表示されます。 テンプレートをおすすめに設定できるのは管理者だけです。
					</div></li></ul></div></li></ol></div></div><div xml:lang="ja-JP" class="section" id="export-template" lang="ja-JP"><div class="titlepage"><div><div><h2 class="title" id="export-template">12.9. テンプレートのエクスポート</h2></div></div></div><div class="para">
		エンドユーザーと管理者はテンプレートを CloudStack からエクスポートすることができます。ユーザーインターフェイスでテンプレートに移動して、操作メニューの[Download Template]をクリックします。
	</div></div><div xml:lang="ja-JP" class="section" id="create-windows-template" lang="ja-JP"><div class="titlepage"><div><div><h2 class="title" id="create-windows-template">12.10. Windows テンプレートの作成</h2></div></div></div><div class="para">
		Windows テンプレートは、複数のコンピューターにプロビジョニングする前に、Sysprep を使用して準備する必要があります。 Sysprep を使用すると、汎用の Windows テンプレートを作成して SID の競合を回避することができます。
	</div><div class="note"><div class="admonition_header"><h2>注記</h2></div><div class="admonition"><div class="para">
			(XenServer) Windows 仮想マシンを XenServer 上で動作させるにはテンプレートとして提供するか仮想マシンの作成後に追加する PV ドライバーが必要となります。管理サーバーでの追加ボリュームやISOイメージのマウント、ライブマイグレーション、グレースフルシャットダウンといった機能を利用するには PV ドライバーは必須となります。
		</div></div></div><div class="para">
	</div><div class="para">
		手順の概要は、次のとおりです。
	</div><div class="orderedlist"><ol><li class="listitem"><div class="para">
				Windows ISO をアップロードします。
			</div><div class="para">
				For more information, see <a class="xref" href="#add-iso">「ISO の追加」</a>.
			</div></li><li class="listitem"><div class="para">
				この ISO を使用して、仮想マシンインスタンスを作成します。
			</div><div class="para">
				For more information, see <a class="xref" href="#creating-vms">「VMの作成」</a>.
			</div></li><li class="listitem"><div class="para">
				Windows Server のバージョンに応じて、次の「Windows Server 2008 R2 の Sysprep」または「Windows Server 2003 R2 の Sysprep」の手順に従います。
			</div></li><li class="listitem"><div class="para">
				準備の手順が完了しました。これで、「Windows テンプレートの作成」で説明するように、テンプレートを実際に作成できます。
			</div></li></ol></div><div xml:lang="ja-JP" class="section" id="sysprep-windows-server-2008R2" lang="ja-JP"><div class="titlepage"><div><div><h3 class="title" id="sysprep-windows-server-2008R2">12.10.1. Windows Server 2008 R2 の Sysprep</h3></div></div></div><div class="para">
		Windows Server 2008 R2 では、Windows システムイメージマネージャーを実行してカスタムの sysprep 応答 XML ファイルを作成します。Windows システムイメージマネージャーは、Windows AIK(Automated Installation Kit:自動インストールキット) の一部としてインストールされます。Windows AIK は、<a href="http://www.microsoft.com/en-us/download/details.aspx?id=9085">Microsoft Download Center</a> からダウンロードできます。
	</div><div class="para">
		Windows Server 2008 R2 で sysprep を実行するには、次の手順に従います。
	</div><div class="note"><div class="admonition_header"><h2>注記</h2></div><div class="admonition"><div class="para">
			ここで概要を示す手順は、Charity Shelbourne による優れたガイドに由来するものであり、元は次の URL で公開されてい ます。 <a href="http://blogs.technet.com/askcore/archive/2008/10/31/automating-the-oobe-process-during-windows-server-2008-sysprep-mini-setup.aspx">Windows Server 2008 Sysprep Mini-Setup.</a>
		</div></div></div><div class="para">
	</div><div class="orderedlist"><ol><li class="listitem"><div class="para">
				Windows AIK をダウンロードしてインストールします。
			</div><div class="note"><div class="admonition_header"><h2>注記</h2></div><div class="admonition"><div class="para">
					注:Windows AIK は、今作成した Windows Server 2008 R2 仮想マシンにはインストールしないでください。Windows AIK は、作成するテンプレートに含めないでください。sysprep 応答ファイルの作成のみに使用します。
				</div></div></div></li><li class="listitem"><div class="para">
				Windows Server 2008 R2 のインストール DVD の\sources ディレクトリにある install.wim ファイルをハードディスクにコピーします。これは非常に大きいファイルであり、コピーに長い時間がかかる場合があります。Windows AIK を使用するには、WIM ファイルを書き込み可能にする必要があります。
			</div></li><li class="listitem"><div class="para">
				Windows AIK の一部である Windows システムイメージマネージャーを起動します。
			</div></li><li class="listitem"><div class="para">
				[Windows イメージ]ペインで[Windows イメージまたはカタログファイルを指定してください]を右クリックして、今コピーした install.wim ファイルをロードします。
			</div></li><li class="listitem"><div class="para">
				Windows 2008 R2 Edition を選択します。
			</div><div class="para">
				カタログファイルを開くことができないと警告するダイアログボックスが表示されることがあります。新しいカタログファイルを作成するには、[はい]をクリックします。
			</div></li><li class="listitem"><div class="para">
				[応答ファイル]ペインで、右クリックして新しい応答ファイルを作成します。
			</div></li><li class="listitem"><div class="para">
				次の手順に従って、Windows システムイメージマネージャーから応答ファイルを作成します。
			</div><div class="orderedlist"><ol class="loweralpha"><li class="listitem"><div class="para">
						自動化する必要がある最初のページは、言語および国や地域を選択するページです。これを自動化するには、 [Windows イメージ]ペインで[Components]を展開し、右クリックして[Microsoft-Windows-International-Core] 設定を[7 oobeSystem]に追加します。[応答ファイル]ペインで、使用する言語と国または地域に合わせて、 [InputLocale]、[SystemLocale]、[UILanguage]、および[UserLocale]を適切に構成します。これらの設定でわ からない点がある場合は、特定の設定を右クリックして[ヘルプ]をクリックします。すると、構成しようとしている設定の例を含む詳細情報が記載された、適切な CHM ヘルプファイルが開きます。
					</div><div class="mediaobject"><img src="./images/sysmanager.png" width="444" alt="sysmanager.png: System Image Manager" /></div></li><li class="listitem"><div class="para">
						ソフトウェアライセンス条項つまりエンドユーザー使用許諾契約書のページを自動化する必要があります。これを行うには、[Components]の[Microsoft-Windows-Shell-Setup]を展開します。[OOBE]を強調表示して、この設定を[7 oobeSystem]に追加します。[設定]で、[HideEULAPage]の横のボックスの一覧から[true]を選択します。
					</div><div class="mediaobject"><img src="./images/software-license.png" width="444" alt="software-license.png: Depicts hiding the EULA page." /></div></li><li class="listitem"><div class="para">
						ライセンスキーが適切に設定されていることを確認します。MAK キーを使用する場合は、Windows 2008 R2 仮 想マシンに MAK キーを入力するだけで済みます。MAK を Windows システムイメージマネージャーに入力する 必要はありません。ライセンス認証に KMS ホストを使用する場合は、プロダクトキーを入力する必要はありません。Windows ボリュームライセンス認証について詳しくは、 <a href="http://technet.microsoft.com/ja-jp/library/bb892849.aspx">http://technet.microsoft.com/ja-jp/library/bb892849.aspx</a> を参照してください。
					</div></li><li class="listitem"><div class="para">
						次に、管理者のパスワードの変更ページを自動化する必要があります。[Components]の [Microsoft-Windows-Shell-Setup]を展開して(まだ展開していない場合)、[UserAccounts]を展開し、 [AdministratorPassword]を右クリックして、設定を応答ファイルの oobeSystem 構成パスに追加します。[設定] で、[Value]の横にパスワードを指定します。
					</div><div class="mediaobject"><img src="./images/change-admin-password.png" width="444" alt="change-admin-password.png: Depicts changing the administrator password" /></div><div class="para">
						AIK のドキュメントを参照して、環境に合うほかの多くのオプションを設定することができます。上の手順は、Windows の無人セットアップを実行するための最小限の内容です。
					</div></li></ol></div></li><li class="listitem"><div class="para">
				応答ファイルを unattend.xml という名前で保存します。検証ウィンドウに表示される警告メッセージは無視できます。
			</div></li><li class="listitem"><div class="para">
				unattend.xml ファイルを Windows Server 2008 R2 仮想マシンの c:\windows\system32\sysprep フォルダーにコピーします。
			</div></li><li class="listitem"><div class="para">
				unattend.xml ファイルを c:\windows\system32\sysprep ディレクトリに配置した後で、次のように sysprep ツールを実行します。
			</div><pre class="programlisting">cd c:\Windows\System32\sysprep
sysprep.exe /oobe /generalize /shutdown
</pre><div class="para">
				Windows Server 2008 R2 仮想マシンは、sysprep が完了すると自動的にシャットダウンします。
			</div></li></ol></div></div><div xml:lang="ja-JP" class="section" id="sysprep-for-windows-server-2003R2" lang="ja-JP"><div class="titlepage"><div><div><h3 class="title" id="sysprep-for-windows-server-2003R2">12.10.2. Windows Server 2003 R2 用 システム準備</h3></div></div></div><div class="para">
		以前のバージョンの Windows には、別の sysprep ツールを使用します。Windows Server 2003 R2 では、次の手順に従いま す。
	</div><div class="orderedlist"><ol><li class="listitem"><div class="para">
				Windows のインストール CD の\support\tools\deploy.cab の内容を、Windows Server 2003 R2 仮想マシンの c:\sysprep ディレクトリに抽出します。
			</div></li><li class="listitem"><div class="para">
				c:¥sysprep¥setupmgr.exe を実行して、sysprep.inf ファイルを作成します。
			</div><div class="orderedlist"><ol class="loweralpha"><li class="listitem"><div class="para">
						[新しい応答ファイルを作成する]をクリックして、新しい応答ファイルを作成します。
					</div></li><li class="listitem"><div class="para">
						[セットアップの種類]ページで、[Sysprep セットアップ]をクリックします。
					</div></li><li class="listitem"><div class="para">
						適切なオペレーティングシステムのバージョンとエディションを選択します。
					</div></li><li class="listitem"><div class="para">
						[使用許諾契約書]ページで、[はい、インストールを完全に自動化します]をクリックします。
					</div></li><li class="listitem"><div class="para">
						名前と組織を入力します。
					</div></li><li class="listitem"><div class="para">
						ディスプレイの設定はデフォルトのままにします。
					</div></li><li class="listitem"><div class="para">
						適切なタイムゾーンを設定します。
					</div></li><li class="listitem"><div class="para">
						プロダクトキーを入力します。
					</div></li><li class="listitem"><div class="para">
						環境に合ったライセンスモードを選択します。
					</div></li><li class="listitem"><div class="para">
						[コンピュータ名を自動で生成する]をクリックします。
					</div></li><li class="listitem"><div class="para">
						デフォルトの管理者パスワードを入力します。パスワードのリセット機能を有効にした場合は、ユーザーは実際にはこのパスワードを使用しません。このパスワードは、ゲストの起動後にインスタンスマネージャーによってリセットされます。
					</div></li><li class="listitem"><div class="para">
						[ネットワークコンポーネント]ページの設定は、[標準的な設定]のままにします。
					</div></li><li class="listitem"><div class="para">
						[ワークグループ]をクリックして設定します。
					</div></li><li class="listitem"><div class="para">
						[テレフォニー]ページの設定はデフォルトのままにします。
					</div></li><li class="listitem"><div class="para">
						適切な地域設定を選択します。
					</div></li><li class="listitem"><div class="para">
						適切な言語設定を選択します。
					</div></li><li class="listitem"><div class="para">
						プリンターをインストールしないでください。
					</div></li><li class="listitem"><div class="para">
						最初のログオン時に実行するコマンドは指定しないでください。
					</div></li><li class="listitem"><div class="para">
						ID 文字列を指定する必要はありません。
					</div></li><li class="listitem"><div class="para">
						応答ファイルを c:\sysprep\sysprep.inf という名前で保存します。
					</div></li></ol></div></li><li class="listitem"><div class="para">
				次のコマンドを実行して、イメージに sysprep を実行します。
			</div><pre class="programlisting">c:\sysprep\sysprep.exe -reseal -mini -activated</pre><div class="para">
				この手順の後で、マシンは自動的にシャットダウンします。
			</div></li></ol></div></div></div><div xml:lang="ja-JP" class="section" id="import-ami" lang="ja-JP"><div class="titlepage"><div><div><h2 class="title" id="import-ami">12.11. AMI のインポート</h2></div></div></div><div class="para">
		次の手順では、XenServer ハイパーバイザーを使用する場合に、AMI(Amazon Machine Image)を CloudStackにインポートする方法を説明します。
	</div><div class="para">
		AMI ファイルがあり、そのファイルが CentOS_6.2_x64 という名前である ことを前提としています。さらに、CentOS ホストで作業することを前提と しています。AMI が Fedora イメージである場合は、まず Fedora ホストで作業する必要があります。
	</div><div class="para">
		注:イメージファイルを Centos/Fedora ホストでカスタマイズした後に VHD に変換する場合は、ファイルベースのストレージリポジトリ(ローカ ル ext3 または NFS のどちらか)を持つ XenServer ホストが必要です。
	</div><div class="note"><div class="admonition_header"><h2>注記</h2></div><div class="admonition"><div class="para">
			コマンドをコピーして実行するときは、単一の行として貼り付けたことを確認してください。一部のドキュメントビューアーでは、コピーしたテキストに不要な改行が含まれる可能性があります。
		</div></div></div><div class="para">
	</div><div class="para">
		AMI をインポートするには
	</div><div class="orderedlist"><ol><li class="listitem"><div class="para">
				イメージファイルでループバックをセットアップします。
			</div><pre class="programlisting"># mkdir -p /mnt/loop/centos62
# mount -o loop  CentOS_6.2_x64 /mnt/loop/centos54
</pre></li><li class="listitem"><div class="para">
				kernel-xen パッケージをイメージにインストールします。これにより、PV カーネルおよび RAM ディスクがイメージにダウンロードされます。
			</div><pre class="programlisting"># yum -c /mnt/loop/centos54/etc/yum.conf --installroot=/mnt/loop/centos62/ -y install kernel-xen</pre></li><li class="listitem"><div class="para">
				grub エントリを/boot/grub/grub.conf に作成します。
			</div><pre class="programlisting"># mkdir -p /mnt/loop/centos62/boot/grub
# touch /mnt/loop/centos62/boot/grub/grub.conf
# echo "" &gt; /mnt/loop/centos62/boot/grub/grub.conf
</pre></li><li class="listitem"><div class="para">
				イメージにインストールされた PV カーネルの名前を確認します。
			</div><pre class="programlisting"># cd /mnt/loop/centos62
# ls lib/modules/
2.6.16.33-xenU  2.6.16-xenU  2.6.18-164.15.1.el5xen  2.6.18-164.6.1.el5.centos.plus  2.6.18-xenU-ec2-v1.0  2.6.21.7-2.fc8xen  2.6.31-302-ec2
# ls boot/initrd*
boot/initrd-2.6.18-164.6.1.el5.centos.plus.img boot/initrd-2.6.18-164.15.1.el5xen.img
# ls boot/vmlinuz*
boot/vmlinuz-2.6.18-164.15.1.el5xen  boot/vmlinuz-2.6.18-164.6.1.el5.centos.plus  boot/vmlinuz-2.6.18-xenU-ec2-v1.0  boot/vmlinuz-2.6.21-2952.fc8xen
</pre><div class="para">
				Xen カーネルおよび RAM ディスクの名前は、常に「xen」で終わります。選択したカーネルバージョンに応じて、 lib/modules にそのバージョンのエントリがあり、それに対応する initrd と vmlinuz があるはずです。上の例では、この条件を満たす唯一のカーネルは 2.6.18-164.15.1.el5xen です。
			</div></li><li class="listitem"><div class="para">
				調べた結果に基づいて、grub.conf ファイルにエントリを作成します。エントリの例を次に示します。
			</div><pre class="programlisting">default=0
timeout=5
hiddenmenu
title CentOS (2.6.18-164.15.1.el5xen)
        root (hd0,0)
        kernel /boot/vmlinuz-2.6.18-164.15.1.el5xen ro root=/dev/xvda 
        initrd /boot/initrd-2.6.18-164.15.1.el5xen.img
</pre></li><li class="listitem"><div class="para">
				etc/fstab を編集します。「sda1」を「xvda」に、「sdb」を「xvdb」に変更します。
			</div><pre class="programlisting"># cat etc/fstab
/dev/xvda  /         ext3    defaults        1 1
/dev/xvdb  /mnt      ext3    defaults        0 0
none       /dev/pts  devpts  gid=5,mode=620  0 0
none       /proc     proc    defaults        0 0
none       /sys      sysfs   defaults        0 0
</pre></li><li class="listitem"><div class="para">
				コンソール経由でのログオンを有効にします。XenServer システムのデフォルトのコンソールデバイスは xvc0 です。 etc/inittab と etc/securetty に、それぞれ次の行があることを確認します。
			</div><pre class="programlisting"># grep xvc0 etc/inittab 
co:2345:respawn:/sbin/agetty xvc0 9600 vt100-nav
# grep xvc0 etc/securetty 
xvc0
</pre></li><li class="listitem"><div class="para">
				RAM ディスクが PV ディスクと PV ネットワークをサポートしていることを確認します。上の例で確認したカーネルバー ジョンに合わせて、これをカスタマイズします。
			</div><pre class="programlisting"># chroot /mnt/loop/centos54
# cd /boot/
# mv initrd-2.6.18-164.15.1.el5xen.img initrd-2.6.18-164.15.1.el5xen.img.bak
# mkinitrd -f /boot/initrd-2.6.18-164.15.1.el5xen.img --with=xennet --preload=xenblk --omit-scsi-modules 2.6.18-164.15.1.el5xen
</pre></li><li class="listitem"><div class="para">
				パスワードを変更します。
			</div><pre class="programlisting"># passwd
Changing password for user root.
New UNIX password: 
Retype new UNIX password: 
passwd: all authentication tokens updated successfully.
</pre></li><li class="listitem"><div class="para">
				chroot を終了します。
			</div><pre class="programlisting"># exit</pre></li><li class="listitem"><div class="para">
				etc/ssh/sshd_config の、パスワードを使用して ssh ログオンを許可する行を確認します。
			</div><pre class="programlisting"># egrep "PermitRootLogin|PasswordAuthentication" /mnt/loop/centos54/etc/ssh/sshd_config  
PermitRootLogin yes
PasswordAuthentication yes
</pre></li><li class="listitem"><div class="para">
				テンプレートのパスワードを CloudStack ユーザーインターフェイスまたは API からリセットできるようにする必要がある場合は、この時点でパスワード変更スクリプトをイメージにインストールします。<a class="xref" href="#add-password-management-to-templates">「テンプレートへのパスワード管理機能の追加」</a>を参照してください。
			</div></li><li class="listitem"><div class="para">
				ループバックマウントを解除して削除します。
			</div><pre class="programlisting"># umount /mnt/loop/centos54
# losetup -d /dev/loop0
</pre></li><li class="listitem"><div class="para">
				イメージファイルを XenServer ホストのファイルベースのストレージリポジトリにコピーします。次の例では、 Xenserver は「xenhost」です。この XenServer は、UUID が a9c5b8c8-536b-a193-a6dc-51af3e5ff799 である NFS リポジトリを持っています。
			</div><pre class="programlisting"># scp CentOS_6.2_x64 xenhost:/var/run/sr-mount/a9c5b8c8-536b-a193-a6dc-51af3e5ff799/</pre></li><li class="listitem"><div class="para">
				Xenserver にログオンして、イメージと同じサイズの VDI を作成します。
			</div><pre class="programlisting">[root@xenhost ~]# cd /var/run/sr-mount/a9c5b8c8-536b-a193-a6dc-51af3e5ff799
[root@xenhost a9c5b8c8-536b-a193-a6dc-51af3e5ff799]#  ls -lh CentOS_6.2_x64
-rw-r--r-- 1 root root 10G Mar 16 16:49 CentOS_6.2_x64
[root@xenhost a9c5b8c8-536b-a193-a6dc-51af3e5ff799]# xe vdi-create virtual-size=10GiB sr-uuid=a9c5b8c8-536b-a193-a6dc-51af3e5ff799 type=user name-label="Centos 6.2 x86_64"
cad7317c-258b-4ef7-b207-cdf0283a7923
</pre></li><li class="listitem"><div class="para">
				イメージファイルを VDI にインポートします。これには 10~20 分かかる可能性があります。
			</div><pre class="programlisting">[root@xenhost a9c5b8c8-536b-a193-a6dc-51af3e5ff799]# xe vdi-import filename=CentOS_6.2_x64 uuid=cad7317c-258b-4ef7-b207-cdf0283a7923</pre></li><li class="listitem"><div class="para">
				VHD ファイルを見つけます。このファイルの名前には、VDI の UUID が含まれます。圧縮して Web サーバーにアップロードします。
			</div><pre class="programlisting">[root@xenhost a9c5b8c8-536b-a193-a6dc-51af3e5ff799]# bzip2 -c cad7317c-258b-4ef7-b207-cdf0283a7923.vhd &gt; CentOS_6.2_x64.vhd.bz2
[root@xenhost a9c5b8c8-536b-a193-a6dc-51af3e5ff799]# scp CentOS_6.2_x64.vhd.bz2 webserver:/var/www/html/templates/
</pre></li></ol></div></div><div xml:lang="ja-JP" class="section" id="convert-hyperv-vm-to-template" lang="ja-JP"><div class="titlepage"><div><div><h2 class="title" id="convert-hyperv-vm-to-template">12.12. Hyper-V 仮想マシンのテンプレートへの変換</h2></div></div></div><div class="para">
		Hyper-V 仮想マシンを XenServer 互換の CloudStack テンプレートに変換するには、NFS VHD ストレージリポジトリがアタッチされたスタンドアロンの XenServer ホストが必要です。CloudStack と組み合わせて使用しているバージョンであれば XenServer のバージョンはどれでもかまいませんが、XenCenter 5.6 FP1 または SP2(5.6 と後方互換性があります)を使用してください。また、NFS ISO ストレージリポジトリがアタッチされていると役に立つ場合があります。
	</div><div class="para">
		Linux 仮想マシンでは、仮想マシンを XenServer で使用する前に、Hyper-V で準備する必要がある場合があります。 Hyper-V で引き続き仮想マシンを使用する場合は、仮想マシンを複製して、その複製で作業します。Hyper-V 統合コンポーネントをアンインストールして、/etc/fstab でデバイス名を参照していないか確認します。
	</div><div class="orderedlist"><ol><li class="listitem"><div class="para">
				linux_ic/drivers/dist ディレクトリから、make uninstall を実行します(ここで、linux_ic は、コピーされた Hyper-V 統合コンポーネントファイルのパスです)。
			</div></li><li class="listitem"><div class="para">
				元の initrd を/boot/のバックアップから復元します(バックアップの名前は*.backup0 です)。
			</div></li><li class="listitem"><div class="para">
				「hdX=noprobe」のエントリを/boot/grub/menu.lst から削除します。
			</div></li><li class="listitem"><div class="para">
				Check /etc/fstab for any partitions mounted by device name. Change those entries (if any) to mount by LABEL or UUID. You can get that information with the blkid command.
			</div></li></ol></div><div class="para">
		次に、仮想マシンが Hyper-V で動作していないことを確認してから、VHD を XenServer に取り込みます。これを行うには、 2 つの方法があります。
	</div><div class="para">
		オプション 1
	</div><div class="orderedlist"><ol><li class="listitem"><div class="para">
				XenCenter を使用して VHD をインポートします。XenCenter で、[ツール]&gt;[仮想アプライアンスツール]&gt;[ディスクイメージインポート]の順に選択します。
			</div></li><li class="listitem"><div class="para">
				[VHD]を選択し、[次へ]をクリックします。
			</div></li><li class="listitem"><div class="para">
				仮想マシンに名前を付け、[ストレージ]ページで NFS VHD ストレージリポジトリを選択し、オペレーティングシステム\nの修復機能を有効にして、NFS ISO ストレージリポジトリを選択します。
			</div></li><li class="listitem"><div class="para">
				[次へ]をクリックし、[完了]をクリックします。これで、仮想マシンが作成されます。
			</div></li></ol></div><div class="para">
		Option two:
	</div><div class="orderedlist"><ol><li class="listitem"><div class="para">
				XenConvert を実行して、[変換元]ボックスの一覧で[VHD]を選択し、[変換先]ボックスの一覧で[XenServer]を選択します。[次へ]をクリックします。
			</div></li><li class="listitem"><div class="para">
				[VHD]を選択し、[次へ]をクリックします。
			</div></li><li class="listitem"><div class="para">
				XenServer ホストの情報を入力し、[次へ]をクリックします。
			</div></li><li class="listitem"><div class="para">
				Name the VM, then click Next, then Convert. A VM should be created.
			</div></li></ol></div><div class="para">
		Hyper-V VHD から仮想マシンを作成したら、次の手順に従って、その仮想マシンを準備します。
	</div><div class="orderedlist"><ol><li class="listitem"><div class="para">
				仮想マシンを起動して、Hyper-V 統合サービスをアンインストールし、再起動します。
			</div></li><li class="listitem"><div class="para">
				XenServer Tools をインストールし、再起動します。
			</div></li><li class="listitem"><div class="para">
				Prepare the VM as desired. For example, run sysprep on Windows VMs. See <a class="xref" href="#create-windows-template">「Windows テンプレートの作成」</a>.
			</div></li></ol></div><div class="para">
		上のオプションのどちらでも、HVM モードの仮想マシンが作成されます。Windows 仮想マシンの場合は問題はありません が、Linux 仮想マシンは適切に動作しない場合があります。Linux 仮想マシンを PV モードに変換するには、追加の手順を 実行する必要があり、その手順はディストリビューションごとに異なります。
	</div><div class="orderedlist"><ol><li class="listitem"><div class="para">
				仮想マシンをシャットダウンして、VHD を NFS ストレージから Web サーバーにコピーします。たとえば、NFS 共有を Web サーバーにマウントしてコピーするか、XenServer ホストから sftp または scp を使用して、Web サーバーにアップロードします。
			</div></li><li class="listitem"><div class="para">
				CloudStack で次の値を使用して、新しいテンプレートを作成します。
			</div><div class="itemizedlist"><ul><li class="listitem"><div class="para">
						<span class="bold bold"><strong>URL :</strong></span> VHD の URL を指定します。
					</div></li><li class="listitem"><div class="para">
						<span class="bold bold"><strong>OS Type :</strong></span> 適切なオペレーティングシステムを使用します。PV モードの CentOS の場合は、[Other PV(32-bit)] または[Other PV(64-bit)]を選択します。この選択肢は、XenServer でのみ使用できます。
					</div></li><li class="listitem"><div class="para">
						<span class="bold bold"><strong>Hypervisor :</strong></span> [XenServer]を選択します。
					</div></li><li class="listitem"><div class="para">
						<span class="bold bold"><strong>Format :</strong></span> [VHD]を選択します。
					</div></li></ul></div></li></ol></div><div class="para">
		テンプレートが作成され、そのテンプレートからインスタンスを作成できます。
	</div></div><div xml:lang="ja-JP" class="section" id="add-password-management-to-templates" lang="ja-JP"><div class="titlepage"><div><div><h2 class="title" id="add-password-management-to-templates">12.13. テンプレートへのパスワード管理機能の追加</h2></div></div></div><div class="para">
		CloudStack は、パスワードのリセット機能をオプションで提供します。ユーザーは CloudStack ユーザーインターフェイスで一時的な管理者パスワードまたはルートパスワードを設定したり、既存の管理者パスワードまたはルートパスワードをリセットしたりできます。
	</div><div class="para">
		パスワードのリセット機能を有効にするには、追加のスクリプトをダウンロードしてテンプレートに適用する必要があります。 テンプレートを後で CloudStack にアップロードする場合は、このテンプレートで管理者/ルートパスワードのリセット機能を有効にするかどうかを指定できます。
	</div><div class="para">
		パスワード管理機能により、インスタンスの起動時にアカウントのパスワードが常にリセットされます。スクリプトにより仮想ルーターに HTTP 呼び出しが行われ、設定する必要があるアカウントのパスワードが取得されます。仮想ルーターにアクセスできる限り、ゲストは使用する必要があるアカウントのパスワードにアクセスできます。ユーザーがパスワードのリセットを要求すると、管理サーバーにより新しいパスワードが生成され、そのアカウントの仮想ルーターに送信されます。このため、パスワードの変更を有効にするには、インスタンスの再起動が必要です。
	</div><div class="para">
		インスタンスの起動中にスクリプトが仮想ルーターと通信できない場合は、パスワードは設定されず、通常どおり起動が続行されます。
	</div><div xml:lang="ja-JP" class="section" id="linux-installation" lang="ja-JP"><div class="titlepage"><div><div><h3 class="title" id="linux-installation">12.13.1. Linux オペレーティングシステムのインストール</h3></div></div></div><div class="para">
		次の手順に従って、Linux オペレーティングシステムのインストールを開始します。
	</div><div class="orderedlist"><ol><li class="listitem"><div class="para">
				スクリプトファイルの cloud-set-guest-password をダウンロードします。
			</div><div class="itemizedlist"><ul><li class="listitem"><div class="para">
						Linux: <a href="     http://cloudstack.org/dl/cloud-set-guest-password     ">     http://cloudstack.org/dl/cloud-set-guest-password     </a>
					</div></li><li class="listitem"><div class="para">
						Windows: <a href="     http://sourceforge.net/projects/cloudstack/files/Password%20Management%20Scripts/CloudInstanceManager.msi/download     ">     http://sourceforge.net/projects/cloudstack/files/Password%20Management%20Scripts/CloudInstanceManager.msi/download     </a>
					</div></li></ul></div></li><li class="listitem"><div class="para">
				このファイルを/etc/init.d にコピーします。
			</div><div class="para">
				一部の Linux ディストリビューションでは、このファイルを/etc/rc.d/init.d にコピーします。
			</div></li><li class="listitem"><div class="para">
				次のコマンドを実行して、スクリプトを実行可能にします。
			</div><pre class="programlisting">chmod +x /etc/init.d/cloud-set-guest-password</pre></li><li class="listitem"><div class="para">
				Linux ディストリビューションに応じて、適切な手順を続行します。
			</div><div class="para">
				Fedora、CentOS/RHEL、および Debian:
			</div><pre class="programlisting">chkconfig --add cloud-set-guest-password</pre></li></ol></div></div><div xml:lang="ja-JP" class="section" id="windows-installation" lang="ja-JP"><div class="titlepage"><div><div><h3 class="title" id="windows-installation">12.13.2. Window オペレーティングシステムのインストール</h3></div></div></div><div class="para">
		インストーラーの CloudInstanceManager.msi を <a href="http://cloudstack.org/download.html">Download page</a> からダウンロードして、新しく作成した Windows 仮想マシンで実行します。
	</div></div></div><div xml:lang="ja-JP" class="section" id="delete-templates" lang="ja-JP"><div class="titlepage"><div><div><h2 class="title" id="delete-templates">12.14. テンプレートの削除</h2></div></div></div><div class="para">
		テンプレートは削除することができます。通例、テンプレートが複数のゾーンにまたがって存在する場合は、削除のために選択されたコピーのみが削除されます。ほかのゾーンの同じテンプレートは削除されません。CloudStack で提供する CentOS テンプ レートは、これに当てはまりません。CloudStack で提供する CentOS テンプレートを削除すると、すべてのゾーンから削除されます。
	</div><div class="para">
		テンプレートを削除しても、そのテンプレートからインスタンス化された仮想マシンは引き続き動作します。ただし、削除されたテンプレートに基づいて新しい仮想マシンを作成することはできません。
	</div></div></div><div xml:lang="ja-JP" class="chapter" id="storage" lang="ja-JP"><div class="titlepage"><div><div><h2 class="title">第13章 Working With Storage</h2></div></div></div><div class="toc"><dl><dt><span class="section"><a href="#storage-overview">13.1. ストレージについて</a></span></dt><dt><span class="section"><a href="#primary-storage">13.2. プライマリストレージ</a></span></dt><dd><dl><dt><span class="section"><a href="#best-practices-primary-storage">13.2.1. Best Practices for Primary Storage</a></span></dt><dt><span class="section"><a href="#runtime-behavior-of-primary-storage">13.2.2. Runtime Behavior of Primary Storage</a></span></dt><dt><span class="section"><a href="#hypervisor-support-for-primarystorage">13.2.3. ハイパーバイザーのプライマリストレージサポート</a></span></dt><dt><span class="section"><a href="#storage-tags">13.2.4. ストレージタグ</a></span></dt><dt><span class="section"><a href="#maintenance-mode-for-primary-storage.xml">13.2.5. プライマリストレージの保守モード</a></span></dt></dl></dd><dt><span class="section"><a href="#secondary-storage">13.3. セカンダリストレージ</a></span></dt><dt><span class="section"><a href="#working-with-volumes">13.4. Working With Volumes</a></span></dt><dd><dl><dt><span class="section"><a href="#creating-new-volumes">13.4.1. 新しいボリュームの作成</a></span></dt><dt><span class="section"><a href="#upload-existing-volume-to-vm">13.4.2. Uploading an Existing Volume to a Virtual Machine</a></span></dt><dt><span class="section"><a href="#attaching-volume">13.4.3. ボリュームのアタッチ</a></span></dt><dt><span class="section"><a href="#detach-move-volumes">13.4.4. Detaching and Moving Volumes</a></span></dt><dt><span class="section"><a href="#vm-storage-migration">13.4.5. VM Storage Migration</a></span></dt><dt><span class="section"><a href="#resizing-volumes">13.4.6. ボリュームのサイズ変更</a></span></dt><dt><span class="section"><a href="#volume-deletion-garbage-collection">13.4.7. ボリュームの削除とガベージコレクション</a></span></dt></dl></dd><dt><span class="section"><a href="#working-with-snapshots">13.5. スナップショットに関わる作業</a></span></dt><dd><dl><dt><span class="section"><a href="#snapshot-throttling">13.5.1. Snapshot Job Throttling</a></span></dt><dt><span class="section"><a href="#automatic-snapshot-creation-retention">13.5.2. スナップショットの自動作成と保持</a></span></dt><dt><span class="section"><a href="#incremental-snapshots-backup">13.5.3. 増分スナップショットとバックアップ</a></span></dt><dt><span class="section"><a href="#volume-status">13.5.4. ボリュームの状態</a></span></dt><dt><span class="section"><a href="#snapshot-restore">13.5.5. スナップショットの復元</a></span></dt></dl></dd></dl></div><div xml:lang="ja-JP" class="section" id="storage-overview" lang="ja-JP"><div class="titlepage"><div><div><h2 class="title" id="storage-overview">13.1. ストレージについて</h2></div></div></div><div class="para">
		CloudStack は2種類のストレージタイプを定義しています: プライマリとセカンダリ。プライマリストレージはiSCSIやNFSを介してアクセスすることができます。加えて、直接接続されたストレージもプライマリストレージとして利用することができます。セカンダリストレージはNFSを介して常にアクセスされます。
	</div><div class="para">
		CloudStack には短期的なストレージは無く、全てのノード上の全てのボリュームは永続性を持ちます。
	</div></div><div xml:lang="ja-JP" class="section" id="primary-storage" lang="ja-JP"><div class="titlepage"><div><div><h2 class="title" id="primary-storage">13.2. プライマリストレージ</h2></div></div></div><div class="para">
		ここでは、CloudStack のプライマリストレージの概念と技術の詳細について説明します。CloudStack ユーザーインターフェイスを使用してプライマリストレージをインストールおよび構成する方法については、『インストールガイド』を参照し てください。
	</div><div class="para">
		<a class="xref" href="#about-primary-storage">「プライマリストレージについて」</a>
	</div><div xml:lang="ja-JP" class="section" id="best-practices-primary-storage" lang="ja-JP"><div class="titlepage"><div><div><h3 class="title" id="best-practices-primary-storage">13.2.1. Best Practices for Primary Storage</h3></div></div></div><div class="itemizedlist"><ul><li class="listitem"><div class="para">
				The speed of primary storage will impact guest performance. If possible, choose smaller, higher RPM drives for primary storage.
			</div></li><li class="listitem"><div class="para">
				Ensure that nothing is stored on the server. Adding the server to CloudStack will destroy any existing data
			</div></li></ul></div></div><div xml:lang="ja-JP" class="section" id="runtime-behavior-of-primary-storage" lang="ja-JP"><div class="titlepage"><div><div><h3 class="title" id="runtime-behavior-of-primary-storage">13.2.2. Runtime Behavior of Primary Storage</h3></div></div></div><div class="para">
		Root volumes are created automatically when a virtual machine is created. Root volumes are deleted when the VM is destroyed. Data volumes can be created and dynamically attached to VMs.  Data volumes are not deleted when VMs are destroyed.
	</div><div class="para">
		Administrators should monitor the capacity of primary storage devices and add additional primary storage as needed. See the Advanced Installation Guide.
	</div><div class="para">
		Administrators add primary storage to the system by creating a CloudStack storage pool. Each storage pool is associated with a cluster.
	</div></div><div xml:lang="ja-JP" class="section" id="hypervisor-support-for-primarystorage" lang="ja-JP"><div class="titlepage"><div><div><h3 class="title" id="hypervisor-support-for-primarystorage">13.2.3. ハイパーバイザーのプライマリストレージサポート</h3></div></div></div><div class="para">
		次の表は各ハイパーバイザー毎のストレージオプションとパラメーターです。
	</div><div class="informaltable"><table border="1"><colgroup><col width="34%" class="c1" /><col width="16%" class="c2" /><col width="16%" class="c3" /><col width="17%" class="c4" /><col width="17%" class="c5" /></colgroup><thead><tr><th>
					</th><th>
						<div class="para">
							VMware vSphere
						</div>
					</th><th>
						<div class="para">
							Citrix XenServer
						</div>
					</th><th>
						<div class="para">
							KVM
						</div>
					</th><td class="auto-generated"> </td></tr></thead><tbody><tr><td>
						<div class="para">
							<span class="bold bold"><strong><span class="bold bold"><strong>Format for Disks, Templates と Snapshots</strong></span></strong></span>
						</div>
					</td><td>
						<div class="para">
							VMDK
						</div>
					</td><td>
						<div class="para">
							VHD
						</div>
					</td><td>
						<div class="para">
							QCOW2
						</div>
					</td><td class="auto-generated"> </td></tr><tr><td>
						<div class="para">
							<span class="bold bold"><strong>iSCSI support</strong></span>
						</div>
					</td><td>
						<div class="para">
							VMFS
						</div>
					</td><td>
						<div class="para">
							Clustered LVM
						</div>
					</td><td>
						<div class="para">
							Yes, via Shared Mountpoint
						</div>
					</td><td class="auto-generated"> </td></tr><tr><td>
						<div class="para">
							<span class="bold bold"><strong>Fiber Channel support</strong></span>
						</div>
					</td><td>
						<div class="para">
							VMFS
						</div>
					</td><td>
						<div class="para">
							Yes, via Existing SR
						</div>
					</td><td>
						<div class="para">
							Yes, via Shared Mountpoint
						</div>
					</td><td class="auto-generated"> </td></tr><tr><td>
						<div class="para">
							<span class="bold bold"><strong>NFS support</strong></span>
						</div>
					</td><td>
						<div class="para">
							Y
						</div>
					</td><td>
						<div class="para">
							Y
						</div>
					</td><td>
						<div class="para">
							Y
						</div>
					</td><td class="auto-generated"> </td></tr><tr><td>
						<div class="para">
							<span class="bold bold"><strong>Local storage support</strong></span>
						</div>
					</td><td>
						<div class="para">
							Y
						</div>
					</td><td>
						<div class="para">
							Y
						</div>
					</td><td>
						<div class="para">
							Y
						</div>
					</td><td class="auto-generated"> </td></tr><tr><td>
						<div class="para">
							<span class="bold bold"><strong>Storage over-provisioning</strong></span>
						</div>
					</td><td>
						<div class="para">
							NFS と iSCSI
						</div>
					</td><td>
						<div class="para">
							NFS
						</div>
					</td><td>
						<div class="para">
							NFS
						</div>
					</td><td class="auto-generated"> </td></tr></tbody></table></div><div class="para">
		XenServer は iSCSI への仮想マシンイメージの展開にクラスタ型 LVM を利用しており、ストレージ自体がシン・プロビジョニングをサポートしていてもハイパーバイザーではオーバープロビジョニングをサポートしていません。その結果、CloudStack ではシン・プロビジョニングが動作しているストレージボリュームを利用している場合においてオーバープロビジョニングをサポートします。
	</div><div class="para">
		KVM は、「共有マウントポイント」ストレージをサポートします。共有マウントポイントは、特定のクラスターの各サーバーに対してローカルなファイルシステムパスです。パスは、たとえば/mnt/primary1 のようにして、クラスター内のすべてのホストで同じになるようにします。この共有マウントポイントは、OCFS2 のようなクラスターファイルシステムであると見なされま す。この場合は、CloudStack は、NFS で行われるようなストレージのマウントやマウント解除を試行しません。CloudStack では、ストレージが使用可能かどうかを管理者が確認する必要があります。
	</div><div class="para">
		NFS ストレージについては、CloudStack でオーバープロビジョニングが管理されます。この場合は、グローバル構成パラメーターの storage.overprovisioning.factor によってオーバープロビジョニングの程度が制御されます。これはハイパーバイ ザーの種類とは関係ありません。
	</div><div class="para">
		ローカルストレージは、vSphere、XenServer、および KVM のプライマリストレージオプションとして選択できます。ローカルディスクオプションが有効になっていると、ローカルディスクストレージプールが各ホストに自動的に作成されます。システム仮想マシン(仮想ルーターなど)にローカルストレージを使用するには、グローバル構成で system.vm.use.local.storage を true に設定します。
	</div><div class="para">
		CloudStack では、1 つのクラスターに複数のプライマリストレージプールを設定できます。たとえば、プライマリストレージに 2 台の NFS サーバーを準備できます。または、最初に 1 つの iSCSI LUN を準備し、1 つ目の LUN の容量に近づいたとき に 2 つ目の iSCSI LUN を追加することもできます。
	</div></div><div xml:lang="ja-JP" class="section" id="storage-tags" lang="ja-JP"><div class="titlepage"><div><div><h3 class="title" id="storage-tags">13.2.4. ストレージタグ</h3></div></div></div><div class="para">
		ストレージには「タグを付ける」ことができます。タグは、プライマリストレージ、ディスクオファリング、またはサービスオファリングに関連付ける文字列属性です。管理者はタグを使用してストレージに関する情報を追加することができます。たとえば、「SSD」であることや「slow（低速）」であることなどです。CloudStackではタグは解釈されません。これらのタグは、サービスオファリングおよびディスクオファリングに付けられたタグと照合されます。CloudStackでは、サービスオファリングおよびディスクオファリングのすべてのタグがプライマリストレージに存在していなければ、プライマリストレージにルートまたはデータディスクを割り当てることができません。サービスオファリングおよびディスクオファリングのタグは、それらのオファリングの持つストレージ要件を識別するために使用されます。たとえば、高性能のサービスオファリングでは、ルートディスクボリュームが「fast（高速）」である必要がある場合があります。
	</div><div class="para">
		タグ、割り当て、クラスターおよびポッドをまたがるボリュームコピーの相互処理は複雑になる可能性があります。この状況を単純にするには、ポッド内のすべてのクラスターのプライマリストレージで同じタグセットを使用します。さまざまなデバイスにタグ付けする場合でも、提示するタグセットは同じにすることができます。
	</div></div><div xml:lang="ja-JP" class="section" id="maintenance-mode-for-primary-storage.xml" lang="ja-JP"><div class="titlepage"><div><div><h3 class="title" id="maintenance-mode-for-primary-storage.xml">13.2.5. プライマリストレージの保守モード</h3></div></div></div><div class="para">
		プライマリストレージは、保守モードにすることができます。たとえばこのモードは、ストレージデバイスの故障した RAM を交換するときに役立ちます。ストレージデバイスを保守モードにすると、まず新しいゲストがストレージデバイスにプロビジョニングされなくなります。続いて、そのストレージデバイスにボリュームを持つすべてのゲストが停止されます。そのようなゲストがすべて停止されると、ストレージデバイスは保守モードに入ったものとしてシャットダウンできるようになります。 ストレージデバイスが再びオンラインになったときに、デバイスの保守モードをキャンセルすることができます。CloudStack によってデバイスがオンラインに戻され、保守モードに入ったときに実行していたすべてのゲストの起動が試行されます。
	</div></div></div><div xml:lang="ja-JP" class="section" id="secondary-storage" lang="ja-JP"><div class="titlepage"><div><div><h2 class="title" id="secondary-storage">13.3. セカンダリストレージ</h2></div></div></div><div class="para">
		ここでは、CloudStack のセカンダリストレージの概念と技術の詳細について説明します。CloudStack ユーザーインターフェイスを使用してセカンダリストレージをインストールおよび構成する方法については、『インストールガイド上級編』を参照してください。
	</div><div class="para">
		<a class="xref" href="#about-secondary-storage">「セカンダリストレージについて」</a>
	</div></div><div xml:lang="ja-JP" class="section" id="working-with-volumes" lang="ja-JP"><div class="titlepage"><div><div><h2 class="title" id="working-with-volumes">13.4. Working With Volumes</h2></div></div></div><div class="para">
		ボリュームは仮想マシンに対するストレージを提供し、ルートディスクや追加のデータディスクとして仮想マシンに提供されます。CloudStack は仮想マシンへの追加ボリュームをサポートしています。
	</div><div class="para">
		Volumes are created for a specific hypervisor type. A volume that has been attached to guest using one hypervisor type (e.g, XenServer) may not be attached to a guest that is using another hypervisor type, for example:vSphere, KVM. This is because the different hypervisors use different disk image formats.
	</div><div class="para">
		CloudStack defines a volume as a unit of storage available to a guest VM. Volumes are either root disks or data disks. The root disk has "/" in the file system and is usually the boot device. Data disks provide for additional storage, for example: "/opt" or "D:". Every guest VM has a root disk, and VMs can also optionally have a data disk. End users can mount multiple data disks to guest VMs. Users choose data disks from the disk offerings created by administrators. The user can create a template from a volume as well; this is the standard procedure for private template creation. Volumes are hypervisor-specific: a volume from one hypervisor type may not be used on a guest of another hypervisor type.
	</div><div class="note"><div class="admonition_header"><h2>注記</h2></div><div class="admonition"><div class="para">
			CloudStack supports attaching up to 13 data disks to a VM on XenServer hypervisor versions 6.0 and above. For the VMs on other hypervisor types, the data disk limit is 6.
		</div></div></div><div xml:lang="ja-JP" class="section" id="creating-new-volumes" lang="ja-JP"><div class="titlepage"><div><div><h3 class="title" id="creating-new-volumes">13.4.1. 新しいボリュームの作成</h3></div></div></div><div class="para">
		ストレージ容量の上限まで、いつでもゲスト仮想マシンにデータディスクボリュームを追加できます。CloudStack 管理者とユーザーの両方が、仮想マシンインスタンスにボリュームを追加できます。新しいボリュームを作成するとエンティティとして CloudStack に格納されますが、ボリュームをアタッチするまでは、実際のストレージリソースは物理ストレージデバイスに割り当てられません。この最適化により、最初のアタッチが行われるとき、ボリュームを使用するゲストに最も近い場所にボリュームが準備されます。
	</div><div class="section" id="local-storage-data-volumes"><div class="titlepage"><div><div><h4 class="title" id="local-storage-data-volumes">13.4.1.1. Using Local Storage for Data Volumes</h4></div></div></div><div class="para">
			You can create data volumes on local storage (supported with XenServer, KVM, and VMware). The data volume is placed on the same host as the VM instance that is attached to the data volume. These local data volumes can be attached to virtual machines, detached, re-attached, and deleted just as with the other types of data volume.
		</div><div class="para">
			Local storage is ideal for scenarios where persistence of data volumes and HA is not required. Some of the benefits include reduced disk I/O latency and cost reduction from using inexpensive local disks.
		</div><div class="para">
			In order for local volumes to be used, the feature must be enabled for the zone.
		</div><div class="para">
			You can create a data disk offering for local storage. When a user creates a new VM, they can select this disk offering in order to cause the data disk volume to be placed in local storage.
		</div><div class="para">
			You can not migrate a VM that has a volume in local storage to a different host, nor migrate the volume itself away to a different host. If you want to put a host into maintenance mode, you must first stop any VMs with local data volumes on that host.
		</div></div><div class="section" id="creating-new-volume-steps"><div class="titlepage"><div><div><h4 class="title" id="creating-new-volume-steps">13.4.1.2. To Create a New Volume</h4></div></div></div><div class="orderedlist"><ol><li class="listitem"><div class="para">
					ユーザーもしくは管理者として CloudStack ユーザーインターフェイスからログインします。
				</div></li><li class="listitem"><div class="para">
					左側のナビゲーションバーで[Storage]をクリックします。
				</div></li><li class="listitem"><div class="para">
					[Select view]ボックスの一覧で[Volumes]を選択します。
				</div></li><li class="listitem"><div class="para">
					新しいボリュームを作成するには[Add Volume]をクリックして次の詳細情報を入力し、[OK]をクリックします。
				</div><div class="itemizedlist"><ul><li class="listitem"><div class="para">
							Name: 後で見つけられるように、ボリュームに一意の名前を付けます。
						</div></li><li class="listitem"><div class="para">
							Availability Zone: ストレージの場所です。ボリュームを使用する仮想マシンに近い場所にする必要があります。
						</div></li><li class="listitem"><div class="para">
							Disk Offering: ストレージの特性を選択します。
						</div></li></ul></div><div class="para">
					新しいボリュームがボリューム一覧に表示され、割り当て済みの状態になります。ボリュームデータは CloudStack に格納されましたが、実際には使用する準備はできていません。
				</div></li><li class="listitem"><div class="para">
					ボリュームを使用するには、「ボリュームのアタッチ」に進みます。
				</div></li></ol></div></div></div><div xml:lang="ja-JP" class="section" id="upload-existing-volume-to-vm" lang="ja-JP"><div class="titlepage"><div><div><h3 class="title" id="upload-existing-volume-to-vm">13.4.2. Uploading an Existing Volume to a Virtual Machine</h3></div></div></div><div class="para">
		Existing data can be made accessible to a virtual machine. This is called uploading a volume to the VM. For example, this is useful to upload data from a local file system and attach it to a VM. Root administrators, domain administrators, and end users can all upload existing volumes to VMs.
	</div><div class="para">
		The upload is performed using HTTP. The uploaded volume is placed in the zone's secondary storage
	</div><div class="para">
		You cannot upload a volume if the preconfigured volume limit has already been reached. The default limit for the cloud is set in the global configuration parameter max.account.volumes, but administrators can also set per-domain limits that are different from the global default. See Setting Usage Limits
	</div><div class="para">
		To upload a volume:
	</div><div class="orderedlist"><ol><li class="listitem" id="optional-hash"><div class="para">
				(Optional) Create an MD5 hash (checksum) of the disk image file that you are going to upload. After uploading the data disk, CloudStack will use this value to verify that no data corruption has occurred.
			</div></li><li class="listitem"><div class="para">
				Log in to the CloudStack UI as an administrator or user
			</div></li><li class="listitem"><div class="para">
				左側のナビゲーションバーで[Storage]をクリックします。
			</div></li><li class="listitem"><div class="para">
				Click Upload Volume.
			</div></li><li class="listitem"><div class="para">
				次の情報を指定します。
			</div><div class="itemizedlist"><ul><li class="listitem" id="volume-name"><div class="para">
						Name and Description. Any desired name and a brief description that can be shown in the UI.
					</div></li><li class="listitem"><div class="para">
						Availability Zone. Choose the zone where you want to store the volume. VMs running on hosts in this zone can attach the volume.
					</div></li><li class="listitem"><div class="para">
						Format. Choose one of the following to indicate the disk image format of the volume.
					</div><div class="informaltable"><table border="1"><colgroup><col width="50%" /><col width="50%" /></colgroup><thead><tr><th align="left">
										<div class="para">
											ハイパーバイザー
										</div>
									</th><th align="left">
										<div class="para">
											Disk Image Format
										</div>
									</th></tr></thead><tbody><tr><td align="left">
										<div class="para">
											XenServer
										</div>
									</td><td align="left">
										<div class="para">
											VHD
										</div>
									</td></tr><tr><td align="left">
										<div class="para">
											VMware
										</div>
									</td><td align="left">
										<div class="para">
											OVA
										</div>
									</td></tr><tr><td align="left">
										<div class="para">
											KVM
										</div>
									</td><td align="left">
										<div class="para">
											QCOW2
										</div>
									</td></tr></tbody></table></div></li><li class="listitem"><div class="para">
						URL. The secure HTTP or HTTPS URL that CloudStack can use to access your disk. The type of file at the URL must match the value chosen in Format. For example, if Format is VHD, the URL might look like the following:
					</div><div class="para">
						http://yourFileServerIP/userdata/myDataDisk.vhd
					</div></li><li class="listitem"><div class="para">
						MD5 checksum. (Optional) Use the hash that you created in step <a class="xref" href="#optional-hash">1</a>.
					</div></li></ul></div></li><li class="listitem"><div class="para">
				Wait until the status of the volume shows that the upload is complete. Click Instances - Volumes, find the name you specified in step <a class="xref" href="#volume-name">???</a>, and make sure the status is Uploaded.
			</div></li></ol></div></div><div xml:lang="ja-JP" class="section" id="attaching-volume" lang="ja-JP"><div class="titlepage"><div><div><h3 class="title" id="attaching-volume">13.4.3. ボリュームのアタッチ</h3></div></div></div><div class="para">
		追加のディスクストレージを提供するために、ゲスト仮想マシンにボリュームをアタッチできます。ボリュームをアタッチするのは、新しいボリュームを初めて作成したとき、既存のボリュームをボリューム間で移動するとき、またはストレージプール間でボリュームを移行した後です。
	</div><div class="orderedlist"><ol><li class="listitem"><div class="para">
				ユーザーもしくは管理者として CloudStack ユーザーインターフェイスからログインします。
			</div></li><li class="listitem"><div class="para">
				左側のナビゲーションバーで[Storage]をクリックします。
			</div></li><li class="listitem"><div class="para">
				[Select view]ボックスの一覧で[Volumes]を選択します。
			</div></li><li class="listitem"><div class="para">
				ボリューム一覧のボリューム名をクリックして[Attach Disk]アイコンをクリックします。
				<span class="inlinemediaobject"><img src="./images/attach-disk-icon.png" alt="AttachDiskButton.png: button to attach a volume" /></span>
			</div></li><li class="listitem"><div class="para">
				ポップアップウィンドウの[Instance]ボックスの一覧で、ボリュームをアタッチする仮想マシンを選択します。ボリュームのアタッチが許可されているインスタンスのみが表示されます。たとえば、ユーザーにはそのユーザーが作成したインスタンスのみが表示されますが、管理者にはより多くの選択肢があります。
			</div></li><li class="listitem"><div class="para">
				[Instances]、インスタンス名、[View Volumes]の順にクリックすると、ボリュームをアタッチ済みかどうかわかりま す。
			</div></li></ol></div></div><div xml:lang="ja-JP" class="section" id="detach-move-volumes" lang="ja-JP"><div class="titlepage"><div><div><h3 class="title" id="detach-move-volumes">13.4.4. Detaching and Moving Volumes</h3></div></div></div><div class="note"><div class="admonition_header"><h2>注記</h2></div><div class="admonition"><div class="para">
			￼この手順は、ストレージプール間でディスクボリュームを移動する手順とは異なります。「仮想マシンストレージの移行」を参照してください。
		</div></div></div><div class="para">
		ボリュームは、ゲスト仮想マシンからデタッチして別のゲストにアタッチ できます。CloudStack 管理者とユーザーの両方が、仮想マシンからボリュームをデタッチしてほかの仮想マシンに移動することができます。
	</div><div class="para">
		2 つの仮想マシンが異なるクラスターに存在しボリュームが大きい場合 は、新しい仮想マシンにボリュームを移動するのに数分かかる可能性があります。
	</div><div class="orderedlist"><ol><li class="listitem"><div class="para">
				ユーザーもしくは管理者として CloudStack UIからログインします。
			</div></li><li class="listitem"><div class="para">
				左側のナビゲーションバーで[Storage]をクリックし、[Select View]ボックスの一覧で[Volumes]を選択します。ボリュームのアタッチ先の仮想マシンがわかっている場合は、[Instances]、インスタンス名、[View Volumes]の順にクリックします。
			</div></li><li class="listitem"><div class="para">
				Click the name of the volume you want to detach, then click the Detach Disk button. 
				<span class="inlinemediaobject"><img src="./images/detach-disk-icon.png" alt="DetachDiskButton.png: button to detach a volume" /></span>

			</div></li><li class="listitem"><div class="para">
				To move the volume to another VM, follow the steps in <a class="xref" href="#attaching-volume">「ボリュームのアタッチ」</a>.
			</div></li></ol></div></div><div xml:lang="ja-JP" class="section" id="vm-storage-migration" lang="ja-JP"><div class="titlepage"><div><div><h3 class="title" id="vm-storage-migration">13.4.5. VM Storage Migration</h3></div></div></div><div class="para">
		Supported in XenServer, KVM, and VMware.
	</div><div class="note"><div class="admonition_header"><h2>注記</h2></div><div class="admonition"><div class="para">
			This procedure is different from moving disk volumes from one VM to another. See Detaching and Moving Volumes <a class="xref" href="#detach-move-volumes">「Detaching and Moving Volumes」</a>.
		</div></div></div><div class="para">
		You can migrate a virtual machine’s root disk volume or any additional data disk volume from one storage pool to another in the same zone.
	</div><div class="para">
		You can use the storage migration feature to achieve some commonly desired administration goals, such as balancing the load on storage pools and increasing the reliability of virtual machines by moving them away from any storage pool that is experiencing issues.
	</div><div xml:lang="ja-JP" class="section" id="migrate-datadisk-volume-new-storage-pool" lang="ja-JP"><div class="titlepage"><div><div><h4 class="title" id="migrate-datadisk-volume-new-storage-pool">13.4.5.1. データディスクボリュームの新しいストレージプールへの移行</h4></div></div></div><div class="orderedlist"><ol><li class="listitem"><div class="para">
				ユーザーもしくは管理者として CloudStack UIからログインします。
			</div></li><li class="listitem"><div class="para">
				仮想マシンからデータディスクをデタッチします。「ボリュームのデタッチと移動」<a class="xref" href="#detach-move-volumes">「Detaching and Moving Volumes」</a>を参照してください(ただし、最後の「再アタッチ」の手順は飛ばして下さい。これは新しいストレージへの移行完了後に実施します)。
			</div></li><li class="listitem"><div class="para">
				CloudStack API コマンドの migrateVolume を呼び出して、ボリューム ID およびゾーン内の任意のストレージプール ID を渡します。
			</div></li><li class="listitem"><div class="para">
				ボリュームの状態が移行中から準備完了になるのを待ちます。
			</div></li><li class="listitem"><div class="para">
				新しいストレージサーバーと同じクラスター内の、望ましい仮想マシンにボリュームをアタッチします。「ボリュームの\nアタッチ<a class="xref" href="#attaching-volume">「ボリュームのアタッチ」</a>」を参照してください。
			</div></li></ol></div></div><div xml:lang="ja-JP" class="section" id="migrate-vm-rootvolume-volume-new-storage-pool" lang="ja-JP"><div class="titlepage"><div><div><h4 class="title" id="migrate-vm-rootvolume-volume-new-storage-pool">13.4.5.2. 仮想マシンルートボリュームの新しいストレージプールへの移行</h4></div></div></div><div class="para">
		ルートディスクボリュームの移行時には、まず仮想マシンを停止して、ユーザーがアクセスできないようにする必要があります。移行が完了したら、仮想マシンを再起動できます。
	</div><div class="orderedlist"><ol><li class="listitem"><div class="para">
				CloudStack ユーザーインターフェイスに管理者としてログインします。
			</div></li><li class="listitem"><div class="para">
				仮想マシンからデータディスクをデタッチします。「ボリュームのデタッチと移動」<a class="xref" href="#detach-move-volumes">「Detaching and Moving Volumes」</a>を参照してください(ただし、最後の「再アタッチ」の手順は飛ばして下さい。これは新しいストレージへの移行完了後に実施します)。
			</div></li><li class="listitem"><div class="para">
				仮想マシンを停止します。
			</div></li><li class="listitem"><div class="para">
				CloudStack API コマンドの migrateVirtualMachine を呼び出して、移行する仮想マシンの ID と、同じゾーン内の移行先のホストおよびストレージプールの ID を渡します。
			</div></li><li class="listitem"><div class="para">
				仮想マシンの状態が移行中から停止済みになるのを待ちます。
			</div></li><li class="listitem"><div class="para">
				仮想マシンを再起動します。
			</div></li></ol></div></div></div><div xml:lang="ja-JP" class="section" id="resizing-volumes" lang="ja-JP"><div class="titlepage"><div><div><h3 class="title" id="resizing-volumes">13.4.6. ボリュームのサイズ変更</h3></div></div></div><div class="para">
		CloudStack provides the ability to resize data disks; CloudStack controls volume size by using disk offerings. This provides CloudStack administrators with the flexibility to choose how much space they want to make available to the end users. Volumes within the disk offerings with the same storage tag can be resized. For example, if you only want to offer 10, 50, and 100 GB offerings, the allowed resize should stay within those limits. That implies if you define a 10 GB, a 50 GB and a 100 GB disk offerings, a user can upgrade from 10 GB to 50 GB, or 50 GB to 100 GB. If you create a custom-sized disk offering, then you have the option to resize the volume by specifying a new, larger size.
	</div><div class="para">
		Additionally, using the resizeVolume API, a data volume can be moved from a static disk offering to a custom disk offering with the size specified. This functionality allows those who might be billing by certain volume sizes or disk offerings to stick to that model, while providing the flexibility to migrate to whatever custom size necessary.
	</div><div class="para">
		This feature is supported on KVM, XenServer, and VMware hosts. However, shrinking volumes is not supported on VMware hosts.
	</div><div class="para">
		Before you try to resize a volume, consider the following:
	</div><div class="itemizedlist"><ul><li class="listitem"><div class="para">
				The VMs associated with the volume are stopped.
			</div></li><li class="listitem"><div class="para">
				The data disks associated with the volume are removed.
			</div></li><li class="listitem"><div class="para">
				When a volume is shrunk, the disk associated with it is simply truncated, and doing so would put its content at risk of data loss. Therefore, resize any partitions or file systems before you shrink a data disk so that all the data is moved off from that disk.
			</div></li></ul></div><div class="para">
		To resize a volume:
	</div><div class="orderedlist"><ol><li class="listitem"><div class="para">
				ユーザーもしくは管理者として CloudStack ユーザーインターフェイスからログインします。
			</div></li><li class="listitem"><div class="para">
				左側のナビゲーションバーで[Storage]をクリックします。
			</div></li><li class="listitem"><div class="para">
				[Select view]ボックスの一覧で[Volumes]を選択します。
			</div></li><li class="listitem"><div class="para">
				Select the volume name in the Volumes list, then click the Resize Volume button 
				<span class="inlinemediaobject"><img src="./images/resize-volume-icon.png" alt="resize-volume-icon.png: button to display the resize volume option." /></span>
			</div></li><li class="listitem"><div class="para">
				In the Resize Volume pop-up, choose desired characteristics for the storage.
			</div><div class="mediaobject"><img src="./images/resize-volume.png" alt="resize-volume.png: option to resize a volume." /></div><div class="orderedlist"><ol class="loweralpha"><li class="listitem"><div class="para">
						If you select Custom Disk, specify a custom size.
					</div></li><li class="listitem"><div class="para">
						Click Shrink OK to confirm that you are reducing the size of a volume.
					</div><div class="para">
						This parameter protects against inadvertent shrinking of a disk, which might lead to the risk of data loss. You must sign off that you know what you are doing.
					</div></li></ol></div></li><li class="listitem"><div class="para">
				[OK]をクリックします。
			</div></li></ol></div></div><div xml:lang="ja-JP" class="section" id="volume-deletion-garbage-collection" lang="ja-JP"><div class="titlepage"><div><div><h3 class="title" id="volume-deletion-garbage-collection">13.4.7. ボリュームの削除とガベージコレクション</h3></div></div></div><div class="para">
		ボリュームを削除しても、そのボリュームから作成されたスナップショットは削除されません。
	</div><div class="para">
		仮想マシンが破棄されるとき、仮想マシンにアタッチされているデータディスクボリュームは削除されません。
	</div><div class="para">
		ガベージコレクション処理を使用すると、ボリュームは完全に破棄されます。グローバル構成変数の expunge.delay および expunge.interval を使用して、いつボリュームを物理的に削除するかを指定します。
	</div><div class="itemizedlist"><ul><li class="listitem"><div class="para">
				expunge.delay:ボリュームが破棄されるまでの経過期間を秒単位で指定します。
			</div></li><li class="listitem"><div class="para">
				expunge.interval:ガベージコレクションチェックを実行する頻度を指定します。
			</div></li></ul></div><div class="para">
		管理者は、データの保持に関するサイトポリシーに応じて、これらの値を調整する必要があります。
	</div></div></div><div xml:lang="ja-JP" class="section" id="working-with-snapshots" lang="ja-JP"><div class="titlepage"><div><div><h2 class="title" id="working-with-snapshots">13.5. スナップショットに関わる作業</h2></div></div></div><div class="para">
		(サポートされるハイパーバイザー : <span class="bold bold"><strong>XenServer</strong></span>、<span class="bold bold"><strong>VMware vSphere</strong></span>、および<span class="bold bold"><strong>KVM</strong></span>)
	</div><div class="para">
		CloudStack は、ディスクボリュームのスナップショットをサポートします。スナップショットは、仮想マシンディスクの一時点でのキャプチャです。メモリと CPU の状態はキャプチャされません。
	</div><div class="para">
		ルートディスクとデータディスクの両方を含むボリュームのスナップショットを作成することができます。管理者は、ユーザーごとに格納されるスナップショットの数を制限します。ユーザーは、特定のファイルの復元のために、スナップ ショットから新しいボリュームを作成でき、復元したディスクから起動するために、スナップショットからテンプレートを作成できます。スナップショットを定期的に作成するように設定できます。完成したスナップショットはプライマリストレージからセカ ンダリストレージにコピーされ、削除されるか新しいスナップショットによって消去されるまで格納されます。
	</div><div class="para">
		ユーザーはスナップショットを手動で作成することも、自動定期スナップショットポリシーをセットアップすることもできます。 ユーザーはスナップショットからディスクボリュームを作成することもでき、そのディスクボリュームはほかのディスクボリュームのように仮想マシンにアタッチできます。ルートディスクとデータディスクの両方のスナップショットがサポートされ ます。ただし現在は、復元されたルートディスクから仮想マシンを起動することはできません。ルートディスクのスナップショットから復元したディスクは通常のデータディスクとして扱われ、復元ディスクのデータは、ディスクを仮想マシンにアタッチすることでアクセスできます。
	</div><div class="para">
		完成したスナップショットはプライマリストレージからセカンダリストレージにコピーされ、削除されるか新しいスナップショットによって消去されるまで格納されます。
	</div><div xml:lang="ja-JP" class="section" id="snapshot-throttling" lang="ja-JP"><div class="titlepage"><div><div><h3 class="title" id="snapshot-throttling">13.5.1. Snapshot Job Throttling</h3></div></div></div><div class="para">
		When a snapshot of a virtual machine is requested, the snapshot job runs on the same host where the VM is running or, in the case of a stopped VM, the host where it ran last. If many snapshots are requested for VMs on a single host, this can lead to problems with too many snapshot jobs overwhelming the resources of the host.
	</div><div class="para">
		To address this situation, the cloud's root administrator can throttle how many snapshot jobs are executed simultaneously on the hosts in the cloud by using the global configuration setting concurrent.snapshots.threshold.perhost. By using this setting, the administrator can better ensure that snapshot jobs do not time out and hypervisor hosts do not experience performance issues due to hosts being overloaded with too many snapshot requests.
	</div><div class="para">
		Set concurrent.snapshots.threshold.perhost to a value that represents a best guess about how many snapshot jobs the hypervisor hosts can execute at one time, given the current resources of the hosts and the number of VMs running on the hosts. If a given host has more snapshot requests, the additional requests are placed in a waiting queue. No new snapshot jobs will start until the number of currently executing snapshot jobs falls below the configured limit.
	</div><div class="para">
		The admin can also set job.expire.minutes to place a maximum on how long a snapshot request will wait in the queue. If this limit is reached, the snapshot request fails and returns an error message.
	</div></div><div xml:lang="ja-JP" class="section" id="automatic-snapshot-creation-retention" lang="ja-JP"><div class="titlepage"><div><div><h3 class="title" id="automatic-snapshot-creation-retention">13.5.2. スナップショットの自動作成と保持</h3></div></div></div><div class="para">
		(サポートされるハイパーバイザー : <span class="bold bold"><strong>XenServer</strong></span>、<span class="bold bold"><strong>VMware vSphere</strong></span>、および <span class="bold bold"><strong>KVM</strong></span>)
	</div><div class="para">
		ユーザーは、ディスクの複数のスナップショットを定期的に自動作成するように、定期スナップショットポリシーを設定でき ます。スナップショットは、時、日、週、または月単位の間隔で作成できます。スナップショットポリシーは、ディスクボリュームごとに 1 つセットアップできます。たとえば、毎日 02:30 にスナップショットを作成するようにセットアップできます。
	</div><div class="para">
		スナップショットのスケジュールごとに、保持するスナップショットの数を指定することもできます。保持期限を超過した古いスナップショットは、自動的に削除されます。このユーザーによって定義された期限は CloudStack 管理者が設定した値以下である必要があります。詳細は <a class="xref" href="#globally-configured-limits">「Globally Configured Limits」</a> を参照してください。制限はスナップショットの自動作成と保持ポリシーによって作成されたスナップショットのみに適用され、追加で手動によるスナップショットを作成、保持することができます。
	</div></div><div xml:lang="ja-JP" class="section" id="incremental-snapshots-backup" lang="ja-JP"><div class="titlepage"><div><div><h3 class="title" id="incremental-snapshots-backup">13.5.3. 増分スナップショットとバックアップ</h3></div></div></div><div class="para">
		スナップショットは、ディスクがあるプライマリストレージ上に作成されます。作成されたスナップショットはすぐにセカンダリストレージにバックアップされ、プライマリストレージの容量を有効活用するために、プライマリストレージから削除されま す。
	</div><div class="para">
		CloudStack では、一部のハイパーバイザーを対象に増分バックアップを行います。増分バックアップがサポートされる場合は、指定間隔で完全バックアップが実行されます。
	</div><div class="informaltable"><table border="1"><colgroup><col width="25%" /><col width="25%" /><col width="25%" /><col width="25%" /></colgroup><thead><tr><th align="left">
					</th><th align="left">
						<div class="para">
							VMware vSphere
						</div>
					</th><th align="left">
						<div class="para">
							Citrix XenServer
						</div>
					</th><th align="left">
						<div class="para">
							KVM
						</div>
					</th></tr></thead><tbody><tr><td align="left">
						<div class="para">
							増分バックアップのサポート
						</div>
					</td><td align="left">
						<div class="para">
							なし
						</div>
					</td><td align="left">
						<div class="para">
							あり
						</div>
					</td><td align="left">
						<div class="para">
							なし
						</div>
					</td></tr></tbody></table></div></div><div xml:lang="ja-JP" class="section" id="volume-status" lang="ja-JP"><div class="titlepage"><div><div><h3 class="title" id="volume-status">13.5.4. ボリュームの状態</h3></div></div></div><div class="para">
		定期スナップショットポリシーによってスナップショットの作成処理を起動する場合は、最後にボリュームのスナップショットを作成した後そのボリュームが非アクティブなままであれば、スナップショットの作成処理はスキップされます。ボリューム がデタッチされているか、実行していない仮想マシンにアタッチされている場合、そのボリュームは非アクティブとみなされ ます。CloudStack では、ボリュームが最後に非アクティブになってから、スナップショットが少なくとも 1 つ必ず作成されます。
	</div><div class="para">
		スナップショットを手動で作成する場合は、ボリュームがアクティブだったかどうかにかかわらず、常にスナップショットが作成されます。
	</div></div><div xml:lang="ja-JP" class="section" id="snapshot-restore" lang="ja-JP"><div class="titlepage"><div><div><h3 class="title" id="snapshot-restore">13.5.5. スナップショットの復元</h3></div></div></div><div class="para">
		スナップショットの復元には 2 つの方法があります。スナップショットからボリュームを作成できます。このボリュームを仮想マシンにマウントし、必要に応じてファイルを復元できます。ルートディスクのスナップショットからテンプレートを作成できます。このテンプレートから仮想マシンを起動して、ルートディスクを復元できます。
	</div></div></div></div><div xml:lang="ja-JP" class="chapter" id="work-with-usage" lang="ja-JP"><div class="titlepage"><div><div><h2 class="title">第14章 使用状況測定サーバーの操作</h2></div></div></div><div class="toc"><dl><dt><span class="section"><a href="#configure-usage-server">14.1. 使用状況測定サーバーの構成</a></span></dt><dt><span class="section"><a href="#set-usage-limit">14.2. Setting Usage Limits</a></span></dt><dt><span class="section"><a href="#globally-configured-limits">14.3. Globally Configured Limits</a></span></dt><dt><span class="section"><a href="#default-account-resource-limit">14.4. デフォルトのアカウントリソースの制限</a></span></dt><dt><span class="section"><a href="#per-domain-limits">14.5. ドメインごとの制限</a></span></dt></dl></div><div class="para">
		使用状況測定サーバーは、別途インストールするオプションのCloudStackコンポーネントです。このサーバーにより使用状況の集計レコードが提供され、これを使用してCloudStackに課金システムを統合することができます。使用状況測定サーバーにより、イベントログからデータが取得され、使用状況の要約レコードが作成されます。このレコードには、listUsageRecords APIコールを呼び出してアクセスできます。
	</div><div class="para">
		使用状況レコードには、ゲストインスタンスが消費した仮想マシンの実行時間やテンプレートのストレージ領域などのリソース量が記録されます。
	</div><div class="para">
		使用状況測定サーバーは、少なくとも1日に1回実行されます。1日に複数回実行されるように構成することもできます。
	</div><div xml:lang="ja-JP" class="section" id="configure-usage-server" lang="ja-JP"><div class="titlepage"><div><div><h2 class="title" id="configure-usage-server">14.1. 使用状況測定サーバーの構成</h2></div></div></div><div class="para">
		使用状況測定サーバーを構成するには
	</div><div class="orderedlist"><ol><li class="listitem"><div class="para">
				使用状況測定サーバーがインストール済みであることを確認します。これにはCloudStackソフトウェアの単なるインストールだけではない、追加の手順が必要です。『インストールガイド上級編』の「使用状況サーバーのインストール(オプション)」を参照してください。
			</div></li><li class="listitem"><div class="para">
				CloudStackユーザーインターフェイスに管理者としてログオンします。
			</div></li><li class="listitem"><div class="para">
				Global Settingsをクリックします。
			</div></li><li class="listitem"><div class="para">
				検索ボックスに「usage」と入力します。設定する動作を制御する構成パラメーターを見つけます。使用できるパラメーターの説明については、次の表を参照してください。
			</div></li><li class="listitem"><div class="para">
				操作列のEditアイコンをクリックします。
			</div></li><li class="listitem"><div class="para">
				望ましい値を入力してSaveアイコンをクリックします。
			</div></li><li class="listitem"><div class="para">
				ほかのグローバル構成変更を行ったときと同様に管理サーバーを再起動し、使用状況測定サーバーも再起動しま す。
			</div><pre class="programlisting"><span class="perl_Comment"># service cloudstack-management restart</span><span class="perl_Comment"></span>
<span class="perl_Comment"></span><span class="perl_Comment"># service cloudstack-usage restart</span><span class="perl_Comment"></span>
<span class="perl_Comment"></span></pre></li></ol></div><div class="para">
		次の表に、使用状況測定サーバーの動作を制御するグローバル構成設定を示します。
	</div><div class="informaltable"><table border="1"><colgroup><col width="50%" /><col width="50%" /></colgroup><thead><tr><th align="left">
						<div class="para">
							パラメーター名
						</div>
					</th><th align="left">
						<div class="para">
							説明
						</div>
					</th></tr></thead><tbody><tr><td align="left">
						<div class="para">
							enable.usage.server
						</div>
					</td><td align="left">
						<div class="para">
							使用状況測定サーバーがアクティブかどうかを示します。
						</div>
					</td></tr><tr><td align="left">
						<div class="para">
							usage.aggregation.timezone
						</div>
					</td><td align="left">
						<div class="para">
							使用状況レコードのタイムゾーンです。使用状況レコードと日次ジョブが異なるタイムゾーンで処理される場合に設定します。たとえば次の設定により、使用状況測定ジョブが米国太平洋標準時午前 0 時 15 分に実行され、グリニッジ標準時午前 0 時 0 分 0 秒から午後 11 時 59 分 59 秒までの 24 時間分の使用状況レコードが生成され ます。
						</div>
						 
<pre class="programlisting">usage.stats.job.exec.time = 00:15	
usage.execution.timezone = PST
usage.aggregation.timezone = GMT
</pre>
						 <div class="para">
							タイムゾーンに設定できる有効な値は <a class="xref" href="#time-zones">付録A <em>タイムゾーン</em></a> を参照してください。
						</div>
						 <div class="para">
							デフォルト: GMT
						</div>

					</td></tr><tr><td align="left">
						<div class="para">
							usage.execution.timezone
						</div>
					</td><td align="left">
						<div class="para">
							usage.stats.job.exec.time のタイムゾーン : タイムゾーンに設定できる有効な値は <a class="xref" href="#time-zones">付録A <em>タイムゾーン</em></a> を参照してください。
						</div>
						 <div class="para">
							デフォルト:管理サーバーのタイムゾーン
						</div>

					</td></tr><tr><td align="left">
						<div class="para">
							usage.sanity.check.interval
						</div>
					</td><td align="left">
						<div class="para">
							サニティチェックの実行間隔で、日単位で指定します。顧客に請求書を発行する前に、誤ったデータを含むレコードを定期的にチェックする場合に設定します。たとえば、これにより仮想マシンが破棄された後に、その仮想マシンについて作成された 使用状況レコードがないかチェックされます。テンプレートやボリュームなどについても同様のチェックが行われます。合計範囲より長い使用時間がないかどうかもチェックされます。問題が見つかった場合は、アラート ALERT_TYPE_USAGE_SANITY_RESULT = 21 が送信されます。
						</div>
					</td></tr><tr><td align="left">
						<div class="para">
							usage.stats.job.aggregation.range
						</div>
					</td><td align="left">
						<div class="para">
							使用状況測定サーバーのジョブの実行間隔で、分単位で指定します。たとえば、この値を 1440 に設定すると、使用状況測定サーバーは 1 日に 1 回実行されます。この値を 600 に設定した場合は、10 時間ごとに実行されます。通常、使用状況測定 サーバーのジョブが実行されるときは、使用状況測定サーバーが最後に実行されてから生成されたすべてのイベントが処理されます。
						</div>
						 <div class="para">
							値が 1440(1 日に 1 回)に設定されている場合は特別な処理になります。この場合は、使用状況測定サーバーは、サーバーが最後に実行されてから生成されたすべてのレコードを必ずしも処理しません。CloudStack は、前日のすべてのレコードを 1 日に 1 回処理するという要件を前提としています。たとえば、現在の日付が 10 月 7 日の場合は、10 月 6 日の午前 0 時から午後 11 時 59 分 59 秒までのレコードの処理が必要であると想定します。CloudStack は、この「午前 0 時から午後 11 時 59 分 59 秒まで」が usage.execution.timezone の時間であると想定します。
						</div>
						 <div class="para">
							デフォルト: 1440
						</div>

					</td></tr><tr><td align="left">
						<div class="para">
							usage.stats.job.exec.time
						</div>
					</td><td align="left">
						<div class="para">
							使用状況測定サーバーの処理を開始する時刻です。グリニッジ標準時の 24 時間表記(HH:MM)で指定します。たとえば、使用状況測定ジョブをグリニッジ標準時午前 10 時 30 分に開始するには「10:30」と入力します。
						</div>
						 <div class="para">
							usage.stats.job.aggregation.range も設定されていて、その値が 1440 ではない場合は、値を usage.stats.job.exec.time に追加して使用状況測定サーバーのジョブを再 実行する時刻を取得します。この処理は 24 時間経過するまで繰り返され、翌日の処理は usage.stats.job.exec.time に再び開始されます。
						</div>
						 <div class="para">
							デフォルト:00:15
						</div>

					</td></tr></tbody></table></div><div class="para">
		たとえば、サーバーのタイムゾーンがグリニッジ標準時で、大部分のユーザーが米国の東海岸に存在する場合に、使用状況レコードをユーザーのローカルタイム(米国東部標準時)の午前 2 時に毎日処理するとします。この場合は、次のように設定します。
	</div><div class="itemizedlist"><ul><li class="listitem"><div class="para">
				enable.usage.server = true
			</div></li><li class="listitem"><div class="para">
				usage.execution.timezone = America/New_York
			</div></li><li class="listitem"><div class="para">
				usage.stats.job.exec.time = 07:00。これにより、使用状況測定ジョブが米国東部標準時の午前 2 時に実行されま す。この時刻は、米国の東海岸で夏時間が開始および終了するときに 1 時間ずれることに注意してください。
			</div></li><li class="listitem"><div class="para">
				usage.stats.job.aggregation.range = 1440
			</div></li></ul></div><div class="para">
		この構成では、使用状況測定ジョブが米国東部標準時午前 2 時に毎日実行され、米国東部標準時(America/New_York)\nのタイムゾーンで定義されている前日の 0 時から午後 11 時 59 分 59 秒までのレコードが処理されます。
	</div><div class="note"><div class="admonition_header"><h2>注記</h2></div><div class="admonition"><div class="para">
			特別な値である 1440 が usage.stats.job.aggregation.range に設定されているので、使用状況測定サーバーは午前 0 時から午前 2 時の間のデータを無視します。このデータは翌日処理されます。
		</div></div></div><div class="para">
	</div></div><div xml:lang="ja-JP" class="section" id="set-usage-limit" lang="ja-JP"><div class="titlepage"><div><div><h2 class="title" id="set-usage-limit">14.2. Setting Usage Limits</h2></div></div></div><div class="para">
		CloudStack provides several administrator control points for capping resource usage by users. Some of these limits are global configuration parameters. Others are applied at the ROOT domain and may be overridden on a per-account basis.
	</div><div class="para">
		Aggregate limits may be set on a per-domain basis. For example, you may limit a domain and all subdomains to the creation of 100 VMs.
	</div><div class="para">
		This section covers the following topics:
	</div></div><div xml:lang="ja-JP" class="section" id="globally-configured-limits" lang="ja-JP"><div class="titlepage"><div><div><h2 class="title" id="globally-configured-limits">14.3. Globally Configured Limits</h2></div></div></div><div class="para">
		In a zone, the guest virtual network has a 24 bit CIDR by default. This limits the guest virtual network to 254 running instances. It can be adjusted as needed, but this must be done before any instances are created in the zone. For example, 10.1.1.0/22 would provide for ~1000 addresses.
	</div><div class="para">
		The following table lists limits set in the Global Configuration:
	</div><div class="informaltable"><table border="1"><colgroup><col width="50%" /><col width="50%" /></colgroup><thead><tr><th>
						<div class="para">
							Parameter Name
						</div>
					</th><th>
						<div class="para">
							Definition
						</div>
					</th></tr></thead><tbody><tr><td>
						<div class="para">
							max.account.public.ips
						</div>
					</td><td>
						<div class="para">
							Number of public IP addresses that can be owned by an account
						</div>
					</td></tr><tr><td>
						<div class="para">
							max.account.snapshots
						</div>
					</td><td>
						<div class="para">
							Number of snapshots that can exist for an account
						</div>
					</td></tr><tr><td>
						<div class="para">
							max.account.templates
						</div>
					</td><td>
						<div class="para">
							Number of templates that can exist for an account
						</div>
					</td></tr><tr><td>
						<div class="para">
							max.account.user.vms
						</div>
					</td><td>
						<div class="para">
							Number of virtual machine instances that can exist for an account
						</div>
					</td></tr><tr><td>
						<div class="para">
							max.account.volumes
						</div>
					</td><td>
						<div class="para">
							Number of disk volumes that can exist for an account
						</div>
					</td></tr><tr><td>
						<div class="para">
							max.template.iso.size
						</div>
					</td><td>
						<div class="para">
							Maximum size for a downloaded template or ISO in GB
						</div>
					</td></tr><tr><td>
						<div class="para">
							max.volume.size.gb
						</div>
					</td><td>
						<div class="para">
							Maximum size for a volume in GB
						</div>
					</td></tr><tr><td>
						<div class="para">
							network.throttling.rate
						</div>
					</td><td>
						<div class="para">
							Default data transfer rate in megabits per second allowed per user (supported on XenServer)
						</div>
					</td></tr><tr><td>
						<div class="para">
							snapshot.max.hourly
						</div>
					</td><td>
						<div class="para">
							Maximum recurring hourly snapshots to be retained for a volume. If the limit is reached, early snapshots from the start of the hour are deleted so that newer ones can be saved. This limit does not apply to manual snapshots. If set to 0, recurring hourly snapshots can not be scheduled
						</div>
					</td></tr><tr><td>
						<div class="para">
							snapshot.max.daily
						</div>
					</td><td>
						<div class="para">
							Maximum recurring daily snapshots to be retained for a volume. If the limit is reached, snapshots from the start of the day are deleted so that newer ones can be saved. This limit does not apply to manual snapshots. If set to 0, recurring daily snapshots can not be scheduled
						</div>
					</td></tr><tr><td>
						<div class="para">
							snapshot.max.weekly
						</div>
					</td><td>
						<div class="para">
							Maximum recurring weekly snapshots to be retained for a volume. If the limit is reached, snapshots from the beginning of the week are deleted so that newer ones can be saved. This limit does not apply to manual snapshots. If set to 0, recurring weekly snapshots can not be scheduled
						</div>
					</td></tr><tr><td>
						<div class="para">
							snapshot.max.monthly
						</div>
					</td><td>
						<div class="para">
							Maximum recurring monthly snapshots to be retained for a volume. If the limit is reached, snapshots from the beginning of the month are deleted so that newer ones can be saved. This limit does not apply to manual snapshots. If set to 0, recurring monthly snapshots can not be scheduled.
						</div>
					</td></tr></tbody></table></div><div class="para">
		To modify global configuration parameters, use the global configuration screen in the CloudStack UI. See Setting Global Configuration Parameters
	</div></div><div xml:lang="ja-JP" class="section" id="default-account-resource-limit" lang="ja-JP"><div class="titlepage"><div><div><h2 class="title" id="default-account-resource-limit">14.4. デフォルトのアカウントリソースの制限</h2></div></div></div><div class="para">
		You can limit resource use by accounts. The default limits are set by using global configuration parameters, and they affect all accounts within a cloud. The relevant parameters are those beginning with max.account, for example: max.account.snapshots.
	</div><div class="para">
		特定のアカウントに対しデフォルトの制限を上書きするには、アカウント毎のリソース制限を設定します。
	</div><div class="orderedlist"><ol><li class="listitem"><div class="para">
				CloudStackユーザーインターフェイスにログオンします。
			</div></li><li class="listitem"><div class="para">
				左側のナビゲーションツリーから [Accounts] をクリックします。
			</div></li><li class="listitem"><div class="para">
				Select the account you want to modify. The current limits are displayed. A value of -1 shows that there is no limit in place.
			</div></li><li class="listitem"><div class="para">
				Click the Edit button.
				<span class="inlinemediaobject"><img src="./images/edit-icon.png" alt="editbutton.png: edits the settings" /></span>
			</div></li></ol></div></div><div xml:lang="ja-JP" class="section" id="per-domain-limits" lang="ja-JP"><div class="titlepage"><div><div><h2 class="title" id="per-domain-limits">14.5. ドメインごとの制限</h2></div></div></div><div class="para">
		CloudStackでは、ドメインごとに制限を構成できます。ドメインの制限と同時に、すべてのユーザーにアカウントの制限が適用されます。ユーザーは属しているドメインのリソース制限を超えないように、グループ単位でさらに制限を受けます。ドメインの制限に基づいて、ドメイン内および、そのドメインのすべてのサブドメイン内のすべてのアカウントの使用状況が合計されます。ルートドメインレベルで設定する制限は、そのルートドメイン以下のすべてのドメインとサブドメイン内のアカウントのリソースの使用状況の合計に適用されます。
	</div><div class="para">
		ドメインの制限を設定するには
	</div><div class="orderedlist"><ol><li class="listitem"><div class="para">
				CloudStackユーザーインターフェイスにログオンします。
			</div></li><li class="listitem"><div class="para">
				左側のナビゲーションバーでDomainsをクリックします。
			</div></li><li class="listitem"><div class="para">
				変更するドメインを選択します。現在のドメインの制限が表示されます。値が-1の場合は、制限が設定されていないことを示します。
			</div></li><li class="listitem"><div class="para">
				[Edit]アイコンをクリックします。
				<span class="inlinemediaobject"><img src="./images/edit-icon.png" alt="editbutton.png: edits the settings." /></span>
			</div></li></ol></div></div></div><div xml:lang="ja-JP" class="chapter" id="networks" lang="ja-JP"><div class="titlepage"><div><div><h2 class="title">第15章 ネットワークとトラフィックの管理</h2></div></div></div><div class="toc"><dl><dt><span class="section"><a href="#guest-traffic">15.1. ゲスト トラフィック</a></span></dt><dt><span class="section"><a href="#networking-in-a-pod">15.2. Networking in a Pod</a></span></dt><dt><span class="section"><a href="#networking-in-a-zone">15.3. Networking in a Zone</a></span></dt><dt><span class="section"><a href="#basic-zone-physical-network-configuration">15.4. 基本ゾーンの物理ネットワーク構成</a></span></dt><dt><span class="section"><a href="#advanced-zone-physical-network-configuration">15.5. Advanced Zone Physical Network Configuration</a></span></dt><dd><dl><dt><span class="section"><a href="#configure-guest-traffic-in-advanced-zone">15.5.1. 拡張ゾーンのゲストトラフィックの構成</a></span></dt><dt><span class="section"><a href="#configure-public-traffic-in-an-advanced-zone">15.5.2. 拡張ゾーンのパブリックトラフィックの構成</a></span></dt></dl></dd><dt><span class="section"><a href="#using-multiple-guest-networks">15.6. Using Multiple Guest Networks</a></span></dt><dd><dl><dt><span class="section"><a href="#add-additional-guest-network">15.6.1. ゲストネットワークの追加</a></span></dt><dt><span class="section"><a href="#change-network-offering-on-guest-network">15.6.2. ゲストネットワーク上のネットワークオファリングの変更</a></span></dt></dl></dd><dt><span class="section"><a href="#security-groups">15.7. セキュリティグループ</a></span></dt><dd><dl><dt><span class="section"><a href="#about-security-groups">15.7.1. セキュリティグループについて</a></span></dt><dt><span class="section"><a href="#add-security-group">15.7.2. セキュリティグループの追加</a></span></dt><dt><span class="section"><a href="#security-groups-advanced-zones">15.7.3. Security Groups in Advanced Zones (KVM Only)</a></span></dt><dt><span class="section"><a href="#enable-security-groups">15.7.4. Enabling Security Groups</a></span></dt><dt><span class="section"><a href="#add-ingress-egress-rules">15.7.5. Adding Ingress and Egress Rules to a Security Group</a></span></dt></dl></dd><dt><span class="section"><a href="#external-firewalls-and-load-balancers">15.8. External Firewalls and Load Balancers</a></span></dt><dd><dl><dt><span class="section"><a href="#using-netscaler-load-balancers">15.8.1. About Using a NetScaler Load Balancer</a></span></dt><dt><span class="section"><a href="#configure-snmp-rhel">15.8.2. Configuring SNMP Community String on a RHEL Server</a></span></dt><dt><span class="section"><a href="#initial-setup-of-external-firewalls-loadbalancer">15.8.3. 外部ファイアウォールとロードバランサーの初期セットアップ</a></span></dt><dt><span class="section"><a href="#ongoing-config-of-external-firewalls-ld">15.8.4. Ongoing Configuration of External Firewalls and Load Balancers</a></span></dt><dt><span class="section"><a href="#autoscale">15.8.5. Configuring AutoScale</a></span></dt></dl></dd><dt><span class="section"><a href="#load-balancer-rules">15.9. 負荷分散のルール</a></span></dt><dd><dl><dt><span class="section"><a href="#add-load-balancer-rule">15.9.1. ロードバランサールールの追加</a></span></dt><dt><span class="section"><a href="#sticky-session-policies-for-lb-rules">15.9.2. Sticky Session Policies for Load Balancer Rules</a></span></dt></dl></dd><dt><span class="section"><a href="#guest-ip-ranges">15.10. Guest IP Ranges</a></span></dt><dt><span class="section"><a href="#acquire-new-ip-address">15.11. 新しい IP アドレスの取得</a></span></dt><dt><span class="section"><a href="#release-ip-address">15.12. IP アドレスの開放</a></span></dt><dt><span class="section"><a href="#static-nat">15.13. 静的 NAT</a></span></dt><dd><dl><dt><span class="section"><a href="#enable-disable-static-nat">15.13.1. スタティック NAT の有効化、無効化</a></span></dt></dl></dd><dt><span class="section"><a href="#ip-forwarding-firewalling">15.14. IP Forwarding and Firewalling</a></span></dt><dd><dl><dt><span class="section"><a href="#egress-firewall-rule">15.14.1. Creating Egress Firewall Rules in an Advanced Zone</a></span></dt><dt><span class="section"><a href="#firewall-rules">15.14.2. ファイアウォールルール</a></span></dt><dt><span class="section"><a href="#port-forwarding">15.14.3. ポート転送</a></span></dt></dl></dd><dt><span class="section"><a href="#ip-load-balancing">15.15. IP Load Balancing</a></span></dt><dt><span class="section"><a href="#dns-dhcp">15.16. DNSとDHCP</a></span></dt><dt><span class="section"><a href="#vpn">15.17. VPN</a></span></dt><dd><dl><dt><span class="section"><a href="#configure-vpn">15.17.1. VPN の構成</a></span></dt><dt><span class="section"><a href="#using-vpn-with-windows">15.17.2. Windows での VPN の使用方法</a></span></dt><dt><span class="section"><a href="#using-vpn-with-mac">15.17.3. Using VPN with Mac OS X</a></span></dt><dt><span class="section"><a href="#site-to-site-vpn">15.17.4. Setting Up a Site-to-Site VPN Connection</a></span></dt></dl></dd><dt><span class="section"><a href="#inter-vlan-routing">15.18. About Inter-VLAN Routing</a></span></dt><dt><span class="section"><a href="#configure-vpc">15.19. VPC の構成</a></span></dt><dd><dl><dt><span class="section"><a href="#vpc">15.19.1. VPC(Virtual Private Cloud) の概要</a></span></dt><dt><span class="section"><a href="#add-vpc">15.19.2. VPC の追加</a></span></dt><dt><span class="section"><a href="#add-tier">15.19.3. 層の追加</a></span></dt><dt><span class="section"><a href="#configure-acl">15.19.4. Configuring Access Control List</a></span></dt><dt><span class="section"><a href="#add-gateway-vpc">15.19.5. VPC へのプライベートゲートウェイの追加</a></span></dt><dt><span class="section"><a href="#add-vm-to-tier">15.19.6. 層への仮想マシンの展開</a></span></dt><dt><span class="section"><a href="#acquire-new-ip-for-vpc">15.19.7. VPC に対しての新しい IP アドレスの取得</a></span></dt><dt><span class="section"><a href="#release-ip-for-vpc">15.19.8. VPC に割り当てられた IP アドレスの開放</a></span></dt><dt><span class="section"><a href="#enable-disable-static-nat-vpc">15.19.9. VPC での静的 NAT の有効化、無効化</a></span></dt><dt><span class="section"><a href="#add-loadbalancer-rule-vpc">15.19.10. VPC への負荷分散ルールの追加</a></span></dt><dt><span class="section"><a href="#add-portforward-vpc">15.19.11. VPC へのポート転送ルールの追加</a></span></dt><dt><span class="section"><a href="#remove-tier">15.19.12. 層の削除</a></span></dt><dt><span class="section"><a href="#remove-vpc">15.19.13. VPC の編集と再起動、削除</a></span></dt></dl></dd><dt><span class="section"><a href="#persistent-network">15.20. Persistent Networks</a></span></dt><dd><dl><dt><span class="section"><a href="#persistent-network-consideration">15.20.1. Persistent Network Considerations</a></span></dt><dt><span class="section"><a href="#set-up-persistent-network">15.20.2. Creating a Persistent Guest Network</a></span></dt></dl></dd></dl></div><div class="para">
		CloudStackクラウドでは、セキュリティの設定された共有インフラストラクチャを使用し、プライベートLANでゲストを使用しているというユーザーの認識のもと、ゲスト仮想マシン間で相互に通信できます。\nCloudStackの仮想ルーターは、ゲストトラフィックのネットワーク設定機能を提供する主要コンポーネントです。
	</div><div xml:lang="ja-JP" class="section" id="guest-traffic" lang="ja-JP"><div class="titlepage"><div><div><h2 class="title" id="guest-traffic">15.1. ゲスト トラフィック</h2></div></div></div><div class="para">
		A network can carry guest traffic only between VMs within one zone. Virtual machines in different zones cannot communicate with each other using their IP addresses; they must communicate with each other by routing through a public IP address.
	</div><div class="para">
		This figure illustrates a typical guest traffic setup:
	</div><div class="mediaobject"><img src="./images/guest-traffic-setup.png" width="444" alt="Depicts a guest traffic setup." /></div><div class="para">
		The Management Server automatically creates a virtual router for each network. A virtual router is a special virtual machine that runs on the hosts. Each virtual router has three network interfaces. Its eth0 interface serves as the gateway for the guest traffic and has the IP address of 10.1.1.1. Its eth1 interface is used by the system to configure the virtual router. Its eth2 interface is assigned a public IP address for public traffic.
	</div><div class="para">
		The virtual router provides DHCP and will automatically assign an IP address for each guest VM within the IP range assigned for the network. The user can manually reconfigure guest VMs to assume different IP addresses.
	</div><div class="para">
		Source NAT is automatically configured in the virtual router to forward outbound traffic for all guest VMs
	</div></div><div xml:lang="ja-JP" class="section" id="networking-in-a-pod" lang="ja-JP"><div class="titlepage"><div><div><h2 class="title" id="networking-in-a-pod">15.2. Networking in a Pod</h2></div></div></div><div class="para">
		The figure below illustrates network setup within a single pod. The hosts are connected to a pod-level switch. At a minimum, the hosts should have one physical uplink to each switch. Bonded NICs are supported as well. The pod-level switch is a pair of redundant gigabit switches with 10 G uplinks.
	</div><div class="mediaobject"><img src="./images/network-singlepod.png" width="444" alt="networksinglepod.png: diagram showing logical view of network in a pod" /></div><div class="para">
		Servers are connected as follows:
	</div><div class="itemizedlist"><ul><li class="listitem"><div class="para">
				Storage devices are connected to only the network that carries management traffic.
			</div></li><li class="listitem"><div class="para">
				Hosts are connected to networks for both management traffic and public traffic.
			</div></li><li class="listitem"><div class="para">
				Hosts are also connected to one or more networks carrying guest traffic.
			</div></li></ul></div><div class="para">
		We recommend the use of multiple physical Ethernet cards to implement each network interface as well as redundant switch fabric in order to maximize throughput and improve reliability.
	</div></div><div xml:lang="ja-JP" class="section" id="networking-in-a-zone" lang="ja-JP"><div class="titlepage"><div><div><h2 class="title" id="networking-in-a-zone">15.3. Networking in a Zone</h2></div></div></div><div class="para">
		The following figure illustrates the network setup within a single zone.
	</div><div class="mediaobject"><img src="./images/network-setup-zone.png" width="444" alt="networksetupzone.png: Depicts network setup in a single zone" /></div><div class="para">
		A firewall for management traffic operates in the NAT mode. The network typically is assigned IP addresses in the 192.168.0.0/16 Class B private address space. Each pod is assigned IP addresses in the 192.168.*.0/24 Class C private address space.
	</div><div class="para">
		Each zone has its own set of public IP addresses. Public IP addresses from different zones do not overlap.
	</div></div><div xml:lang="ja-JP" class="section" id="basic-zone-physical-network-configuration" lang="ja-JP"><div class="titlepage"><div><div><h2 class="title" id="basic-zone-physical-network-configuration">15.4. 基本ゾーンの物理ネットワーク構成</h2></div></div></div><div class="para">
		基本ネットワークの場合は、物理ネットワークの構成はごく簡単です。構成する必要があるのは、ゲスト仮想マシンが生成するトラフィックを伝送するための1つのゲストネットワークだけです。CloudStackに初めてゾーンを追加するときは、Add Zone の画面からゲストネットワークをセットアップします。
	</div></div><div xml:lang="ja-JP" class="section" id="advanced-zone-physical-network-configuration" lang="ja-JP"><div class="titlepage"><div><div><h2 class="title" id="advanced-zone-physical-network-configuration">15.5. Advanced Zone Physical Network Configuration</h2></div></div></div><div class="para">
		Within a zone that uses advanced networking, you need to tell the Management Server how the physical network is set up to carry different kinds of traffic in isolation.
	</div><div xml:lang="ja-JP" class="section" id="configure-guest-traffic-in-advanced-zone" lang="ja-JP"><div class="titlepage"><div><div><h3 class="title" id="configure-guest-traffic-in-advanced-zone">15.5.1. 拡張ゾーンのゲストトラフィックの構成</h3></div></div></div><div class="para">
		次の手順は、CloudStack ユーザーインターフェイスにログオン済みであることを前提としています。基本ゲストネットワークを構成するには、次の手順に従います。
	</div><div class="orderedlist"><ol><li class="listitem"><div class="para">
				左側のナビゲーションバーで [Infrastructure] をクリックします。[Zones] で [View More] をクリックし、ネットワークを追加するゾーンを選択します。
			</div></li><li class="listitem"><div class="para">
				[Network] タブをクリックします。
			</div></li><li class="listitem"><div class="para">
				[Add guest network]をクリックします。
			</div><div class="para">
				ゲストネットワークの追加ウインドウが表示されます。
			</div><div class="mediaobject"><img src="./images/add-guest-network.png" alt="networksetupzone.png: Depicts network setup in a single zone" /></div></li><li class="listitem"><div class="para">
				次の情報を指定します。
			</div><div class="itemizedlist"><ul><li class="listitem"><div class="para">
						<span class="bold bold"><strong> Name : </strong></span> ネットワークの名前です。これはユーザーに表示されます。
					</div></li><li class="listitem"><div class="para">
						<span class="bold bold"><strong> Display Text : </strong></span>ネットワークの説明です。これはユーザーに表示されます。
					</div></li><li class="listitem"><div class="para">
						<span class="bold bold"><strong> Zone : </strong></span> ゲストネットワークを構成したいゾーン名です。
					</div></li><li class="listitem"><div class="para">
						<span class="bold bold"><strong> Network offering : </strong></span> もし管理者が複数のネットワークオファリングを設定している場合、利用したいネットワークオファリングを選択します。
					</div></li><li class="listitem"><div class="para">
						<span class="bold bold"><strong> Guest Gateway : </strong></span> ゲストが使用するゲートウェイです。
					</div></li><li class="listitem"><div class="para">
						<span class="bold bold"><strong> Guest Netmask : </strong></span> ゲストの使用するサブネット上で使用されるネットマスクです。
					</div></li></ul></div></li><li class="listitem"><div class="para">
				「OK」をクリックします。
			</div></li></ol></div></div><div xml:lang="ja-JP" class="section" id="configure-public-traffic-in-an-advanced-zone" lang="ja-JP"><div class="titlepage"><div><div><h3 class="title" id="configure-public-traffic-in-an-advanced-zone">15.5.2. 拡張ゾーンのパブリックトラフィックの構成</h3></div></div></div><div class="para">
		拡張ネットワーク設定を使用するゾーンでは、インターネットトラフィックの IP アドレスの範囲を少なくとも 1 つ構成する必要があります。
	</div></div></div><div xml:lang="ja-JP" class="section" id="using-multiple-guest-networks" lang="ja-JP"><div class="titlepage"><div><div><h2 class="title" id="using-multiple-guest-networks">15.6. Using Multiple Guest Networks</h2></div></div></div><div class="para">
		In zones that use advanced networking, additional networks for guest traffic may be added at any time after the initial installation. You can also customize the domain name associated with the network by specifying a DNS suffix for each network.
	</div><div class="para">
		A VM's networks are defined at VM creation time. A VM cannot add or remove networks after it has been created, although the user can go into the guest and remove the IP address from the NIC on a particular network.
	</div><div class="para">
		Each VM has just one default network. The virtual router's DHCP reply will set the guest's default gateway as that for the default network. Multiple non-default networks may be added to a guest in addition to the single, required default network. The administrator can control which networks are available as the default network.
	</div><div class="para">
		Additional networks can either be available to all accounts or be assigned to a specific account. Networks that are available to all accounts are zone-wide. Any user with access to the zone can create a VM with access to that network. These zone-wide networks provide little or no isolation between guests.Networks that are assigned to a specific account provide strong isolation.
	</div><div xml:lang="ja-JP" class="section" id="add-additional-guest-network" lang="ja-JP"><div class="titlepage"><div><div><h3 class="title" id="add-additional-guest-network">15.6.1. ゲストネットワークの追加</h3></div></div></div><div class="orderedlist"><ol><li class="listitem"><div class="para">
				管理者もしくはエンドユーザーとして CloudStack UI にログインします。
			</div></li><li class="listitem"><div class="para">
				左側のナビゲーションから [Network] を選択します。
			</div></li><li class="listitem"><div class="para">
				[Add guest network] をクリックし、以下の情報を入力します。
			</div><div class="itemizedlist"><ul><li class="listitem"><div class="para">
						<span class="bold bold"><strong>Name : </strong></span>ネットワークの名前です。この名前はユーザーから見ることができます。
					</div></li><li class="listitem"><div class="para">
						<span class="bold bold"><strong>Display Text : </strong></span> ネットワークの詳細情報です。この情報はユーザーから見ることができます。
					</div></li><li class="listitem"><div class="para">
						<span class="bold bold"><strong> Zone : </strong></span> ネットワークを適用するゾーンの名前です。各ゾーンはゲストネットワークに対し違うIPレンジを持ったブロードキャストドメインに属します。管理者は各ゾーンに対しIPレンジを設定する必要があります。
					</div></li><li class="listitem"><div class="para">
						<span class="bold bold"><strong> Network offering : </strong></span> もし管理者によって複数のネットワークオファリングが設定されている場合、ここで利用したいネットワークを1つ選択します。
					</div></li><li class="listitem"><div class="para">
						<span class="bold bold"><strong> Guest Gateway : </strong></span> ゲストVMが利用するゲートウェイを設定します。
					</div></li><li class="listitem"><div class="para">
						<span class="bold bold"><strong> Guest Netmask : </strong></span> ゲストVMが利用するサブネットのネットマスクを設定します。
					</div></li></ul></div></li><li class="listitem"><div class="para">
				[Create] をクリックします。
			</div></li></ol></div></div><div xml:lang="ja-JP" class="section" id="change-network-offering-on-guest-network" lang="ja-JP"><div class="titlepage"><div><div><h3 class="title" id="change-network-offering-on-guest-network">15.6.2. ゲストネットワーク上のネットワークオファリングの変更</h3></div></div></div><div class="para">
		ユーザーまたは管理者は、既存のゲストネットワークに関連付けられているネットワークオファリングを変更できます。
	</div><div class="itemizedlist"><ul><li class="listitem"><div class="para">
				管理者もしくはエンドユーザーとして CloudStack UI にログインします。
			</div></li><li class="listitem"><div class="para">
				If you are changing from a network offering that uses the CloudStack virtual router to one that uses external devices as network service providers, you must first stop all the VMs on the network.  <span>See <a class="xref" href="#stopping-and-starting-vms">「仮想マシンの停止と起動」</a>.</span>
			</div></li><li class="listitem"><div class="para">
				左側のナビゲーションから [Network] を選択します。
			</div></li><li class="listitem"><div class="para">
				Click the name of the network you want to modify.
			</div></li><li class="listitem"><div class="para">
				In the Details tab, click Edit.
				<span class="inlinemediaobject"><img src="./images/edit-icon.png" alt="EditButton.png: button to edit a network" /></span>
			</div></li><li class="listitem"><div class="para">
				[Network Offering]ボックスの一覧で新しいネットワークオファリングを選択して、[Apply]をクリックします。
			</div></li><li class="listitem"><div class="para">
				A prompt is displayed asking whether you want to keep the existing CIDR. This is to let you know that if you change the network offering, the CIDR will be affected. Choose No to proceed with the change.
			</div></li><li class="listitem"><div class="para">
				Wait for the update to complete. Don’t try to restart VMs until the network change is complete.
			</div></li><li class="listitem"><div class="para">
				If you stopped any VMs, restart them.
			</div></li></ul></div></div></div><div xml:lang="ja-JP" class="section" id="security-groups" lang="ja-JP"><div class="titlepage"><div><div><h2 class="title" id="security-groups">15.7. セキュリティグループ</h2></div></div></div><div xml:lang="ja-JP" class="section" id="about-security-groups" lang="ja-JP"><div class="titlepage"><div><div><h3 class="title" id="about-security-groups">15.7.1. セキュリティグループについて</h3></div></div></div><div class="para">
		Security groups provide a way to isolate traffic to VMs. A security group is a group of VMs that filter their incoming and outgoing traffic according to a set of rules, called ingress and egress rules. These rules filter network traffic according to the IP address that is attempting to communicate with the VM. Security groups are particularly useful in zones that use basic networking, because there is a single guest network for all guest VMs. In advanced zones, security groups are supported only on the KVM hypervisor.
	</div><div class="note"><div class="admonition_header"><h2>注記</h2></div><div class="admonition"><div class="para">
			拡張ネットワークを使用すゾーンでは、代わりに複数のゲストネットワークを作成することで、仮想マシンへのトラフィックを隔離します。
		</div></div></div><div class="para">
	</div><div class="para">
		各CloudStackアカウントには、すべての受信トラフィックを拒否し、すべての送信トラフィックを許可するデフォルトのセキュリティグループが用意されています。すべての新しい仮想マシンが望ましい規則セットを継承するように、デフォルトのセキュリティグループを変更できます。
	</div><div class="para">
		CloudStackのユーザーは、任意の数のセキュリティグループを追加できます。新しい仮想マシンには、ユーザー定義のセキュリティグループが別に指定されていない限り、デフォルトのセキュリティグループが起動時に割り当てられます。仮想マシンは、任意の数のセキュリティグループのメンバーになることができます。仮想マシンをセキュリティグループに割り当てると、仮想マシンは有効である限りずっとそのグループに属します。実行中の仮想マシンを別のセキュリティグループに移動することはできません。
	</div><div class="para">
		セキュリティグループは、任意の数の受信規則および送信規則を削除または追加することで変更できます。変更後の新しい規則は、実行中または停止中にかかわらず、グループ内のすべての仮想マシンに適用されます。
	</div><div class="para">
		受信規則を指定しない場合は、送信規則によって送信が許可されているトラフィックへの応答を除いて、トラフィックの受信は許可されません。
	</div></div><div xml:lang="ja-JP" class="section" id="add-security-group" lang="ja-JP"><div class="titlepage"><div><div><h3 class="title" id="add-security-group">15.7.2. セキュリティグループの追加</h3></div></div></div><div class="para">
		ユーザーもしくは管理者は新しいセキュリティグループを定義することができます。
	</div><div class="orderedlist"><ol><li class="listitem"><div class="para">
				管理者もしくはエンドユーザーとして CloudStack UI にログインします。
			</div></li><li class="listitem"><div class="para">
				左側のナビゲーションバーで[Network]をクリックします。
			</div></li><li class="listitem"><div class="para">
				[Select view]ボックスの一覧で[Security Groups]を選択します。
			</div></li><li class="listitem"><div class="para">
				[Add Security Group]をクリックします。
			</div></li><li class="listitem"><div class="para">
				名前と説明を入力します。
			</div></li><li class="listitem"><div class="para">
				[OK]をクリックします。
			</div><div class="para">
				新しいセキュリティグループが[Security Groups Details]タブに表示されます。
			</div></li><li class="listitem"><div class="para">
				セキュリティグループを使いやすくするには、「セキュリティグループへの受信規則と送信規則の追加」に進みます。
			</div></li></ol></div></div><div xml:lang="ja-JP" class="section" id="security-groups-advanced-zones" lang="ja-JP"><div class="titlepage"><div><div><h3 class="title" id="security-groups-advanced-zones">15.7.3. Security Groups in Advanced Zones (KVM Only)</h3></div></div></div><div class="para">
		CloudStack provides the ability to use security groups to provide isolation between guests on a single shared, zone-wide network in an advanced zone where KVM is the hypervisor. Using security groups in advanced zones rather than multiple VLANs allows a greater range of options for setting up guest isolation in a cloud.
	</div><div class="formalpara"><h5 class="formalpara" id="idp17088352">Limitations</h5>
			The following are not supported for this feature:
		</div><div class="itemizedlist"><ul><li class="listitem"><div class="para">
				Two IP ranges with the same VLAN and different gateway or netmask in security group-enabled shared network.
			</div></li><li class="listitem"><div class="para">
				Two IP ranges with the same VLAN and different gateway or netmask in account-specific shared networks.
			</div></li><li class="listitem"><div class="para">
				Multiple VLAN ranges in security group-enabled shared network.
			</div></li><li class="listitem"><div class="para">
				Multiple VLAN ranges in account-specific shared networks.
			</div></li></ul></div><div class="para">
		Security groups must be enabled in the zone in order for this feature to be used.
	</div></div><div xml:lang="ja-JP" class="section" id="enable-security-groups" lang="ja-JP"><div class="titlepage"><div><div><h3 class="title" id="enable-security-groups">15.7.4. Enabling Security Groups</h3></div></div></div><div class="para">
		In order for security groups to function in a zone, the security groups feature must first be enabled for the zone. The administrator can do this when creating a new zone, by selecting a network offering that includes security groups. The procedure is described in Basic Zone Configuration in the Advanced Installation Guide. The administrator can not enable security groups for an existing zone, only when creating a new zone.
	</div></div><div xml:lang="ja-JP" class="section" id="add-ingress-egress-rules" lang="ja-JP"><div class="titlepage"><div><div><h3 class="title" id="add-ingress-egress-rules">15.7.5. Adding Ingress and Egress Rules to a Security Group</h3></div></div></div><div class="orderedlist"><ol><li class="listitem"><div class="para">
				管理者もしくはエンドユーザーとして CloudStack UI にログインします。
			</div></li><li class="listitem"><div class="para">
				左側のナビゲーションバーで[Network]をクリックします。
			</div></li><li class="listitem"><div class="para">
				In Select view, choose Security Groups, then click the security group you want .
			</div></li><li class="listitem"><div class="para">
				To add an ingress rule, click the Ingress Rules tab and fill out the following fields to specify what network traffic is allowed into VM instances in this security group. If no ingress rules are specified, then no traffic will be allowed in, except for responses to any traffic that has been allowed out through an egress rule.
			</div><div class="itemizedlist"><ul><li class="listitem"><div class="para">
						<span class="bold bold"><strong>Add by CIDR/Account</strong></span>. Indicate whether the source of the traffic will be defined by IP address (CIDR) or an existing security group in a CloudStack account (Account). Choose Account if you want to allow incoming traffic from all VMs in another security group
					</div></li><li class="listitem"><div class="para">
						<span class="bold bold"><strong>Protocol</strong></span>. The networking protocol that sources will use to send traffic to the security group. TCP and UDP are typically used for data exchange and end-user communications. ICMP is typically used to send error messages or network monitoring data.
					</div></li><li class="listitem"><div class="para">
						<span class="bold bold"><strong>Start Port, End Port</strong></span>. (TCP, UDP only) A range of listening ports that are the destination for the incoming traffic. If you are opening a single port, use the same number in both fields.
					</div></li><li class="listitem"><div class="para">
						<span class="bold bold"><strong>ICMP Type, ICMP Code</strong></span>. (ICMP only) The type of message and error code that will be accepted.
					</div></li><li class="listitem"><div class="para">
						<span class="bold bold"><strong>CIDR</strong></span>. (Add by CIDR only) To accept only traffic from IP addresses within a particular address block, enter a CIDR or a comma-separated list of CIDRs. The CIDR is the base IP address of the incoming traffic. For example, 192.168.0.0/22. To allow all CIDRs, set to 0.0.0.0/0.
					</div></li><li class="listitem"><div class="para">
						<span class="bold bold"><strong>Account, Security Group</strong></span>. (Add by Account only) To accept only traffic from another security group, enter the CloudStack account and name of a security group that has already been defined in that account. To allow traffic between VMs within the security group you are editing now, enter the same name you used in step 7.
					</div></li></ul></div><div class="para">
				The following example allows inbound HTTP access from anywhere:
			</div><div class="mediaobject"><img src="./images/http-access.png" width="444" alt="httpaccess.png: allows inbound HTTP access from anywhere" /></div></li><li class="listitem"><div class="para">
				To add an egress rule, click the Egress Rules tab and fill out the following fields to specify what type of traffic is allowed to be sent out of VM instances in this security group. If no egress rules are specified, then all traffic will be allowed out. Once egress rules are specified, the following types of traffic are allowed out: traffic specified in egress rules; queries to DNS and DHCP servers; and responses to any traffic that has been allowed in through an ingress rule
			</div><div class="itemizedlist"><ul><li class="listitem"><div class="para">
						<span class="bold bold"><strong>Add by CIDR/Account</strong></span>. Indicate whether the destination of the traffic will be defined by IP address (CIDR) or an existing security group in a CloudStack account (Account). Choose Account if you want to allow outgoing traffic to all VMs in another security group.
					</div></li><li class="listitem"><div class="para">
						<span class="bold bold"><strong>Protocol</strong></span>. The networking protocol that VMs will use to send outgoing traffic. TCP and UDP are typically used for data exchange and end-user communications. ICMP is typically used to send error messages or network monitoring data.
					</div></li><li class="listitem"><div class="para">
						<span class="bold bold"><strong>Start Port, End Port</strong></span>. (TCP, UDP only) A range of listening ports that are the destination for the outgoing traffic. If you are opening a single port, use the same number in both fields.
					</div></li><li class="listitem"><div class="para">
						<span class="bold bold"><strong>ICMP Type, ICMP Code</strong></span>. (ICMP only) The type of message and error code that will be sent
					</div></li><li class="listitem"><div class="para">
						<span class="bold bold"><strong>CIDR</strong></span>. (Add by CIDR only) To send traffic only to IP addresses within a particular address block, enter a CIDR or a comma-separated list of CIDRs. The CIDR is the base IP address of the destination. For example, 192.168.0.0/22. To allow all CIDRs, set to 0.0.0.0/0.
					</div></li><li class="listitem"><div class="para">
						<span class="bold bold"><strong>Account, Security Group</strong></span>. (Add by Account only) To allow traffic to be sent to another security group, enter the CloudStack account and name of a security group that has already been defined in that account. To allow traffic between VMs within the security group you are editing now, enter its name.
					</div></li></ul></div></li><li class="listitem"><div class="para">
				[Add]をクリックします。
			</div></li></ol></div></div></div><div xml:lang="ja-JP" class="section" id="external-firewalls-and-load-balancers" lang="ja-JP"><div class="titlepage"><div><div><h2 class="title" id="external-firewalls-and-load-balancers">15.8. External Firewalls and Load Balancers</h2></div></div></div><div class="para">
		CloudStack is capable of replacing its Virtual Router with an external Juniper SRX device and an optional external NetScaler or F5 load balancer for gateway and load balancing services. In this case, the VMs use the SRX as their gateway.
	</div><div xml:lang="ja-JP" class="section" id="using-netscaler-load-balancers" lang="ja-JP"><div class="titlepage"><div><div><h3 class="title" id="using-netscaler-load-balancers">15.8.1. About Using a NetScaler Load Balancer</h3></div></div></div><div class="para">
		Citrix NetScaler is supported as an external network element for load balancing in zones that use advanced networking (also called advanced zones). Set up an external load balancer when you want to provide load balancing through means other than CloudStack’s provided virtual router.
	</div><div class="para">
		The NetScaler can be set up in direct (outside the firewall) mode. It must be added before any load balancing rules are deployed on guest VMs in the zone.
	</div><div class="para">
		The functional behavior of the NetScaler with CloudStack is the same as described in the CloudStack documentation for using an F5 external load balancer. The only exception is that the F5 supports routing domains, and NetScaler does not. NetScaler can not yet be used as a firewall.
	</div><div class="para">
		The Citrix NetScaler comes in three varieties. The following table summarizes how these variants are treated in CloudStack.
	</div><div class="informaltable"><table border="1"><colgroup><col width="33%" /><col width="33%" /><col width="33%" /></colgroup><thead><tr><th align="left">
						<div class="para">
							NetScaler ADC Type
						</div>
					</th><th align="left">
						<div class="para">
							Description of Capabilities
						</div>
					</th><th align="left">
						<div class="para">
							CloudStack Supported Features
						</div>
					</th></tr></thead><tbody><tr><td align="left">
						<div class="para">
							MPX
						</div>
					</td><td align="left">
						<div class="para">
							Physical appliance. Capable of deep packet inspection. Can act as application firewall and load balancer
						</div>
					</td><td align="left">
						<div class="para">
							In advanced zones, load balancer functionality fully supported without limitation. In basic zones, static NAT, elastic IP (EIP), and elastic load balancing (ELB) are also provided
						</div>
					</td></tr><tr><td align="left">
						<div class="para">
							VPX
						</div>
					</td><td align="left">
						<div class="para">
							Virtual appliance. Can run as VM on XenServer, ESXi, and Hyper-V hypervisors. Same functionality as MPX
						</div>
					</td><td align="left">
						<div class="para">
							Supported only on ESXi. Same functional support as for MPX. CloudStack will treat VPX and MPX as the same device type
						</div>
					</td></tr><tr><td align="left">
						<div class="para">
							SDX
						</div>
					</td><td align="left">
						<div class="para">
							Physical appliance. Can create multiple fully isolated VPX instances on a single appliance to support multi-tenant usage
						</div>
					</td><td align="left">
						<div class="para">
							CloudStack will dynamically provision, configure, and manage the lifecycle of VPX instances on the SDX. Provisioned instances are added into CloudStack automatically – no manual configuration by the administrator is required. Once a VPX instance is added into CloudStack, it is treated the same as a VPX on an ESXi host.
						</div>
					</td></tr></tbody></table></div></div><div xml:lang="ja-JP" class="section" id="configure-snmp-rhel" lang="ja-JP"><div class="titlepage"><div><div><h3 class="title" id="configure-snmp-rhel">15.8.2. Configuring SNMP Community String on a RHEL Server</h3></div></div></div><div class="para">
		The SNMP Community string is similar to a user id or password that provides access to a network device, such as router. This string is sent along with all SNMP requests. If the community string is correct, the device responds with the requested information. If the community string is incorrect, the device discards the request and does not respond.
	</div><div class="para">
		The NetScaler device uses SNMP to communicate with the VMs. You must install SNMP and configure SNMP Community string for a secure communication between the NetScaler device and the RHEL machine.
	</div><div class="orderedlist"><ol><li class="listitem"><div class="para">
				Ensure that you installed SNMP on RedHat. If not, run the following command:
			</div><pre class="screen">yum install net-snmp-utils</pre></li><li class="listitem"><div class="para">
				Edit the /etc/snmp/snmpd.conf file to allow the SNMP polling from the NetScaler device.
			</div><div class="orderedlist"><ol><li class="listitem"><div class="para">
						Map the community name into a security name (local and mynetwork, depending on where the request is coming from):
					</div><div class="note"><div class="admonition_header"><h2>注記</h2></div><div class="admonition"><div class="para">
							Use a strong password instead of public when you edit the following table.
						</div></div></div><pre class="screen">#         sec.name   source        community
com2sec    local      localhost     public
com2sec   mynetwork   0.0.0.0       public</pre><div class="note"><div class="admonition_header"><h2>注記</h2></div><div class="admonition"><div class="para">
							Setting to 0.0.0.0 allows all IPs to poll the NetScaler server.
						</div></div></div></li><li class="listitem"><div class="para">
						Map the security names into group names:
					</div><pre class="screen">#      group.name   sec.model  sec.name
group   MyRWGroup     v1         local
group   MyRWGroup     v2c        local
group   MyROGroup     v1        mynetwork
group   MyROGroup     v2c       mynetwork</pre></li><li class="listitem"><div class="para">
						Create a view to allow the groups to have the permission to:
					</div><pre class="screen">incl/excl subtree mask view all included .1</pre></li><li class="listitem"><div class="para">
						Grant access with different write permissions to the two groups to the view you created.
					</div><pre class="screen"># context     sec.model     sec.level     prefix     read     write     notif
  access      MyROGroup ""  any noauth     exact      all      none     none
  access      MyRWGroup ""  any noauth     exact      all      all      all</pre></li></ol></div></li><li class="listitem"><div class="para">
				Unblock SNMP in iptables.
			</div><pre class="screen">iptables -A INPUT -p udp --dport 161 -j ACCEPT</pre></li><li class="listitem"><div class="para">
				Start the SNMP service:
			</div><pre class="screen">service snmpd start</pre></li><li class="listitem"><div class="para">
				Ensure that the SNMP service is started automatically during the system startup:
			</div><pre class="screen">chkconfig snmpd on</pre></li></ol></div></div><div xml:lang="ja-JP" class="section" id="initial-setup-of-external-firewalls-loadbalancer" lang="ja-JP"><div class="titlepage"><div><div><h3 class="title" id="initial-setup-of-external-firewalls-loadbalancer">15.8.3. 外部ファイアウォールとロードバランサーの初期セットアップ</h3></div></div></div><div class="para">
		When the first VM is created for a new account, CloudStack programs the external firewall and load balancer to work with the VM. The following objects are created on the firewall:
	</div><div class="itemizedlist"><ul><li class="listitem"><div class="para">
				A new logical interface to connect to the account's private VLAN. The interface IP is always the first IP of the account's private subnet (e.g. 10.1.1.1).
			</div></li><li class="listitem"><div class="para">
				A source NAT rule that forwards all outgoing traffic from the account's private VLAN to the public Internet, using the account's public IP address as the source address
			</div></li><li class="listitem"><div class="para">
				A firewall filter counter that measures the number of bytes of outgoing traffic for the account
			</div></li></ul></div><div class="para">
		The following objects are created on the load balancer:
	</div><div class="itemizedlist"><ul><li class="listitem"><div class="para">
				A new VLAN that matches the account's provisioned Zone VLAN
			</div></li><li class="listitem"><div class="para">
				A self IP for the VLAN. This is always the second IP of the account's private subnet (e.g. 10.1.1.2).
			</div></li></ul></div></div><div xml:lang="ja-JP" class="section" id="ongoing-config-of-external-firewalls-ld" lang="ja-JP"><div class="titlepage"><div><div><h3 class="title" id="ongoing-config-of-external-firewalls-ld">15.8.4. Ongoing Configuration of External Firewalls and Load Balancers</h3></div></div></div><div class="para">
		Additional user actions (e.g. setting a port forward) will cause further programming of the firewall and load balancer. A user may request additional public IP addresses and forward traffic received at these IPs to specific VMs. This is accomplished by enabling static NAT for a public IP address, assigning the IP to a VM, and specifying a set of protocols and port ranges to open. When a static NAT rule is created, CloudStack programs the zone's external firewall with the following objects:
	</div><div class="itemizedlist"><ul><li class="listitem"><div class="para">
				A static NAT rule that maps the public IP address to the private IP address of a VM.
			</div></li><li class="listitem"><div class="para">
				A security policy that allows traffic within the set of protocols and port ranges that are specified.
			</div></li><li class="listitem"><div class="para">
				A firewall filter counter that measures the number of bytes of incoming traffic to the public IP.
			</div></li></ul></div><div class="para">
		The number of incoming and outgoing bytes through source NAT, static NAT, and load balancing rules is measured and saved on each external element. This data is collected on a regular basis and stored in the CloudStack database.
	</div></div><div xml:lang="ja-JP" class="section" id="autoscale" lang="ja-JP"><div class="titlepage"><div><div><h3 class="title" id="autoscale">15.8.5. Configuring AutoScale</h3></div></div></div><div class="para">
		AutoScaling allows you to scale your back-end services or application VMs up or down seamlessly and automatically according to the conditions you define. With AutoScaling enabled, you can ensure that the number of VMs you are using seamlessly scale up when demand increases, and automatically decreases when demand subsides. Using AutoScaling, you can automatically shut down instances you don't need, or launch new instances, depending on demand.
	</div><div class="para">
		NetScaler AutoScaling is designed to seamlessly launch or terminate VMs based on user-defined conditions. Conditions for triggering a scaleup or scaledown action can vary from a simple use case like monitoring the CPU usage of a server to a complex use case of monitoring a combination of server's responsiveness and its CPU usage. For example, you can configure AutoScaling to launch an additional VM whenever CPU usage exceeds 80 percent for 15 minutes, or to remove a VM whenever CPU usage is less than 20 percent for 30 minutes.
	</div><div class="para">
		CloudStack uses the NetScaler load balancer to monitor all aspects of a system's health and work in unison with CloudStack to initiate scale-up or scale-down actions.
	</div><div class="note"><div class="admonition_header"><h2>注記</h2></div><div class="admonition"><div class="para">
			AutoScale is supported on NetScaler Release 10 Build 73.e and beyond.
		</div></div></div><div class="formalpara"><h5 class="formalpara" id="idp25509440">事前準備</h5>
			Before you configure an AutoScale rule, consider the following:
		</div><div class="itemizedlist"><ul><li class="listitem"><div class="para">
				Ensure that the necessary template is prepared before configuring AutoScale. When a VM is deployed by using a template and when it comes up, the application should be up and running.
			</div><div class="note"><div class="admonition_header"><h2>注記</h2></div><div class="admonition"><div class="para">
					If the application is not running, the NetScaler device considers the VM as ineffective and continues provisioning the VMs unconditionally until the resource limit is exhausted.
				</div></div></div></li><li class="listitem"><div class="para">
				Deploy the templates you prepared. Ensure that the applications come up on the first boot and is ready to take the traffic. Observe the time requires to deploy the template. Consider this time when you specify the quiet time while configuring AutoScale.
			</div></li><li class="listitem"><div class="para">
				The AutoScale feature supports the SNMP counters that can be used to define conditions for taking scale up or scale down actions. To monitor the SNMP-based counter, ensure that the SNMP agent is installed in the template used for creating the AutoScale VMs, and the SNMP operations work with the configured SNMP community and port by using standard SNMP managers. For example, see <a class="xref" href="#configure-snmp-rhel">「Configuring SNMP Community String on a RHEL Server」</a> to configure SNMP on a RHEL machine.
			</div></li><li class="listitem"><div class="para">
				Ensure that the endpointe.url parameter present in the Global Settings is set to the Management Server API URL. For example, http://10.102.102.22:8080/client/api. In a multi-node Management Server deployment, use the virtual IP address configured in the load balancer for the management server’s cluster. Additionally, ensure that the NetScaler device has access to this IP address to provide AutoScale support.
			</div><div class="para">
				If you update the endpointe.url, disable the AutoScale functionality of the load balancer rules in the system, then enable them back to reflect the changes. For more information see <a class="xref" href="#update-autoscale">Updating an AutoScale Configuration</a>
			</div></li><li class="listitem"><div class="para">
				If the API Key and Secret Key are regenerated for an AutoScale user, ensure that the AutoScale functionality of the load balancers that the user participates in are disabled and then enabled to reflect the configuration changes in the NetScaler.
			</div></li><li class="listitem"><div class="para">
				In an advanced Zone, ensure that at least one VM should be present before configuring a load balancer rule with AutoScale. Having one VM in the network ensures that the network is in implemented state for configuring AutoScale.
			</div></li></ul></div><div class="formalpara"><h5 class="formalpara" id="idm9084784">Configuration</h5>
			以下の要素を指定します。
		</div><div class="mediaobject"><img src="./images/autoscale-config.png" width="444" alt="autoscaleateconfig.png: Configuring AutoScale" /></div><div class="itemizedlist"><ul><li class="listitem"><div class="para">
				<span class="bold bold"><strong>Template</strong></span>: A template consists of a base OS image and application. A template is used to provision the new instance of an application on a scaleup action. When a VM is deployed from a template, the VM can start taking the traffic from the load balancer without any admin intervention. For example, if the VM is deployed for a Web service, it should have the Web server running, the database connected, and so on.
			</div></li><li class="listitem"><div class="para">
				<span class="bold bold"><strong>Compute offering</strong></span>: A predefined set of virtual hardware attributes, including CPU speed, number of CPUs, and RAM size, that the user can select when creating a new virtual machine instance. Choose one of the compute offerings to be used while provisioning a VM instance as part of scaleup action.
			</div></li><li class="listitem"><div class="para">
				<span class="bold bold"><strong>Min Instance</strong></span>: The minimum number of active VM instances that is assigned to a load balancing rule. The active VM instances are the application instances that are up and serving the traffic, and are being load balanced. This parameter ensures that a load balancing rule has at least the configured number of active VM instances are available to serve the traffic.
			</div><div class="note"><div class="admonition_header"><h2>注記</h2></div><div class="admonition"><div class="para">
					If an application, such as SAP, running on a VM instance is down for some reason, the VM is then not counted as part of Min Instance parameter, and the AutoScale feature initiates a scaleup action if the number of active VM instances is below the configured value. Similarly, when an application instance comes up from its earlier down state, this application instance is counted as part of the active instance count and the AutoScale process initiates a scaledown action when the active instance count breaches the Max instance value.
				</div></div></div></li><li class="listitem"><div class="para">
				<span class="bold bold"><strong>Max Instance</strong></span>: Maximum number of active VM instances that <span class="bold bold"><strong>should be assigned to </strong></span>a load balancing rule. This parameter defines the upper limit of active VM instances that can be assigned to a load balancing rule.
			</div><div class="para">
				Specifying a large value for the maximum instance parameter might result in provisioning large number of VM instances, which in turn leads to a single load balancing rule exhausting the VM instances limit specified at the account or domain level.
			</div><div class="note"><div class="admonition_header"><h2>注記</h2></div><div class="admonition"><div class="para">
					If an application, such as SAP, running on a VM instance is down for some reason, the VM is not counted as part of Max Instance parameter. So there may be scenarios where the number of VMs provisioned for a scaleup action might be more than the configured Max Instance value. Once the application instances in the VMs are up from an earlier down state, the AutoScale feature starts aligning to the configured Max Instance value.
				</div></div></div></li></ul></div><div class="para">
		Specify the following scale-up and scale-down policies:
	</div><div class="itemizedlist"><ul><li class="listitem"><div class="para">
				<span class="bold bold"><strong>Duration</strong></span>: The duration, in seconds, for which the conditions you specify must be true to trigger a scaleup action. The conditions defined should hold true for the entire duration you specify for an AutoScale action to be invoked.
			</div></li><li class="listitem"><div class="para">
				<span class="bold bold"><strong>Counter</strong></span>: The performance counters expose the state of the monitored instances. By default, CloudStack offers four performance counters: Three SNMP counters and one NetScaler counter. The SNMP counters are Linux User CPU, Linux System CPU, and Linux CPU Idle. The NetScaler counter is ResponseTime. The root administrator can add additional counters into CloudStack by using the CloudStack API.
			</div></li><li class="listitem"><div class="para">
				<span class="bold bold"><strong>Operator</strong></span>: The following five relational operators are supported in AutoScale feature: Greater than, Less than, Less than or equal to, Greater than or equal to, and Equal to.
			</div></li><li class="listitem"><div class="para">
				<span class="bold bold"><strong>Threshold</strong></span>: Threshold value to be used for the counter. Once the counter defined above breaches the threshold value, the AutoScale feature initiates a scaleup or scaledown action.
			</div></li><li class="listitem"><div class="para">
				<span class="bold bold"><strong>Add</strong></span>: Click Add to add the condition.
			</div></li></ul></div><div class="para">
		Additionally, if you want to configure the advanced settings, click Show advanced settings, and specify the following:
	</div><div class="itemizedlist"><ul><li class="listitem"><div class="para">
				<span class="bold bold"><strong>Polling interval</strong></span>: Frequency in which the conditions, combination of counter, operator and threshold, are to be evaluated before taking a scale up or down action. The default polling interval is 30 seconds.
			</div></li><li class="listitem"><div class="para">
				<span class="bold bold"><strong>Quiet Time</strong></span>: This is the cool down period after an AutoScale action is initiated. The time includes the time taken to complete provisioning a VM instance from its template and the time taken by an application to be ready to serve traffic. This quiet time allows the fleet to come up to a stable state before any action can take place. The default is 300 seconds.
			</div></li><li class="listitem"><div class="para">
				<span class="bold bold"><strong>Destroy VM Grace Period</strong></span>: The duration in seconds, after a scaledown action is initiated, to wait before the VM is destroyed as part of scaledown action. This is to ensure graceful close of any pending sessions or transactions being served by the VM marked for destroy. The default is 120 seconds.
			</div></li><li class="listitem"><div class="para">
				<span class="bold bold"><strong>Security Groups</strong></span>: Security groups provide a way to isolate traffic to the VM instances. A security group is a group of VMs that filter their incoming and outgoing traffic according to a set of rules, called ingress and egress rules. These rules filter network traffic according to the IP address that is attempting to communicate with the VM.
			</div></li><li class="listitem"><div class="para">
				<span class="bold bold"><strong>Disk Offerings</strong></span>: A predefined set of disk size for primary data storage.
			</div></li><li class="listitem"><div class="para">
				<span class="bold bold"><strong>SNMP Community</strong></span>: The SNMP community string to be used by the NetScaler device to query the configured counter value from the provisioned VM instances. Default is public.
			</div></li><li class="listitem"><div class="para">
				<span class="bold bold"><strong>SNMP Port</strong></span>: The port number on which the SNMP agent that run on the provisioned VMs is listening. Default port is 161.
			</div></li><li class="listitem"><div class="para">
				<span class="bold bold"><strong>User</strong></span>: This is the user that the NetScaler device use to invoke scaleup and scaledown API calls to the cloud. If no option is specified, the user who configures AutoScaling is applied. Specify another user name to override.
			</div></li><li class="listitem"><div class="para">
				<span class="bold bold"><strong>Apply</strong></span>: Click Apply to create the AutoScale configuration.
			</div></li></ul></div><div class="formalpara"><h5 class="formalpara" id="idm6433608">Disabling and Enabling an AutoScale Configuration</h5>
			If you want to perform any maintenance operation on the AutoScale VM instances, disable the AutoScale configuration. When the AutoScale configuration is disabled, no scaleup or scaledown action is performed. You can use this downtime for the maintenance activities. To disable the AutoScale configuration, click the Disable AutoScale
			<span class="inlinemediaobject"><img src="./images/enable-disable-autoscale.png" alt="EnableDisable.png: button to enable or disable AutoScale." /></span>
			button.
		</div><div class="para">
		The button toggles between enable and disable, depending on whether AutoScale is currently enabled or not. After the maintenance operations are done, you can enable the AutoScale configuration back. To enable, open the AutoScale configuration page again, then click the Enable AutoScale
		<span class="inlinemediaobject"><img src="./images/enable-disable-autoscale.png" alt="EnableDisable.png: button to enable or disable AutoScale." /></span>
		button.
	</div><div class="formalpara" id="update-autoscale"><h5 class="formalpara">Updating an AutoScale Configuration</h5>
			You can update the various parameters and add or delete the conditions in a scaleup or scaledown rule. Before you update an AutoScale configuration, ensure that you disable the AutoScale load balancer rule by clicking the Disable AutoScale button.
		</div><div class="para">
		After you modify the required AutoScale parameters, click Apply. To apply the new AutoScale policies, open the AutoScale configuration page again, then click the Enable AutoScale button.
	</div><div class="formalpara"><h5 class="formalpara" id="idm7429832">Runtime Considerations</h5>
		</div><div class="itemizedlist"><ul><li class="listitem"><div class="para">
				An administrator should not assign a VM to a load balancing rule which is configured for AutoScale.
			</div></li><li class="listitem"><div class="para">
				Before a VM provisioning is completed if NetScaler is shutdown or restarted, the provisioned VM cannot be a part of the load balancing rule though the intent was to assign it to a load balancing rule. To workaround, rename the AutoScale provisioned VMs based on the rule name or ID so at any point of time the VMs can be reconciled to its load balancing rule.
			</div></li><li class="listitem"><div class="para">
				Making API calls outside the context of AutoScale, such as destroyVM, on an autoscaled VM leaves the load balancing configuration in an inconsistent state. Though VM is destroyed from the load balancer rule, NetScaler continues to show the VM as a service assigned to a rule.
			</div></li></ul></div></div></div><div xml:lang="ja-JP" class="section" id="load-balancer-rules" lang="ja-JP"><div class="titlepage"><div><div><h2 class="title" id="load-balancer-rules">15.9. 負荷分散のルール</h2></div></div></div><div class="para">
		CloudStack ユーザーもしくは管理者はパブリックIPから1つもしくは複数の仮想マシンへの受信トラフィックの分散のため負荷分散ルールを作成するかもしれません。ユーザーは特定のアルゴリズムに基づきルールを作成し仮想マシンのセットに対して割り当てます。
	</div><div class="note"><div class="admonition_header"><h2>注記</h2></div><div class="admonition"><div class="para">
			もし、負荷分散ルールを作成する際 NetScaler のような外部デバイスを含んだネットワークサービスオファリングを利用していた場合、また後にネットワークサービスオファリングを CloudStack の仮想ルーターを利用するよう変更を加える場合、継続して機能を利用するためには全ての負荷分散ルールに対しファイアウォールルールを追加しなければなりません。
		</div></div></div><div class="para">
	</div><div xml:lang="ja-JP" class="section" id="add-load-balancer-rule" lang="ja-JP"><div class="titlepage"><div><div><h3 class="title" id="add-load-balancer-rule">15.9.1. ロードバランサールールの追加</h3></div></div></div><div class="orderedlist"><ol><li class="listitem"><div class="para">
				管理者もしくはエンドユーザーとして CloudStack UI にログインします。
			</div></li><li class="listitem"><div class="para">
				左側のナビゲーションから [Network] を選択します。
			</div></li><li class="listitem"><div class="para">
				トラフィックの負荷分散をしたいしたいネットワークの名前をクリックします。
			</div></li><li class="listitem"><div class="para">
				[View IP Addresses] をクリックします。
			</div></li><li class="listitem"><div class="para">
				ルールを作成したい IP アドレスをクリックし、[Configuration] タブをクリックします。
			</div></li><li class="listitem"><div class="para">
				構成図のロードバランサーをクリックし、[View All] をクリックします。
			</div><div class="para">
				基本ゾーンでは IP アドレスを選択せずに負荷分散ルールを作成することもできます。 CloudStack は負荷分散ルールの作成時に内部的に IP を割り当て、ルール作成時に割り当てられた IP アドレスがリスト表示されます。
			</div><div class="para">
				ネットワークの名前を選択し、[Add Load Balancer] タブをクリックします。詳細は <a class="xref" href="#config-lb">7</a> を参照してください。
			</div></li><li class="listitem" id="config-lb"><div class="para">
				次の項目を入力します。
			</div><div class="itemizedlist"><ul><li class="listitem"><div class="para">
						<span class="bold bold"><strong>Name : </strong></span> 負荷分散ルールの名前です。
					</div></li><li class="listitem"><div class="para">
						<span class="bold bold"><strong>Public Port : </strong></span> 負荷分散のための入力トラフィックを受信するポート番号です。
					</div></li><li class="listitem"><div class="para">
						<span class="bold bold"><strong>Private Port : </strong></span> 仮想マシンがトラフィックを受信するポート番号です。
					</div></li><li class="listitem"><div class="para">
						<span class="bold bold"><strong>Algorithm : </strong></span> CloudStack で利用したい負荷分散アルゴリズムを選択します。 CloudStack では様々なアルゴリズムをサポートしています。 これらのアルゴリズムに関して詳細を知りたい場合はインターネット上でより多くの情報を取得できます。
					</div></li><li class="listitem"><div class="para">
						<span class="bold bold"><strong>Stickiness : </strong></span> (オプション) [Configure] をクリックし、スティックネスポリシーを選択します。詳細は「Sticky Session Policies for Load Balancer Rules」を参照してください。
					</div></li><li class="listitem"><div class="para">
						<span class="bold bold"><strong>AutoScale</strong></span>: [Configure] をクリックし <a class="xref" href="#autoscale">「Configuring AutoScale」</a> に従ってオートスケールの設定を完了します。
					</div></li></ul></div></li><li class="listitem"><div class="para">
				[Add VMs] をクリックした後入力トラフィックの負荷を分散する2つ以上の仮想マシンを選択し、[Apply] をクリックします。
			</div><div class="para">
				新しい負荷分散ルールがリスト表示され、IP アドレスに対する負荷分散ルールを引き続き追加することができます。
			</div></li></ol></div></div><div xml:lang="ja-JP" class="section" id="sticky-session-policies-for-lb-rules" lang="ja-JP"><div class="titlepage"><div><div><h3 class="title" id="sticky-session-policies-for-lb-rules">15.9.2. Sticky Session Policies for Load Balancer Rules</h3></div></div></div><div class="para">
		Sticky sessions are used in Web-based applications to ensure continued availability of information across the multiple requests in a user's session. For example, if a shopper is filling a cart, you need to remember what has been purchased so far. The concept of "stickiness" is also referred to as persistence or maintaining state.
	</div><div class="para">
		Any load balancer rule defined in CloudStack can have a stickiness policy. The policy consists of a name, stickiness method, and parameters. The parameters are name-value pairs or flags, which are defined by the load balancer vendor. The stickiness method could be load balancer-generated cookie, application-generated cookie, or source-based. In the source-based method, the source IP address is used to identify the user and locate the user’s stored data. In the other methods, cookies are used. The cookie generated by the load balancer or application is included in request and response URLs to create persistence. The cookie name can be specified by the administrator or automatically generated. A variety of options are provided to control the exact behavior of cookies, such as how they are generated and whether they are cached.
	</div><div class="para">
		For the most up to date list of available stickiness methods, see the CloudStack UI or call listNetworks and check the SupportedStickinessMethods capability.
	</div></div></div><div xml:lang="ja-JP" class="section" id="guest-ip-ranges" lang="ja-JP"><div class="titlepage"><div><div><h2 class="title" id="guest-ip-ranges">15.10. Guest IP Ranges</h2></div></div></div><div class="para">
		The IP ranges for guest network traffic are set on a per-account basis by the user. This allows the users to configure their network in a fashion that will enable VPN linking between their guest network and their clients.
	</div></div><div xml:lang="ja-JP" class="section" id="acquire-new-ip-address" lang="ja-JP"><div class="titlepage"><div><div><h2 class="title" id="acquire-new-ip-address">15.11. 新しい IP アドレスの取得</h2></div></div></div><div class="orderedlist"><ol><li class="listitem"><div class="para">
				管理者もしくはエンドユーザーとして CloudStack UI にログインします。
			</div></li><li class="listitem"><div class="para">
				左側のナビゲーションから [Network] を選択します。
			</div></li><li class="listitem"><div class="para">
				変更したいネットワークの名前をクリックします。
			</div></li><li class="listitem"><div class="para">
				[View IP Addresses] をクリックします。
			</div></li><li class="listitem"><div class="para">
				[Acquire New IP] をクリックし、確認ダイアログで [Yes] をクリックします。
			</div><div class="para">
				一般的に IP アドレスは有限のリソースであるため確認を求められます。しばらくするとステータスが「Allocated」となり新しい IP アドレスが表示されます。これで新しい IP アドレスをポートフォワーディングやスタティック NAT ルールに利用できます。
			</div></li></ol></div></div><div xml:lang="ja-JP" class="section" id="release-ip-address" lang="ja-JP"><div class="titlepage"><div><div><h2 class="title" id="release-ip-address">15.12. IP アドレスの開放</h2></div></div></div><div class="para">
		When the last rule for an IP address is removed, you can release that IP address. The IP address still belongs to the VPC; however, it can be picked up for any guest network again.
	</div><div class="orderedlist"><ol><li class="listitem"><div class="para">
				管理者またはユーザーとして CloudStack ユーザーインターフェイスにログオンします。
			</div></li><li class="listitem"><div class="para">
				左側のナビゲーションから [Network] を選択します。
			</div></li><li class="listitem"><div class="para">
				変更したいネットワークの名前をクリックします。
			</div></li><li class="listitem"><div class="para">
				[View IP Addresses] をクリックします。
			</div></li><li class="listitem"><div class="para">
				開放したい IP アドレスをクリックします。
			</div></li><li class="listitem"><div class="para">
				Click the Release IP button. 
				<span class="inlinemediaobject"><img src="./images/release-ip-icon.png" alt="ReleaseIPButton.png: button to release an IP" /></span>
			</div></li></ol></div></div><div xml:lang="ja-JP" class="section" id="static-nat" lang="ja-JP"><div class="titlepage"><div><div><h2 class="title" id="static-nat">15.13. 静的 NAT</h2></div></div></div><div class="para">
		A static NAT rule maps a public IP address to the private IP address of a VM in order to allow Internet traffic into the VM. The public IP address always remains the same, which is why it is called “static” NAT. This section tells how to enable or disable static NAT for a particular IP address.
	</div><div xml:lang="ja-JP" class="section" id="enable-disable-static-nat" lang="ja-JP"><div class="titlepage"><div><div><h3 class="title" id="enable-disable-static-nat">15.13.1. スタティック NAT の有効化、無効化</h3></div></div></div><div class="para">
		もし、すでにポートフォワーディングのルールが IP アドレスに反映されている場合、IP に対してスタティック NAT を有効化することができません。
	</div><div class="para">
		仮想マシンがいくつかのネットワークに所属している場合、スタティック NAT のルールは デフォルトネットワークでしか機能しません。
	</div><div class="orderedlist"><ol><li class="listitem"><div class="para">
				管理者もしくはエンドユーザーとして CloudStack UI にログインします。
			</div></li><li class="listitem"><div class="para">
				左側のナビゲーションから [Network] を選択します。
			</div></li><li class="listitem"><div class="para">
				変更したいネットワークの名前をクリックします。
			</div></li><li class="listitem"><div class="para">
				[View IP Addresses] をクリックします。
			</div></li><li class="listitem"><div class="para">
				変更したい IP アドレスをクリックします。
			</div></li><li class="listitem"><div class="para">
				Click the Static NAT 
				<span class="inlinemediaobject"><img src="./images/enable-disable.png" alt="ReleaseIPButton.png: button to release an IP" /></span>
				button.
			</div><div class="para">
				The button toggles between Enable and Disable, depending on whether static NAT is currently enabled for the IP address.
			</div></li><li class="listitem"><div class="para">
				If you are enabling static NAT, a dialog appears where you can choose the destination VM and click Apply.
			</div></li></ol></div></div></div><div xml:lang="ja-JP" class="section" id="ip-forwarding-firewalling" lang="ja-JP"><div class="titlepage"><div><div><h2 class="title" id="ip-forwarding-firewalling">15.14. IP Forwarding and Firewalling</h2></div></div></div><div class="para">
		By default, all incoming traffic to the public IP address is rejected. All outgoing traffic from the guests is also blocked by default.
	</div><div class="para">
		To allow outgoing traffic, follow the procedure in <a class="xref" href="#egress-firewall-rule">「Creating Egress Firewall Rules in an Advanced Zone」</a>.
	</div><div class="para">
		To allow incoming traffic, users may set up firewall rules and/or port forwarding rules. For example, you can use a firewall rule to open a range of ports on the public IP address, such as 33 through 44. Then use port forwarding rules to direct traffic from individual ports within that range to specific ports on user VMs. For example, one port forwarding rule could route incoming traffic on the public IP's port 33 to port 100 on one user VM's private IP. For more information, see <a class="xref" href="#firewall-rules">「ファイアウォールルール」</a> and <a class="xref" href="#port-forwarding">「ポート転送」</a>.
	</div><div xml:lang="ja-JP" class="section" id="egress-firewall-rule" lang="ja-JP"><div class="titlepage"><div><div><h3 class="title" id="egress-firewall-rule">15.14.1. Creating Egress Firewall Rules in an Advanced Zone</h3></div></div></div><div class="note"><div class="admonition_header"><h2>注記</h2></div><div class="admonition"><div class="para">
			The egress firewall rules are supported only on virtual routers.
		</div></div></div><div class="para">
	</div><div class="para">
		The egress traffic originates from a private network to a public network, such as the Internet. By default, the egress traffic is blocked, so no outgoing traffic is allowed from a guest network to the Internet. However, you can control the egress traffic in an Advanced zone by creating egress firewall rules. When an egress firewall rule is applied, the traffic specific to the rule is allowed and the remaining traffic is blocked. When all the firewall rules are removed the default policy, Block, is applied.
	</div><div class="para">
		Consider the following scenarios to apply egress firewall rules:
	</div><div class="itemizedlist"><ul><li class="listitem"><div class="para">
				Allow the egress traffic from specified source CIDR. The Source CIDR is part of guest network CIDR.
			</div></li><li class="listitem"><div class="para">
				Allow the egress traffic with destination protocol TCP,UDP,ICMP, or ALL.
			</div></li><li class="listitem"><div class="para">
				Allow the egress traffic with destination protocol and port range. The port range is specified for TCP, UDP or for ICMP type and code.
			</div></li></ul></div><div class="para">
		To configure an egress firewall rule:
	</div><div class="orderedlist"><ol><li class="listitem"><div class="para">
				管理者またはユーザーとして CloudStack ユーザーインターフェイスにログオンします。
			</div></li><li class="listitem"><div class="para">
				左側のナビゲーションから [Network] を選択します。
			</div></li><li class="listitem"><div class="para">
				In Select view, choose Guest networks, then click the Guest network you want.
			</div></li><li class="listitem"><div class="para">
				To add an egress rule, click the Egress rules tab and fill out the following fields to specify what type of traffic is allowed to be sent out of VM instances in this guest network:
			</div><div class="mediaobject"><img src="./images/egress-firewall-rule.png" width="444" alt="egress-firewall-rule.png: adding an egress firewall rule" /></div><div class="itemizedlist"><ul><li class="listitem"><div class="para">
						<span class="bold bold"><strong>CIDR</strong></span>: (Add by CIDR only) To send traffic only to the IP addresses within a particular address block, enter a CIDR or a comma-separated list of CIDRs. The CIDR is the base IP address of the destination. For example, 192.168.0.0/22. To allow all CIDRs, set to 0.0.0.0/0.
					</div></li><li class="listitem"><div class="para">
						<span class="bold bold"><strong>Protocol</strong></span>: The networking protocol that VMs uses to send outgoing traffic. The TCP and UDP protocols are typically used for data exchange and end-user communications. The ICMP protocol is typically used to send error messages or network monitoring data.
					</div></li><li class="listitem"><div class="para">
						<span class="bold bold"><strong>Start Port, End Port</strong></span>: (TCP, UDP only) A range of listening ports that are the destination for the outgoing traffic. If you are opening a single port, use the same number in both fields.
					</div></li><li class="listitem"><div class="para">
						<span class="bold bold"><strong>ICMP Type, ICMP Code</strong></span>: (ICMP only) The type of message and error code that are sent.
					</div></li></ul></div></li><li class="listitem"><div class="para">
				[Add]をクリックします。
			</div></li></ol></div></div><div xml:lang="ja-JP" class="section" id="firewall-rules" lang="ja-JP"><div class="titlepage"><div><div><h3 class="title" id="firewall-rules">15.14.2. ファイアウォールルール</h3></div></div></div><div class="para">
		デフォルトではパブリック IP に対する全ての入力トラフィックはファイアウォールで排除されます。外部からのトラフィックを許可するには特定のファイアウォールルールによりファイアウォールのポートを開放することができます。また、オプションとして接続元 IP をフィルタリングするため CIDR を指定することもできます。これは特定の IP アドレスからの入力リクエストのみを許可する場合に有効です。
	</div><div class="para">
		エラスティックな IP アドレスに対してポートを開放するためにファイアウォールルールを利用することはできません。エラスティック IP を使用している際は外部からのアクセスは代わりにセキュリティグループにより制御します。詳細は <a class="xref" href="#add-security-group">「セキュリティグループの追加」</a> を参照してください。
	</div><div class="para">
		拡張ゾーンでは仮想ルーターを用いて出力用ファイアウォールルールを作成できます。詳細は <a class="xref" href="#egress-firewall-rule">「Creating Egress Firewall Rules in an Advanced Zone」</a> を参照してください。
	</div><div class="para">
		ファイアウォールのルールは管理サーバー UI の [Firewall] タブから作成することができます。このタブは CloudStack がインストールされた時点ではデフォルトで表示されません。[Firewall] タブを表示するには CloudStack 管理者がグローバル設定パラメーターで「firewall.rule.ui.enabled」を "true" に設定する必要があります。
	</div><div class="para">
		ファイアウォールルールの作成方法
	</div><div class="orderedlist"><ol><li class="listitem"><div class="para">
				管理者もしくはエンドユーザーとして CloudStack UI にログインします。
			</div></li><li class="listitem"><div class="para">
				左側のナビゲーションから [Network] を選択します。
			</div></li><li class="listitem"><div class="para">
				変更したいネットワークの名前をクリックします。
			</div></li><li class="listitem"><div class="para">
				[View IP Addresses] をクリックします。
			</div></li><li class="listitem"><div class="para">
				変更したい IP アドレスをクリックします。
			</div></li><li class="listitem"><div class="para">
				[Configuration] タブをクリクし次の値を入力します。
			</div><div class="itemizedlist"><ul><li class="listitem"><div class="para">
						<span class="bold bold"><strong>Source CIDR : </strong></span> (オプション) 特定のアドレスブロックに含まれる IP アドレスのみを許可するには CIDR かカンマで区切られた CIDR のリストを入力します。 例として 192.168.0.0/22 などが挙げられます。また、空欄にすると全ての CIDR を許可します。
					</div></li><li class="listitem"><div class="para">
						<span class="bold bold"><strong>Protocol : </strong></span> 開放されたポートで利用される通信プロトコルです。
					</div></li><li class="listitem"><div class="para">
						<span class="bold bold"><strong>Start Port と End Port : </strong></span> ファイアウォールで開放したいポート番号です。単一のポートを開放したい場合、両方のフィールドに同一の番号を入力してください。
					</div></li><li class="listitem"><div class="para">
						<span class="bold bold"><strong>ICMP Type と ICMP Code : </strong></span> プロトコルに ICMP を設定した場合のみ利用されます。ICMP プロトコルにおいて必要な ICMP ヘッダーに埋め込まれるタイプとコードを入力してください。何を入力するべきか詳細に関しては 「ICMP ドキュメント」を参照してください。
					</div></li></ul></div></li><li class="listitem"><div class="para">
				[Add]をクリックします。
			</div></li></ol></div></div><div xml:lang="ja-JP" class="section" id="port-forwarding" lang="ja-JP"><div class="titlepage"><div><div><h3 class="title" id="port-forwarding">15.14.3. ポート転送</h3></div></div></div><div class="para">
		ポート転送サービスは、ポリシーを定義するポート転送規則のセットです。ポート転送サービスは、1 台または複数のゲスト仮想マシンに適用されます。これにより、ゲスト仮想マシンに、ポート転送サービスで定義するポリシーに従って管理される受信ネットワークアクセス権が付与されます。オプションで、CIDR を指定して送信元 IP アドレスをフィルターすることもで きます。これは、特定の IP アドレスからの受信要求の転送のみを許可する場合に役立ちます。
	</div><div class="para">
		任意の数のポート転送サービスを、ゲスト仮想マシンに適用できます。ポート転送サービスは定義できますが、メンバーを持つものではありません。
	</div><div class="para">
		エラスティック IP に対してはポートを開放するためにポート転送を利用することができません。エラスティック IP を使っている場合は代わりにセキュリティグループを使って外部からのアクセスをコントロールします。詳細は「セキュリティグループ」を参照してください。
	</div><div class="para">
		ポート転送を設定するには
	</div><div class="orderedlist"><ol><li class="listitem"><div class="para">
				管理者もしくはエンドユーザーとして CloudStack UI にログインします。
			</div></li><li class="listitem"><div class="para">
				もし、完了しない場合は CloudStack でパブリック IP アドレスの範囲をゾーンに追加します。詳細はインストールガイドの「ゾーンとポッドの追加」を参照してください。
			</div></li><li class="listitem"><div class="para">
				1 台または複数のゲスト仮想マシンを CloudStack に追加してください。
			</div></li><li class="listitem"><div class="para">
				左側のナビゲーションバーで[Network]をクリックします。
			</div></li><li class="listitem"><div class="para">
				仮想マシンを実行しているゲストネットワークの名前をクリックします。
			</div></li><li class="listitem"><div class="para">
				既存の IP アドレスを選択するか、新しい IP アドレスを取得します(<a class="xref" href="#acquire-new-ip-address">「新しい IP アドレスの取得」</a> を参照)。一覧内の IP アドレスをクリックします。
			</div></li><li class="listitem"><div class="para">
				[Configuration]タブをクリックします。
			</div></li><li class="listitem"><div class="para">
				ダイアグラムの[Port Forwarding]ノードの[View All]をクリックします。
			</div></li><li class="listitem"><div class="para">
				次の項目を入力します。
			</div><div class="itemizedlist"><ul><li class="listitem"><div class="para">
						<span class="bold bold"><strong>Public Port :</strong></span> パブリックトラフィックが送信される、前の手順で取得した IP アドレスのポートです。
					</div></li><li class="listitem"><div class="para">
						<span class="bold bold"><strong>Private Port :</strong></span> 転送されたパブリックトラフィックをインスタンスがリッスンするポートです。
					</div></li><li class="listitem"><div class="para">
						<span class="bold bold"><strong>Protocol</strong></span>: 2 つのポートの間で使用される通信プロトコルです。
					</div></li></ul></div></li><li class="listitem"><div class="para">
				[Add]をクリックします。
			</div></li></ol></div></div></div><div xml:lang="ja-JP" class="section" id="ip-load-balancing" lang="ja-JP"><div class="titlepage"><div><div><h2 class="title" id="ip-load-balancing">15.15. IP Load Balancing</h2></div></div></div><div class="para">
		The user may choose to associate the same public IP for multiple guests. CloudStack implements a TCP-level load balancer with the following policies.
	</div><div class="itemizedlist"><ul><li class="listitem"><div class="para">
				ラウンドロビン
			</div></li><li class="listitem"><div class="para">
				Least connection
			</div></li><li class="listitem"><div class="para">
				Source IP
			</div></li></ul></div><div class="para">
		This is similar to port forwarding but the destination may be multiple IP addresses.
	</div></div><div xml:lang="ja-JP" class="section" id="dns-dhcp" lang="ja-JP"><div class="titlepage"><div><div><h2 class="title" id="dns-dhcp">15.16. DNSとDHCP</h2></div></div></div><div class="para">
		The Virtual Router provides DNS and DHCP services to the guests. It proxies DNS requests to the DNS server configured on the Availability Zone.
	</div></div><div xml:lang="ja-JP" class="section" id="vpn" lang="ja-JP"><div class="titlepage"><div><div><h2 class="title" id="vpn">15.17. VPN</h2></div></div></div><div class="para">
		CloudStack アカウントの所有者は、仮想マシンにアクセスするためのVPN(Virtual Private Network:仮想プライベートネットワーク)を作成できます。リモートアクセス VPN サービスを提供するネットワークオファリングからゲストネットワークのインスタンスを作成すると、システム仮想マシンに基づいて、仮想ルーターによってサービスが提供されます。\nCloudStack は、L2TP over IPsec ベースのリモートアクセス VPN サービ スをゲスト仮想ネットワークに提供します。各ネットワークに仮想ルー\nターがあるため、VPN はネットワーク間で共有されません。Windows、Mac OS X、および iOS のネイティブ VPN クライアントを使用して、ゲストネットワークに接続できます。アカウント所有者は VPN ユーザーを作成して管理することができます。このために、CloudStack のアカウントデータベースではなく別のテーブルが使用されます。VPN ユーザーデータベースは、 特定のアカウント所有者が作成するすべての VPN で共有されます。すべての VPN ユーザーはそのアカウント所有者が作成するすべての VPN にアクセスできます。
	</div><div class="note"><div class="admonition_header"><h2>注記</h2></div><div class="admonition"><div class="para">
			トラフィックのすべてが VPN を経由するわけ はないことに注意してください。つまり、 VPN によって構築されるルートはゲストネットワーク専用にする必要があり、すべてのトラフィックに使用できるわけではありません。
		</div></div></div><div class="para">
	</div><div class="itemizedlist"><ul><li class="listitem"><div class="para">
				<span class="bold bold"><strong>モバイルユーザー/リモートアクセス :</strong></span> ユーザーは、自宅または事務所からクラウド内のプライベートネットワーク に安全に接続することを望んでいます。通常、接続するクライアントの IP アドレスは動的であり、VPN サーバーで事前構成することはできません。
			</div></li><li class="listitem"><div class="para">
				<span class="bold bold"><strong>Site to Site</strong></span>. In this scenario, two private subnets are connected over the public Internet with a secure VPN tunnel. The cloud user’s subnet (for example, an office network) is connected through a gateway to the network in the cloud. The address of the user’s gateway must be preconfigured on the VPN server in the cloud. Note that although L2TP-over-IPsec can be used to set up Site-to-Site VPNs, this is not the primary intent of this feature. For more information, see <a class="xref" href="#site-to-site-vpn">「Setting Up a Site-to-Site VPN Connection」</a>
			</div></li></ul></div><div xml:lang="ja-JP" class="section" id="configure-vpn" lang="ja-JP"><div class="titlepage"><div><div><h3 class="title" id="configure-vpn">15.17.1. VPN の構成</h3></div></div></div><div class="para">
		クラウドの VPN をセットアップするには
	</div><div class="orderedlist"><ol><li class="listitem"><div class="para">
				管理者もしくはエンドユーザーとして CloudStack UI にログインします。
			</div></li><li class="listitem"><div class="para">
				左側のナビゲーションバーで [Global Settings] をクリックします。
			</div></li><li class="listitem"><div class="para">
				次のグローバル構成パラメーターを設定します。
			</div><div class="itemizedlist"><ul><li class="listitem"><div class="para">
						remote.access.vpn.client.ip.range – The range of IP addresses to be allocated to remote access VPN clients. The first IP in the range is used by the VPN server.
					</div></li><li class="listitem"><div class="para">
						remote.access.vpn.psk.length – IPSec キーの長さです。
					</div></li><li class="listitem"><div class="para">
						remote.access.vpn.user.limit – アカウントあたりの VPN ユーザーの最大数です。
					</div></li></ul></div></li></ol></div><div class="para">
		特定のネットワークの VPN を有効にするには
	</div><div class="orderedlist"><ol><li class="listitem"><div class="para">
				ユーザーまたは管理者として CloudStack ユーザーインターフェイスにログオンします。
			</div></li><li class="listitem"><div class="para">
				左側のナビゲーションバーで[Network]をクリックします。
			</div></li><li class="listitem"><div class="para">
				設定するネットワークの名前をクリックします。
			</div></li><li class="listitem"><div class="para">
				[View IP Addresses] をクリックします。
			</div></li><li class="listitem"><div class="para">
				表示される IP アドレスの 1 つをクリックします。
			</div></li><li class="listitem"><div class="para">
				[Enable VPN]アイコンをクリックします。
				<span class="inlinemediaobject"><img src="./images/vpn-icon.png" alt="AttachDiskButton.png: button to attach a volume" /></span>
			</div><div class="para">
				ポップアップウィンドウに IPsec キーが表示されます。
			</div></li></ol></div></div><div xml:lang="ja-JP" class="section" id="using-vpn-with-windows" lang="ja-JP"><div class="titlepage"><div><div><h3 class="title" id="using-vpn-with-windows">15.17.2. Windows での VPN の使用方法</h3></div></div></div><div class="para">
		VPN を使用する手順は、Windows のバージョンによって異なります。一般に、ユーザーは VPN プロパティを編集し、デフォ ルトのルートが VPN ではないことを確認する必要があります。次の手順は Windows Vista 上の Windows L2TP クライアントを対象にしています。ほかのバージョンの Windows でもコマンドは同様のはずです。
	</div><div class="orderedlist"><ol><li class="listitem" id="source-nat"><div class="para">
				CloudStack ユーザーインターフェイスにログオンして、アカウントの送信元 NAT IP アドレスをクリックします。[VPN] タブに IPsec 事前共有キーが表示されます。これと送信元 NAT IP アドレスを記録します。ユーザーインターフェイスに、ユーザーとパスワードも表示されます。ユーザーを選択するか、ユーザーが存在しない場合はユーザーとパスワードを追加します。
			</div></li><li class="listitem"><div class="para">
				Windows コンピューターでコントロールパネルの[ネットワークと共有センター]を開きます。[接続またはネットワークのセットアップ]をクリックします。
			</div></li><li class="listitem"><div class="para">
				次に開くダイアログボックスで、[いいえ]をクリックして新しい接続を作成します。
			</div></li><li class="listitem"><div class="para">
				次に開くダイアログボックスで、[インターネット接続(VPN)を使用します]をクリックします。
			</div></li><li class="listitem"><div class="para">
				In the next dialog, enter the source NAT IP from step <a class="xref" href="#source-nat">1</a> and give the connection a name. Check Don't connect now.
			</div></li><li class="listitem"><div class="para">
				In the next dialog, enter the user name and password selected in step <a class="xref" href="#source-nat">1</a>.
			</div></li><li class="listitem"><div class="para">
				[Create] をクリックします。
			</div></li><li class="listitem"><div class="para">
				コントロールパネルに戻り、[ネットワーク接続]をクリックして新しい接続を表示します。接続はまだアクティブになっていません。
			</div></li><li class="listitem"><div class="para">
				新しい接続を右クリックし、[プロパティ]を選択します。[プロパティ]ダイアログボックスで[ネットワーク]タブをクリックします。
			</div></li><li class="listitem"><div class="para">
				In Type of VPN, choose L2TP IPsec VPN, then click IPsec settings. Select Use preshared key. Enter the preshared key from Step <a class="xref" href="#source-nat">1</a>.
			</div></li><li class="listitem"><div class="para">
				これで、接続をアクティブにする準備ができました。コントロールパネルに戻り、[ネットワーク接続]を開いて作成した接続をダブルクリックします。
			</div></li><li class="listitem"><div class="para">
				Enter the user name and password from Step <a class="xref" href="#source-nat">1</a>.
			</div></li></ol></div></div><div xml:lang="ja-JP" class="section" id="using-vpn-with-mac" lang="ja-JP"><div class="titlepage"><div><div><h3 class="title" id="using-vpn-with-mac">15.17.3. Using VPN with Mac OS X</h3></div></div></div><div class="para">
		First, be sure you've configured the VPN settings in your CloudStack install. This section is only concerned with connecting via Mac OS X to your VPN.
	</div><div class="para">
		Note, these instructions were written on Mac OS X 10.7.5. They may differ slightly in older or newer releases of Mac OS X.
	</div><div class="orderedlist"><ol><li class="listitem"><div class="para">
				On your Mac, open System Preferences and click Network.
			</div></li><li class="listitem"><div class="para">
				Make sure Send all traffic over VPN connection is not checked.
			</div></li><li class="listitem"><div class="para">
				If your preferences are locked, you'll need to click the lock in the bottom left-hand corner to make any changes and provide your administrator credentials.
			</div></li><li class="listitem"><div class="para">
				You will need to create a new network entry. Click the plus icon on the bottom left-hand side and you'll see a dialog that says "Select the interface and enter a name for the new service." Select VPN from the Interface drop-down menu, and "L2TP over IPSec" for the VPN Type. Enter whatever you like within the "Service Name" field.
			</div></li><li class="listitem"><div class="para">
				You'll now have a new network interface with the name of whatever you put in the "Service Name" field. For the purposes of this example, we'll assume you've named it "CloudStack." Click on that interface and provide the IP address of the interface for your VPN under the Server Address field, and the user name for your VPN under Account Name.
			</div></li><li class="listitem"><div class="para">
				Click Authentication Settings, and add the user's password under User Authentication and enter the pre-shared IPSec key in the Shared Secret field under Machine Authentication. Click OK.
			</div></li><li class="listitem"><div class="para">
				You may also want to click the "Show VPN status in menu bar" but that's entirely optional.
			</div></li><li class="listitem"><div class="para">
				Now click "Connect" and you will be connected to the CloudStack VPN.
			</div></li></ol></div></div><div xml:lang="ja-JP" class="section" id="site-to-site-vpn" lang="ja-JP"><div class="titlepage"><div><div><h3 class="title" id="site-to-site-vpn">15.17.4. Setting Up a Site-to-Site VPN Connection</h3></div></div></div><div class="para">
		A Site-to-Site VPN connection helps you establish a secure connection from an enterprise datacenter to the cloud infrastructure. This allows users to access the guest VMs by establishing a VPN connection to the virtual router of the account from a device in the datacenter of the enterprise. Having this facility eliminates the need to establish VPN connections to individual VMs.
	</div><div class="para">
		The supported endpoints on the remote datacenters are:
	</div><div class="itemizedlist"><ul><li class="listitem"><div class="para">
				Cisco ISR with IOS 12.4 or later
			</div></li><li class="listitem"><div class="para">
				Juniper J-Series routers with JunOS 9.5 or later
			</div></li></ul></div><div class="note"><div class="admonition_header"><h2>注記</h2></div><div class="admonition"><div class="para">
			In addition to the specific Cisco and Juniper devices listed above, the expectation is that any Cisco or Juniper device running on the supported operating systems are able to establish VPN connections.
		</div></div></div><div class="para">
		To set up a Site-to-Site VPN connection, perform the following:
	</div><div class="orderedlist"><ol><li class="listitem"><div class="para">
				Create a Virtual Private Cloud (VPC).
			</div><div class="para">
				See <a class="xref" href="#configure-vpc">「VPC の構成」</a>.
			</div></li><li class="listitem"><div class="para">
				Create a VPN Customer Gateway.
			</div></li><li class="listitem"><div class="para">
				Create a VPN gateway for the VPC that you created.
			</div></li><li class="listitem"><div class="para">
				Create VPN connection from the VPC VPN gateway to the customer VPN gateway.
			</div></li></ol></div><div class="note"><div class="admonition_header"><h2>注記</h2></div><div class="admonition"><div class="para">
			Appropriate events are generated on the CloudStack UI when status of a Site-to-Site VPN connection changes from connected to disconnected, or vice versa. Currently no events are generated when establishing a VPN connection fails or pending.
		</div></div></div><div xml:lang="ja-JP" class="section" id="create-vpn-customer-gateway" lang="ja-JP"><div class="titlepage"><div><div><h4 class="title" id="create-vpn-customer-gateway">15.17.4.1. Creating and Updating a VPN Customer Gateway</h4></div></div></div><div class="note"><div class="admonition_header"><h2>注記</h2></div><div class="admonition"><div class="para">
			A VPN customer gateway can be connected to only one VPN gateway at a time.
		</div></div></div><div class="para">
		To add a VPN Customer Gateway:
	</div><div class="orderedlist"><ol><li class="listitem"><div class="para">
				管理者もしくはエンドユーザーとして CloudStack UI にログインします。
			</div></li><li class="listitem"><div class="para">
				左側のナビゲーションから [Network] を選択します。
			</div></li><li class="listitem"><div class="para">
				In the Select view, select VPN Customer Gateway.
			</div></li><li class="listitem"><div class="para">
				Click Add site-to-site VPN.
			</div><div class="mediaobject"><img src="./images/add-vpn-customer-gateway.png" alt="addvpncustomergateway.png: adding a customer gateway." /></div><div class="para">
				次の情報を指定します。
			</div><div class="itemizedlist"><ul><li class="listitem"><div class="para">
						<span class="bold bold"><strong>Name</strong></span>: A unique name for the VPN customer gateway you create.
					</div></li><li class="listitem"><div class="para">
						<span class="bold bold"><strong>Gateway</strong></span>: The IP address for the remote gateway.
					</div></li><li class="listitem"><div class="para">
						<span class="bold bold"><strong>CIDR list</strong></span>: The guest CIDR list of the remote subnets. Enter a CIDR or a comma-separated list of CIDRs. Ensure that a guest CIDR list is not overlapped with the VPC’s CIDR, or another guest CIDR. The CIDR must be RFC1918-compliant.
					</div></li><li class="listitem"><div class="para">
						<span class="bold bold"><strong>IPsec Preshared Key</strong></span>: Preshared keying is a method where the endpoints of the VPN share a secret key. This key value is used to authenticate the customer gateway and the VPC VPN gateway to each other.
					</div><div class="note"><div class="admonition_header"><h2>注記</h2></div><div class="admonition"><div class="para">
							The IKE peers (VPN end points) authenticate each other by computing and sending a keyed hash of data that includes the Preshared key. If the receiving peer is able to create the same hash independently by using its Preshared key, it knows that both peers must share the same secret, thus authenticating the customer gateway.
						</div></div></div></li><li class="listitem"><div class="para">
						<span class="bold bold"><strong>IKE Encryption</strong></span>: The Internet Key Exchange (IKE) policy for phase-1. The supported encryption algorithms are AES128, AES192, AES256, and 3DES. Authentication is accomplished through the Preshared Keys.
					</div><div class="note"><div class="admonition_header"><h2>注記</h2></div><div class="admonition"><div class="para">
							The phase-1 is the first phase in the IKE process. In this initial negotiation phase, the two VPN endpoints agree on the methods to be used to provide security for the underlying IP traffic. The phase-1 authenticates the two VPN gateways to each other, by confirming that the remote gateway has a matching Preshared Key.
						</div></div></div></li><li class="listitem"><div class="para">
						<span class="bold bold"><strong>IKE Hash</strong></span>: The IKE hash for phase-1. The supported hash algorithms are SHA1 and MD5.
					</div></li><li class="listitem"><div class="para">
						<span class="bold bold"><strong>IKE DH</strong></span>: A public-key cryptography protocol which allows two parties to establish a shared secret over an insecure communications channel. The 1536-bit Diffie-Hellman group is used within IKE to establish session keys. The supported options are None, Group-5 (1536-bit) and Group-2 (1024-bit).
					</div></li><li class="listitem"><div class="para">
						<span class="bold bold"><strong>ESP Encryption</strong></span>: Encapsulating Security Payload (ESP) algorithm within phase-2. The supported encryption algorithms are AES128, AES192, AES256, and 3DES.
					</div><div class="note"><div class="admonition_header"><h2>注記</h2></div><div class="admonition"><div class="para">
							The phase-2 is the second phase in the IKE process. The purpose of IKE phase-2 is to negotiate IPSec security associations (SA) to set up the IPSec tunnel. In phase-2, new keying material is extracted from the Diffie-Hellman key exchange in phase-1, to provide session keys to use in protecting the VPN data flow.
						</div></div></div></li><li class="listitem"><div class="para">
						<span class="bold bold"><strong>ESP Hash</strong></span>: Encapsulating Security Payload (ESP) hash for phase-2. Supported hash algorithms are SHA1 and MD5.
					</div></li><li class="listitem"><div class="para">
						<span class="bold bold"><strong>Perfect Forward Secrecy</strong></span>: Perfect Forward Secrecy (or PFS) is the property that ensures that a session key derived from a set of long-term public and private keys will not be compromised. This property enforces a new Diffie-Hellman key exchange. It provides the keying material that has greater key material life and thereby greater resistance to cryptographic attacks. The available options are None, Group-5 (1536-bit) and Group-2 (1024-bit). The security of the key exchanges increase as the DH groups grow larger, as does the time of the exchanges.
					</div><div class="note"><div class="admonition_header"><h2>注記</h2></div><div class="admonition"><div class="para">
							When PFS is turned on, for every negotiation of a new phase-2 SA the two gateways must generate a new set of phase-1 keys. This adds an extra layer of protection that PFS adds, which ensures if the phase-2 SA’s have expired, the keys used for new phase-2 SA’s have not been generated from the current phase-1 keying material.
						</div></div></div></li><li class="listitem"><div class="para">
						<span class="bold bold"><strong>IKE Lifetime (seconds)</strong></span>: The phase-1 lifetime of the security association in seconds. Default is 86400 seconds (1 day). Whenever the time expires, a new phase-1 exchange is performed.
					</div></li><li class="listitem"><div class="para">
						<span class="bold bold"><strong>ESP Lifetime (seconds)</strong></span>: The phase-2 lifetime of the security association in seconds. Default is 3600 seconds (1 hour). Whenever the value is exceeded, a re-key is initiated to provide a new IPsec encryption and authentication session keys.
					</div></li><li class="listitem"><div class="para">
						<span class="bold bold"><strong>Dead Peer Detection</strong></span>: A method to detect an unavailable Internet Key Exchange (IKE) peer. Select this option if you want the virtual router to query the liveliness of its IKE peer at regular intervals. It’s recommended to have the same configuration of DPD on both side of VPN connection.
					</div></li></ul></div></li><li class="listitem"><div class="para">
				「OK」をクリックします。
			</div></li></ol></div><div class="formalpara"><h5 class="formalpara" id="idm8594048">Updating and Removing a VPN Customer Gateway</h5>
			You can update a customer gateway either with no VPN connection, or related VPN connection is in error state.
		</div><div class="orderedlist"><ol><li class="listitem"><div class="para">
				管理者もしくはエンドユーザーとして CloudStack UI にログインします。
			</div></li><li class="listitem"><div class="para">
				左側のナビゲーションから [Network] を選択します。
			</div></li><li class="listitem"><div class="para">
				In the Select view, select VPN Customer Gateway.
			</div></li><li class="listitem"><div class="para">
				Select the VPN customer gateway you want to work with.
			</div></li><li class="listitem"><div class="para">
				To modify the required parameters, click the Edit VPN Customer Gateway button
				<span class="inlinemediaobject"><img src="./images/edit-icon.png" alt="edit.png: button to edit a VPN customer gateway" /></span>
			</div></li><li class="listitem"><div class="para">
				To remove the VPN customer gateway, click the Delete VPN Customer Gateway button
				<span class="inlinemediaobject"><img src="./images/delete-button.png" alt="delete.png: button to remove a VPN customer gateway" /></span>
			</div></li><li class="listitem"><div class="para">
				「OK」をクリックします。
			</div></li></ol></div></div><div xml:lang="ja-JP" class="section" id="create-vpn-gateway-for-vpc" lang="ja-JP"><div class="titlepage"><div><div><h4 class="title" id="create-vpn-gateway-for-vpc">15.17.4.2. VPC での VPN ゲートウェイの作成</h4></div></div></div><div class="orderedlist"><ol><li class="listitem"><div class="para">
				管理者もしくはエンドユーザーとして CloudStack UI にログインします。
			</div></li><li class="listitem"><div class="para">
				左側のナビゲーションから [Network] を選択します。
			</div></li><li class="listitem"><div class="para">
				選択ビューから VPC を選択します。
			</div><div class="para">
				アカウントに対して作成された全ての VPC がページにリスト表示されます。
			</div></li><li class="listitem"><div class="para">
				仮想マシンを展開したい VPC の [Configure] ボタンをクリックします。
			</div><div class="para">
				VPC ページではダイアグラム上にリストされる作成された全ての層が表示されます。
			</div></li><li class="listitem"><div class="para">
				設定アイコンをクリックします。
			</div><div class="para">
				以下のオプションが表示されます。
			</div><div class="itemizedlist"><ul><li class="listitem"><div class="para">
						IP アドレス
					</div></li><li class="listitem"><div class="para">
						ゲートウェイ
					</div></li><li class="listitem"><div class="para">
						サイト間 VPN
					</div></li><li class="listitem"><div class="para">
						ネットワーク ACL
					</div></li></ul></div></li><li class="listitem"><div class="para">
				サイト間 VPN を選択します。
			</div><div class="para">
				既に VPN ゲートウェイを作成している場合は表示された VPN ゲートウェイからサイト間 VPN を選択します。
			</div></li><li class="listitem"><div class="para">
				確認ダイアログで [Yes] を選択します。
			</div><div class="para">
				しばらく経つと VPN ゲートウェイが作成されます。その後、作成したVPN ゲートウェイの詳細が表示されます。次に [Yes] をクリックします。
			</div><div class="para">
				VPN ゲートウェイ情報ページでは以下の詳細情報が表示されます。
			</div><div class="itemizedlist"><ul><li class="listitem"><div class="para">
						IP アドレス
					</div></li><li class="listitem"><div class="para">
						アカウント
					</div></li><li class="listitem"><div class="para">
						ドメイン
					</div></li></ul></div></li></ol></div></div><div xml:lang="ja-JP" class="section" id="create-vpn-connection-vpc" lang="ja-JP"><div class="titlepage"><div><div><h4 class="title" id="create-vpn-connection-vpc">15.17.4.3. VPC 接続の作成</h4></div></div></div><div class="orderedlist"><ol><li class="listitem"><div class="para">
				管理者もしくはエンドユーザーとして CloudStack UI にログインします。
			</div></li><li class="listitem"><div class="para">
				左側のナビゲーションから [Network] を選択します。
			</div></li><li class="listitem"><div class="para">
				選択ビューから VPC を選択します。
			</div><div class="para">
				アカウントに対し作成した全ての VPC がページに表示されます。
			</div></li><li class="listitem"><div class="para">
				仮想マシンを展開したい VPC の [Configure] ボタンをクリックします。
			</div><div class="para">
				VPC ページではダイアグラム上にリストされる作成された全ての層が表示されます。
			</div></li><li class="listitem"><div class="para">
				設定アイコンをクリックします。
			</div><div class="para">
				以下のオプションが表示されます。
			</div><div class="itemizedlist"><ul><li class="listitem"><div class="para">
						IP アドレス
					</div></li><li class="listitem"><div class="para">
						ゲートウェイ
					</div></li><li class="listitem"><div class="para">
						サイト間 VPN
					</div></li><li class="listitem"><div class="para">
						ネットワーク ACL
					</div></li></ul></div></li><li class="listitem"><div class="para">
				サイト間 VPN を選択します。
			</div><div class="para">
				サイト間 VPN のページが表示されます。
			</div></li><li class="listitem"><div class="para">
				セレクトビューのドロップダウンから VPN 接続を選択します。
			</div></li><li class="listitem"><div class="para">
				[Create VPN Connection] をクリックします。
			</div><div class="para">
				VPN 接続のダイアログが表示されます。
			</div><div class="mediaobject"><img src="./images/create-vpn-connection.png" alt="createvpnconnection.png: creating a vpn connection to the customer gateway." /></div></li><li class="listitem"><div class="para">
				必要なカスタマーゲートウェイを選択し、 [OK] をクリックします。
			</div><div class="para">
				しばらくすると VPN 接続が表示されます。
			</div><div class="para">
				VPN 接続に関して以下の情報が表示されます。
			</div><div class="itemizedlist"><ul><li class="listitem"><div class="para">
						IP アドレス
					</div></li><li class="listitem"><div class="para">
						ゲートウェイ
					</div></li><li class="listitem"><div class="para">
						状態
					</div></li><li class="listitem"><div class="para">
						IPSec の事前共有鍵
					</div></li><li class="listitem"><div class="para">
						IKE 規則
					</div></li><li class="listitem"><div class="para">
						ESP 規則
					</div></li></ul></div></li></ol></div></div><div xml:lang="ja-JP" class="section" id="delete-reset-vpn" lang="ja-JP"><div class="titlepage"><div><div><h4 class="title" id="delete-reset-vpn">15.17.4.4. VPN 接続の再起動と削除</h4></div></div></div><div class="orderedlist"><ol><li class="listitem"><div class="para">
				管理者もしくはエンドユーザーとして CloudStack UI にログインします。
			</div></li><li class="listitem"><div class="para">
				左側のナビゲーションから [Network] を選択します。
			</div></li><li class="listitem"><div class="para">
				選択ビューから VPC を選択します。
			</div><div class="para">
				アカウントに対して作成された全ての VPC がページにリスト表示されます。
			</div></li><li class="listitem"><div class="para">
				仮想マシンを展開したい VPC の [Configure] ボタンをクリックします。
			</div><div class="para">
				VPC ページではダイアグラム上にリストされる作成された全ての層が表示されます。
			</div></li><li class="listitem"><div class="para">
				設定アイコンをクリックします。
			</div><div class="para">
				以下のオプションが表示されます。
			</div><div class="itemizedlist"><ul><li class="listitem"><div class="para">
						IP アドレス
					</div></li><li class="listitem"><div class="para">
						ゲートウェイ
					</div></li><li class="listitem"><div class="para">
						サイト間 VPN
					</div></li><li class="listitem"><div class="para">
						ネットワーク ACL
					</div></li></ul></div></li><li class="listitem"><div class="para">
				サイト間 VPN を選択します。
			</div><div class="para">
				サイト間 VPN のページが表示されます。
			</div></li><li class="listitem"><div class="para">
				セレクトビューのドロップダウンから VPN 接続を選択します。
			</div><div class="para">
				作成した全ての VPN 接続が表示されます。
			</div></li><li class="listitem"><div class="para">
				対象となる VPN 接続を選択します。
			</div><div class="para">
				[詳細] タブが表示されます。
			</div></li><li class="listitem"><div class="para">
				VPN 接続を削除するには [Delete VPN Connection] ボタンをクリックします。
				<span class="inlinemediaobject"><img src="./images/remove-vpn.png" alt="remove-vpn.png: button to remove a VPN connection" /></span>
			</div><div class="para">
				VPN 接続を再起動するには [詳細] タブにある [Reset VPN Connection] ボタンをクリックします。
				<span class="inlinemediaobject"><img src="./images/reset-vpn.png" alt="reset-vpn.png: button to reset a VPN connection" /></span>
			</div></li></ol></div></div></div></div><div xml:lang="ja-JP" class="section" id="inter-vlan-routing" lang="ja-JP"><div class="titlepage"><div><div><h2 class="title" id="inter-vlan-routing">15.18. About Inter-VLAN Routing</h2></div></div></div><div class="para">
		Inter-VLAN Routing is the capability to route network traffic between VLANs. This feature enables you to build Virtual Private Clouds (VPC), an isolated segment of your cloud, that can hold multi-tier applications. These tiers are deployed on different VLANs that can communicate with each other. You provision VLANs to the tiers your create, and VMs can be deployed on different tiers. The VLANs are connected to a virtual router, which facilitates communication between the VMs. In effect, you can segment VMs by means of VLANs into different networks that can host multi-tier applications, such as Web, Application, or Database. Such segmentation by means of VLANs logically separate application VMs for higher security and lower broadcasts, while remaining physically connected to the same device.
	</div><div class="para">
		This feature is supported on XenServer and VMware hypervisors.
	</div><div class="para">
		The major advantages are:
	</div><div class="itemizedlist"><ul><li class="listitem"><div class="para">
				The administrator can deploy a set of VLANs and allow users to deploy VMs on these VLANs. A guest VLAN is randomly alloted to an account from a pre-specified set of guest VLANs. All the VMs of a certain tier of an account reside on the guest VLAN allotted to that account.
			</div><div class="note"><div class="admonition_header"><h2>注記</h2></div><div class="admonition"><div class="para">
					A VLAN allocated for an account cannot be shared between multiple accounts.
				</div></div></div></li><li class="listitem"><div class="para">
				The administrator can allow users create their own VPC and deploy the application. In this scenario, the VMs that belong to the account are deployed on the VLANs allotted to that account.
			</div></li><li class="listitem"><div class="para">
				Both administrators and users can create multiple VPCs. The guest network NIC is plugged to the VPC virtual router when the first VM is deployed in a tier.
			</div></li><li class="listitem"><div class="para">
				The administrator can create the following gateways to send to or receive traffic from the VMs:
			</div><div class="itemizedlist"><ul><li class="listitem"><div class="para">
						<span class="bold bold"><strong>VPN Gateway</strong></span>: For more information, see <a class="xref" href="#create-vpn-gateway-for-vpc">「VPC での VPN ゲートウェイの作成」</a>.
					</div></li><li class="listitem"><div class="para">
						<span class="bold bold"><strong>Public Gateway</strong></span>: The public gateway for a VPC is added to the virtual router when the virtual router is created for VPC. The public gateway is not exposed to the end users. You are not allowed to list it, nor allowed to create any static routes.
					</div></li><li class="listitem"><div class="para">
						<span class="bold bold"><strong>Private Gateway</strong></span>: For more information, see <a class="xref" href="#add-gateway-vpc">「VPC へのプライベートゲートウェイの追加」</a>.
					</div></li></ul></div></li><li class="listitem"><div class="para">
				Both administrators and users can create various possible destinations-gateway combinations. However, only one gateway of each type can be used in a deployment.
			</div><div class="para">
				For example:
			</div><div class="itemizedlist"><ul><li class="listitem"><div class="para">
						<span class="bold bold"><strong>VLANs and Public Gateway</strong></span>: For example, an application is deployed in the cloud, and the Web application VMs communicate with the Internet.
					</div></li><li class="listitem"><div class="para">
						<span class="bold bold"><strong>VLANs, VPN Gateway, and Public Gateway</strong></span>: For example, an application is deployed in the cloud; the Web application VMs communicate with the Internet; and the database VMs communicate with the on-premise devices.
					</div></li></ul></div></li><li class="listitem"><div class="para">
				The administrator can define Access Control List (ACL) on the virtual router to filter the traffic among the VLANs or between the Internet and a VLAN. You can define ACL based on CIDR, port range, protocol, type code (if ICMP protocol is selected) and Ingress/Egress type.
			</div></li></ul></div><div class="para">
		The following figure shows the possible deployment scenarios of a Inter-VLAN setup:
	</div><div class="mediaobject"><img src="./images/multi-tier-app.png" width="444" alt="mutltier.png: a multi-tier setup." /></div><div class="para">
		To set up a multi-tier Inter-VLAN deployment, see <a class="xref" href="#configure-vpc">「VPC の構成」</a>.
	</div></div><div xml:lang="ja-JP" class="section" id="configure-vpc" lang="ja-JP"><div class="titlepage"><div><div><h2 class="title" id="configure-vpc">15.19. VPC の構成</h2></div></div></div><div xml:lang="ja-JP" class="section" id="vpc" lang="ja-JP"><div class="titlepage"><div><div><h3 class="title" id="vpc">15.19.1. VPC(Virtual Private Cloud) の概要</h3></div></div></div><div class="para">
		CloudStack 仮想プライベートクラウドは CloudStack の機能の一部です。 VPC は一般的な物理ネットワークに似た独自の仮想ネットワークトポロジを持ち、ユーザーはプライベードアドレスを持つ仮想マシンをその仮想ネットワーク上で起動することができます。例: 10.0.0.0/16。 IP のアドレス範囲に準じた仮想マシングループに対し VPC のネットワークを有効化し、層を定義することができます。
	</div><div class="para">
		例として、VPC がプライベートなアドレス範囲である 10.0.0.0/16 を持っていした場合、ゲストネットワークは 10.0.1.0/24, 10.0.2.0/24, 10.0.3.0/24 といったアドレスを持つことができます。
	</div><div class="formalpara"><h5 class="formalpara" id="idp24666608">VPC の主要コンポーネント。</h5>
			VPC は以下のネットワークコンポーネントから構成されます。
		</div><div class="itemizedlist"><ul><li class="listitem"><div class="para">
				<span class="bold bold"><strong>VPC</strong></span>: VPC は仮想ルーターを介し通信することができる、複数の独立したネットワークのコンテナとして動作します。
			</div></li><li class="listitem"><div class="para">
				<span class="bold bold"><strong>Network Tiers</strong></span>: 各層はそれぞれ独立したネットワークとして VLAN 情報やCIDR情報を持ち、VLAN によってセグメント化されます。各層の NIC はゲートウェイとして動作します。
			</div></li><li class="listitem"><div class="para">
				<span class="bold bold"><strong>Virtual Router</strong></span>: 仮想ルーターは自動的に作成され VPC 作成とともに起動します。仮想ルーターは各層とパブリックなゲートウェイから受信する直接のトラフィック、VPN ゲートウェイ、NAT インスタンスに接しています。各層は NIC や 仮想ルーターの IP と連携しDNS や DHCP といったサービスを提供します。
			</div></li><li class="listitem"><div class="para">
				<span class="bold bold"><strong>Public Gateway</strong></span>: インターネットと VPC との通信はパブリックゲートウェイを介して処理されます。VPC ではパブリックゲートウェイはエンドユーザーに対し不可視であるため静的ルーティングはパブリックゲートウェイではサポートされていません。
			</div></li><li class="listitem"><div class="para">
				<span class="bold bold"><strong>Private Gateway</strong></span>: プライベートネットワークと VPC との通信は全てルーティングされます。詳細な情報は <a class="xref" href="#add-gateway-vpc">「VPC へのプライベートゲートウェイの追加」</a> を参照して下さい。
			</div></li><li class="listitem"><div class="para">
				<span class="bold bold"><strong>VPN Gateway</strong></span>: VPC に付与される VPN 接続です。
			</div></li><li class="listitem"><div class="para">
				<span class="bold bold"><strong>Site-to-Site VPN Connection</strong></span>: VPC とデータセンターやホームネットワーク、コロケーション環境とを接続するハードウェアベースの VPN 接続です。詳細な情報は <a class="xref" href="#site-to-site-vpn">「Setting Up a Site-to-Site VPN Connection」</a> を参照して下さい。
			</div></li><li class="listitem"><div class="para">
				<span class="bold bold"><strong>Customer Gateway</strong></span>: VPN 接続の利用者側ゲートウェイです。詳細な情報は <a class="xref" href="#create-vpn-customer-gateway">「Creating and Updating a VPN Customer Gateway」</a> を参照して下さい。
			</div></li><li class="listitem"><div class="para">
				<span class="bold bold"><strong>NAT Instance</strong></span>: インターネットからパブリックゲートウェイを介しての仮想マシンアクセスのためのポートアドレス転送を提供するインスタンスです。詳細な情報は <a class="xref" href="#enable-disable-static-nat-vpc">「VPC での静的 NAT の有効化、無効化」</a> を参照して下さい。
			</div></li></ul></div><div class="formalpara"><h5 class="formalpara" id="idp2675456">VPC のネットワークアーキテクチャ</h5>
			VPC では次のネットワークアーキテクチャの基本的なオプションが提供されます。
		</div><div class="itemizedlist"><ul><li class="listitem"><div class="para">
				パブリックゲートウェイのみの VPC
			</div></li><li class="listitem"><div class="para">
				パブリック、プライベートゲートウェイを持つ VPC
			</div></li><li class="listitem"><div class="para">
				パブリック、プライベートゲートウェイとサイト間 VPN アクセスを持つ VPC
			</div></li><li class="listitem"><div class="para">
				プライベートゲートウェイのみとサイト間 VPN アクセスを持つ VPC
			</div></li></ul></div><div class="formalpara"><h5 class="formalpara" id="idp32407616">VPC の接続オプション</h5>
			次のように VPC に接続することができます。
		</div><div class="itemizedlist"><ul><li class="listitem"><div class="para">
				パブリックゲートウェイを介してインターネットから接続。
			</div></li><li class="listitem"><div class="para">
				VPN ゲートウェイを介しサイト間 VPN 接続を利用して会社のデータセンターから接続
			</div></li><li class="listitem"><div class="para">
				パブリックゲートウェイと VPN ゲートウェイを利用してインターネット、会社のデータセンター双方から接続
			</div></li></ul></div><div class="formalpara"><h5 class="formalpara" id="idp18184520">VPC ネットワークの考慮点</h5>
			VPC を作成する前に次のことを考慮しておきます。
		</div><div class="itemizedlist"><ul><li class="listitem"><div class="para">
				VPC はデフォルトで作成された際に有効化されます。
			</div></li><li class="listitem"><div class="para">
				VPC は拡張ゾーンでのみ作成可能で、同時に複数ゾーンに所属させることは出来ません。
			</div></li><li class="listitem"><div class="para">
				デフォルトの VPC の作成可能数はアカウント毎に20個です。しかし、グローバル設定の max.account.vpcs を変更することでアカウント毎に作成可能な VPC の最大数を制御することができます。
			</div></li><li class="listitem"><div class="para">
				デフォルトの VPC 上の層の作成可能数はアカウント毎に3個です。vpc.max.networks を変更することで最大数を制御することができます。
			</div></li><li class="listitem"><div class="para">
				各層は VPC 上で一意な CIDR を設定すべきです。また、層の CIDR は VPC の CIDR 内に収まっているべきです。
			</div></li><li class="listitem"><div class="para">
				層は単一の VPC にのみ所属します。
			</div></li><li class="listitem"><div class="para">
				VPC 内の全てのネットワーク層は同一アカウントに紐付けられるべきです。
			</div></li><li class="listitem"><div class="para">
				デフォルトでは VPC が作成された際、送信元 NAT 用 IP が割り当てられます。送信元 NAT 用 IP は VPC が削除された時のみ開放されます。
			</div></li><li class="listitem"><div class="para">
				パブリック IP は同時に1つだけ利用することができます。IP が送信元 NAT 用である場合静的 NAT や ポート転送用に割り当てることはできません。
			</div></li><li class="listitem"><div class="para">
				展開された仮想マシンはプライベート IP のみ利用することができます。インターネットへの通信を行う場合、展開した VPC で仮想マシンに対しての NAT を有効化する必要があります。
			</div></li><li class="listitem"><div class="para">
				新しいネットワークのみが VPC に対して追加できます。VPC 毎のネットワークの最大値は vpc.max.networks によって制限されており、デフォルト値は3です。
			</div></li><li class="listitem"><div class="para">
				負荷分散サービスは VPC 内の単一の層に対してのみサポートされます。
			</div></li><li class="listitem"><div class="para">
				層に IP アドレスが割り当てられた場合
			</div><div class="itemizedlist"><ul><li class="listitem"><div class="para">
						IP は VPC 内の複数の層で同時に利用することはできません。例としてA層とB層を持ちパブリック IPを1つ持っている場合、IP を用いたポート転送ルールはA、Bに対し作成することはできますが双方同時には作成できません。
					</div></li><li class="listitem"><div class="para">
						IP は VPC 内の他のゲストネットワークに対しての静的NATや負荷分散、ポート転送ルールに利用できません。
					</div></li></ul></div></li><li class="listitem"><div class="para">
				リモートアクセス VPN は VPCではサポートされていません。
			</div></li></ul></div></div><div xml:lang="ja-JP" class="section" id="add-vpc" lang="ja-JP"><div class="titlepage"><div><div><h3 class="title" id="add-vpc">15.19.2. VPC の追加</h3></div></div></div><div class="para">
		VPC を作成する場合、ゾーンと VPC 対しての IP アドレスが必要になります。この際、クラスレス内部ドメインルーティングを CIDR のブロックとして指定する必要があります。
	</div><div class="orderedlist"><ol><li class="listitem"><div class="para">
				管理者またはユーザーとして CloudStack ユーザーインターフェイスにログオンします。
			</div></li><li class="listitem"><div class="para">
				左側のナビゲーションから [Network] を選択します。
			</div></li><li class="listitem"><div class="para">
				選択ビューから VPC を選択します。
			</div></li><li class="listitem"><div class="para">
				[Add VPC] をクリックすると VPC 追加ページでは以下の情報が表示されます。
			</div><div class="mediaobject"><img src="./images/add-vpc.png" alt="add-vpc.png: adding a vpc." /></div><div class="para">
				次の情報を指定します。
			</div><div class="itemizedlist"><ul><li class="listitem"><div class="para">
						<span class="bold bold"><strong>Name</strong></span>: 作成した VPC の名称です。
					</div></li><li class="listitem"><div class="para">
						<span class="bold bold"><strong>Description</strong></span>: VPC の詳細情報です。
					</div></li><li class="listitem"><div class="para">
						<span class="bold bold"><strong>Zone</strong></span>: VPC を利用可能にしたいゾーンを選択します。
					</div></li><li class="listitem"><div class="para">
						<span class="bold bold"><strong>Super CIDR for Guest Networks</strong></span>: VPC における全ての層(ゲストネットワーク)に対する CIDR を定義します。 層を作成した際はそれが入力したスーパー CIDR の内部に所属することを確認します。また、CIDR が RFC1918 を満たしていることを確認します。
					</div></li><li class="listitem"><div class="para">
						<span class="bold bold"><strong>DNS domain for Guest Networks</strong></span>: 特別なドメイン名を割り当てたい場合には DNS サフィックスを指定します。このパラメーターは VPC 上の全ての層に対し適用され、これは VPC 上に作成された全ての層は同じ DNS ドメインに所属することを意味します。パラメーターを指定しない場合は DNS 名は自動的に生成されます。
					</div></li></ul></div></li></ol></div></div><div xml:lang="ja-JP" class="section" id="add-tier" lang="ja-JP"><div class="titlepage"><div><div><h3 class="title" id="add-tier">15.19.3. 層の追加</h3></div></div></div><div class="para">
		層は VPC 上で明確に区別でき各ネットワークを分離しデフォルトで他の層とのアクセスを禁止します。層は異なった VLAN 上に構成され仮想ルーターを介することで互いに通信することができます。層は VPC 上に他の層に対し安価で低遅延のネットワーク接続を提供します。
	</div><div class="orderedlist"><ol><li class="listitem"><div class="para">
				管理者もしくはエンドユーザーとして CloudStack UI にログインします。
			</div></li><li class="listitem"><div class="para">
				左側のナビゲーションから [Network] を選択します。
			</div></li><li class="listitem"><div class="para">
				選択ビューから VPC を選択します。
			</div><div class="para">
				アカウントに対して作成された全ての VPC がページ上にリスト表示されます。
			</div><div class="note"><div class="admonition_header"><h2>注記</h2></div><div class="admonition"><div class="para">
					エンドユーザーはそれぞれの VPC を確認することができ、ROOT管理者やドメイン管理者は権限を許可されている全ての VPC を確認することができます。
				</div></div></div></li><li class="listitem"><div class="para">
				セットアップしたい層を含む VPC の [Configure] ボタンをクリックします。
			</div><div class="para">
				次のように層の追加ダイアログが表示されます。
			</div><div class="mediaobject"><img src="./images/add-tier.png" alt="add-tier.png: adding a tier to a vpc." /></div><div class="para">
				既に層を作成済みの場合 VPC のダイアログが表示されるので新しい層を追加するため [Create Tier] をクリックします。
			</div></li><li class="listitem"><div class="para">
				以下の要素を指定します。
			</div><div class="para">
				全ての項目が必須となります。
			</div><div class="itemizedlist"><ul><li class="listitem"><div class="para">
						<span class="bold bold"><strong>Name</strong></span>: 作成した層に対する唯一の名前です。
					</div></li><li class="listitem"><div class="para">
						<span class="bold bold"><strong>Network Offering</strong></span>: 以下のデフォルトのネットワークオファリングがリスト表示されます。DefaultIsolatedNetworkOfferingForVpcNetworksNoLB, DefaultIsolatedNetworkOfferingForVpcNetworks。
					</div><div class="para">
						VPC では LB-enabled ネットワークオファリングだけが作成されます。
					</div></li><li class="listitem"><div class="para">
						<span class="bold bold"><strong>Gateway</strong></span>: 作成された層のゲートウェイです。VPC 作成時に指定したスーパー CIDR 内に収まり、VPC 内の他の層と重複しないことを確認します。
					</div></li><li class="listitem"><div class="para">
						<span class="bold bold"><strong>Netmask</strong></span>: 作成された層のネットマスクです。
					</div><div class="para">
						例として、もし VPC の CIDR を10.0.0.0/16とした場合、層の CIDR は10.0.1.0/24となり、ゲートウェイは10.0.1.1 となります。またその際のネットマスクは255.255.255.0となります。
					</div></li></ul></div></li><li class="listitem"><div class="para">
				「OK」をクリックします。
			</div></li><li class="listitem"><div class="para">
				層のアクセス制御リストを設定する場合は引き続き設定を続けます。
			</div></li></ol></div></div><div xml:lang="ja-JP" class="section" id="configure-acl" lang="ja-JP"><div class="titlepage"><div><div><h3 class="title" id="configure-acl">15.19.4. Configuring Access Control List</h3></div></div></div><div class="para">
		Define Network Access Control List (ACL) on the VPC virtual router to control incoming (ingress) and outgoing (egress) traffic between the VPC tiers, and the tiers and Internet. By default, all incoming and outgoing traffic to the guest networks is blocked. To open the ports, you must create a new network ACL. The network ACLs can be created for the tiers only if the NetworkACL service is supported.
	</div><div class="orderedlist"><ol><li class="listitem"><div class="para">
				管理者またはユーザーとして CloudStack ユーザーインターフェイスにログオンします。
			</div></li><li class="listitem"><div class="para">
				左側のナビゲーションから [Network] を選択します。
			</div></li><li class="listitem"><div class="para">
				選択ビューから VPC を選択します。
			</div><div class="para">
				アカウントに対して作成された全ての VPC がページにリスト表示されます。
			</div></li><li class="listitem"><div class="para">
				設定アイコンをクリックします。
			</div><div class="para">
				以下のオプションが表示されます。
			</div><div class="itemizedlist"><ul><li class="listitem"><div class="para">
						IP アドレス
					</div></li><li class="listitem"><div class="para">
						ゲートウェイ
					</div></li><li class="listitem"><div class="para">
						サイト間 VPN
					</div></li><li class="listitem"><div class="para">
						ネットワーク ACL
					</div></li></ul></div></li><li class="listitem"><div class="para">
				Select Network ACLs.
			</div><div class="para">
				The Network ACLs page is displayed.
			</div></li><li class="listitem"><div class="para">
				Click Add Network ACLs.
			</div><div class="para">
				To add an ACL rule, fill in the following fields to specify what kind of network traffic is allowed in this tier.
			</div><div class="itemizedlist"><ul><li class="listitem"><div class="para">
						<span class="bold bold"><strong>CIDR</strong></span>: The CIDR acts as the Source CIDR for the Ingress rules, and Destination CIDR for the Egress rules. To accept traffic only from or to the IP addresses within a particular address block, enter a CIDR or a comma-separated list of CIDRs. The CIDR is the base IP address of the incoming traffic. For example, 192.168.0.0/22. To allow all CIDRs, set to 0.0.0.0/0.
					</div></li><li class="listitem"><div class="para">
						<span class="bold bold"><strong>Protocol</strong></span>: The networking protocol that sources use to send traffic to the tier. The TCP and UDP protocols are typically used for data exchange and end-user communications. The ICMP protocol is typically used to send error messages or network monitoring data.
					</div></li><li class="listitem"><div class="para">
						<span class="bold bold"><strong>Start Port</strong></span>, <span class="bold bold"><strong>End Port</strong></span> (TCP, UDP only): A range of listening ports that are the destination for the incoming traffic. If you are opening a single port, use the same number in both fields.
					</div></li><li class="listitem"><div class="para">
						<span class="bold bold"><strong>Select Tier</strong></span>: Select the tier for which you want to add this ACL rule.
					</div></li><li class="listitem"><div class="para">
						<span class="bold bold"><strong>ICMP Type</strong></span>, <span class="bold bold"><strong>ICMP Code</strong></span> (ICMP only): The type of message and error code that will be sent.
					</div></li><li class="listitem"><div class="para">
						<span class="bold bold"><strong>Traffic Type</strong></span>: Select the traffic type you want to apply.
					</div><div class="itemizedlist"><ul><li class="listitem"><div class="para">
								<span class="bold bold"><strong>Egress</strong></span>: To add an egress rule, select Egress from the Traffic type drop-down box and click Add. This specifies what type of traffic is allowed to be sent out of VM instances in this tier. If no egress rules are specified, all traffic from the tier is allowed out at the VPC virtual router. Once egress rules are specified, only the traffic specified in egress rules and the responses to any traffic that has been allowed in through an ingress rule are allowed out. No egress rule is required for the VMs in a tier to communicate with each other.
							</div></li><li class="listitem"><div class="para">
								<span class="bold bold"><strong>Ingress</strong></span>: To add an ingress rule, select Ingress from the Traffic type drop-down box and click Add. This specifies what network traffic is allowed into the VM instances in this tier. If no ingress rules are specified, then no traffic will be allowed in, except for responses to any traffic that has been allowed out through an egress rule.
							</div></li></ul></div><div class="note"><div class="admonition_header"><h2>注記</h2></div><div class="admonition"><div class="para">
							By default, all incoming and outgoing traffic to the guest networks is blocked. To open the ports, create a new network ACL.
						</div></div></div></li></ul></div></li><li class="listitem"><div class="para">
				Click Add. The ACL rule is added.
			</div><div class="para">
				To view the list of ACL rules you have added, click the desired tier from the Network ACLs page, then select the Network ACL tab.
			</div><div class="mediaobject"><img src="./images/network-acl.png" width="444" alt="network-acl.png: adding, editing, deleting an ACL rule." /></div><div class="para">
				You can edit the tags assigned to the ACL rules and delete the ACL rules you have created. Click the appropriate button in the Actions column.
			</div></li></ol></div></div><div xml:lang="ja-JP" class="section" id="add-gateway-vpc" lang="ja-JP"><div class="titlepage"><div><div><h3 class="title" id="add-gateway-vpc">15.19.5. VPC へのプライベートゲートウェイの追加</h3></div></div></div><div class="para">
		プライベートゲートウェイはルート管理者のみ追加することができます。VPCのプライベートネットワークは物理ネットワークの NIC と1対1の関係があり、同一データセンター上でゲートウェイを持たない重複しない VLAN や IP が許容されます。
	</div><div class="orderedlist"><ol><li class="listitem"><div class="para">
				管理者もしくはエンドユーザーとして CloudStack UI にログインします。
			</div></li><li class="listitem"><div class="para">
				左側のナビゲーションから [Network] を選択します。
			</div></li><li class="listitem"><div class="para">
				選択ビューから VPC を選択します。
			</div><div class="para">
				アカウントに対して作成された全ての VPC がページにリスト表示されます。
			</div></li><li class="listitem"><div class="para">
				負荷分散ルールを構成したい VPC の構成ボタンをクリックします。
			</div><div class="para">
				VPC ページではダイアグラム上にリストされる作成された全ての層が表示されます。
			</div></li><li class="listitem"><div class="para">
				設定アイコンをクリックします。
			</div><div class="para">
				以下のオプションが表示されます。
			</div><div class="itemizedlist"><ul><li class="listitem"><div class="para">
						IP アドレス
					</div></li><li class="listitem"><div class="para">
						プライベートゲートウェイ
					</div></li><li class="listitem"><div class="para">
						サイト間 VPN
					</div></li><li class="listitem"><div class="para">
						ネットワーク ACL
					</div></li></ul></div></li><li class="listitem"><div class="para">
				プライベートゲートウェイを選択します。
			</div><div class="para">
				ゲートウェイのページに表示されます。
			</div></li><li class="listitem"><div class="para">
				[Add new gateway]をクリックします。
			</div><div class="mediaobject"><img src="./images/add-new-gateway-vpc.png" alt="add-new-gateway-vpc.png: adding a private gateway for the VPC." /></div></li><li class="listitem"><div class="para">
				以下の要素を指定します。
			</div><div class="itemizedlist"><ul><li class="listitem"><div class="para">
						<span class="bold bold"><strong>物理ネットワーク</strong></span>: \nゾーンに作成された物理ネットワークです。
					</div></li><li class="listitem"><div class="para">
						<span class="bold bold"><strong>IP アドレス</strong></span>: \nVPC ゲートウェイに割り当てられた IP アドレスです。
					</div></li><li class="listitem"><div class="para">
						<span class="bold bold"><strong>ゲートウェイ</strong></span>: \nトラフィックが VPC に対し(もしくは VPC から)ルーティングされるゲートウェイです。
					</div></li><li class="listitem"><div class="para">
						<span class="bold bold"><strong>ネットマスク</strong></span>: \nVPC ゲートウェイに割り当てられた IP に対してのネットマスクです。
					</div></li><li class="listitem"><div class="para">
						<span class="bold bold"><strong>VLAN</strong></span>: \nVPC ゲートウェイに割り当てられた VLAN です。
					</div></li></ul></div><div class="para">
				新しいゲートウェイがリスト上に表示されます。VPC に対しゲートウェイを追加するためこれらの手順を繰り返すこともできます。
			</div></li></ol></div></div><div xml:lang="ja-JP" class="section" id="add-vm-to-tier" lang="ja-JP"><div class="titlepage"><div><div><h3 class="title" id="add-vm-to-tier">15.19.6. 層への仮想マシンの展開</h3></div></div></div><div class="orderedlist"><ol><li class="listitem"><div class="para">
				管理者またはユーザーとして CloudStack ユーザーインターフェイスにログオンします。
			</div></li><li class="listitem"><div class="para">
				左側のナビゲーションから [Network] を選択します。
			</div></li><li class="listitem"><div class="para">
				選択ビューから VPC を選択します。
			</div><div class="para">
				アカウントに対して作成された全ての VPC がページにリスト表示されます。
			</div></li><li class="listitem"><div class="para">
				仮想マシンを展開したい VPC の [Configure] ボタンをクリックします。
			</div><div class="para">
				VPC のページが表示され作成済みの全ての層がリスト表示されます。
			</div></li><li class="listitem"><div class="para">
				仮想マシンを追加したい層で [Add VM] ボタンをクリックします。
			</div><div class="para">
				インスタンスの追加ページが表示されます。
			</div><div class="para">
				この場面でインスタンスを追加するにはページの指示に従います。インスタンスの追加に関してはインストールガイドの「インスタンスの追加」の章を参照して下さい。
			</div></li></ol></div></div><div xml:lang="ja-JP" class="section" id="acquire-new-ip-for-vpc" lang="ja-JP"><div class="titlepage"><div><div><h3 class="title" id="acquire-new-ip-for-vpc">15.19.7. VPC に対しての新しい IP アドレスの取得</h3></div></div></div><div class="para">
		IP アドレスを取得するとゲストネットワークを除く全ての IP アドレスが VPC に割り当てられます。ゲストネットワークへの IP アドレスは IP やネットワークに対して初めてポート転送、負荷分散、静的NATルールを作成した際に割り当てられます。また、IP は複数のネットワークに対して同時には割り当てることができません。
	</div><div class="orderedlist"><ol><li class="listitem"><div class="para">
				管理者またはユーザーとして CloudStack ユーザーインターフェイスにログオンします。
			</div></li><li class="listitem"><div class="para">
				左側のナビゲーションから [Network] を選択します。
			</div></li><li class="listitem"><div class="para">
				選択ビューから [VPC] を選択します。
			</div><div class="para">
				アカウントに対して作成された全ての VPC がページにリスト表示されます。
			</div></li><li class="listitem"><div class="para">
				仮想マシンを展開したい VPC の [Configure] ボタンをクリックします。
			</div><div class="para">
				VPC ページではダイアグラム上にリストされる作成された全ての層が表示されます。
			</div></li><li class="listitem"><div class="para">
				設定アイコンをクリックします。
			</div><div class="para">
				以下のオプションが表示されます。
			</div><div class="itemizedlist"><ul><li class="listitem"><div class="para">
						IP アドレス
					</div></li><li class="listitem"><div class="para">
						ゲートウェイ
					</div></li><li class="listitem"><div class="para">
						サイト間 VPN
					</div></li><li class="listitem"><div class="para">
						ネットワーク ACL
					</div></li></ul></div></li><li class="listitem"><div class="para">
				IP アドレスを選択します。
			</div><div class="para">
				IP アドレスのページが表示されます。
			</div></li><li class="listitem"><div class="para">
				[Acquire New IP] をクリックし、確認ダイアログで [Yes] をクリックします。
			</div><div class="para">
				一般的に IP アドレスは限りあるリソースであるため確認用ページが表示されます。しばらく経つと状態が [Allocated] に変化し新しい IP アドレスが表示されます。これでポート転送や負荷分散、静的NATルールに対し IP アドレスを利用することができます。
			</div></li></ol></div></div><div xml:lang="ja-JP" class="section" id="release-ip-for-vpc" lang="ja-JP"><div class="titlepage"><div><div><h3 class="title" id="release-ip-for-vpc">15.19.8. VPC に割り当てられた IP アドレスの開放</h3></div></div></div><div class="para">
		IP アドレスは限られたリソースであり、特定の IP をこれ以上利用することが無い場合は VPC から IP を開放し利用可能アドレスのプールに返却することができます。IP アドレスに対し全てのネットワーク機能(ポート転送、負荷分散、静的NATルール)を削除している場合には層から IP アドレスを開放することができます。ここで開放された IP アドレスは同一の VPC に属し続けます。
	</div><div class="orderedlist"><ol><li class="listitem"><div class="para">
				管理者またはユーザーとして CloudStack ユーザーインターフェイスにログオンします。
			</div></li><li class="listitem"><div class="para">
				左側のナビゲーションから [Network] を選択します。
			</div></li><li class="listitem"><div class="para">
				選択ビューから VPC を選択します。
			</div><div class="para">
				アカウントに対して作成された全ての VPC がページにリスト表示されます。
			</div></li><li class="listitem"><div class="para">
				開放したい IP を持つ VPC の [Configure] ボタンをクリックします。
			</div><div class="para">
				VPC ページではダイアグラム上にリストされる作成された全ての層が表示されます。
			</div></li><li class="listitem"><div class="para">
				設定アイコンをクリックします。
			</div><div class="para">
				以下のオプションが表示されます。
			</div><div class="itemizedlist"><ul><li class="listitem"><div class="para">
						IP アドレス
					</div></li><li class="listitem"><div class="para">
						ゲートウェイ
					</div></li><li class="listitem"><div class="para">
						サイト間 VPN
					</div></li><li class="listitem"><div class="para">
						ネットワーク ACL
					</div></li></ul></div></li><li class="listitem"><div class="para">
				IP アドレスを選択します。
			</div><div class="para">
				IP アドレスのページが表示されます。
			</div></li><li class="listitem"><div class="para">
				開放したい IP をクリックします。
			</div></li><li class="listitem"><div class="para">
				詳細タブで [Release IP] ボタンをクリックします。
				<span class="inlinemediaobject"><img src="./images/release-ip-icon.png" alt="release-ip-icon.png: button to release an IP." /></span>
			</div></li></ol></div></div><div xml:lang="ja-JP" class="section" id="enable-disable-static-nat-vpc" lang="ja-JP"><div class="titlepage"><div><div><h3 class="title" id="enable-disable-static-nat-vpc">15.19.9. VPC での静的 NAT の有効化、無効化</h3></div></div></div><div class="para">
		静的 NAT ルールは VPC 内の仮想マシンに割り当てられたプライベート IP に対しインターネットからのトラフィックを渡すためパブリック IP と関連付けられます。この章では VPC 上の特定 IP アドレスに対してどのように静的 NAT の有効化、無効化するか説明しています。
	</div><div class="para">
		もし、すでにポートフォワーディングのルールが IP アドレスに反映されている場合、IP に対して静的 NAT を有効化することができません。
	</div><div class="para">
		仮想マシンがいくつかのネットワークに所属している場合、静的 NAT のルールは デフォルトネットワークでしか機能しません。
	</div><div class="orderedlist"><ol><li class="listitem"><div class="para">
				管理者またはユーザーとして CloudStack ユーザーインターフェイスにログオンします。
			</div></li><li class="listitem"><div class="para">
				左側のナビゲーションから [Network] を選択します。
			</div></li><li class="listitem"><div class="para">
				選択ビューから VPC を選択します。
			</div><div class="para">
				アカウントに対して作成された全ての VPC がページにリスト表示されます。
			</div></li><li class="listitem"><div class="para">
				仮想マシンを展開したい VPC の [Configure] ボタンをクリックします。
			</div><div class="para">
				VPC ページではダイアグラム上にリストされる作成された全ての層が表示されます。
			</div></li><li class="listitem"><div class="para">
				設定アイコンをクリックします。
			</div><div class="para">
				以下のオプションが表示されます。
			</div><div class="itemizedlist"><ul><li class="listitem"><div class="para">
						IP アドレス
					</div></li><li class="listitem"><div class="para">
						ゲートウェイ
					</div></li><li class="listitem"><div class="para">
						サイト間 VPN
					</div></li><li class="listitem"><div class="para">
						ネットワーク ACL
					</div></li></ul></div></li><li class="listitem"><div class="para">
				IP アドレスを選択します。
			</div><div class="para">
				IP アドレスのページが表示されます。
			</div></li><li class="listitem"><div class="para">
				設定したい IP をクリックします。
			</div></li><li class="listitem"><div class="para">
				詳細タブで [Static NAT] ボタンをクリックします。
				<span class="inlinemediaobject"><img src="./images/enable-disable.png" alt="enable-disable.png: button to enable Statid NAT." /></span>
				ボタンは有効、無効のトグルボタンになっており、表示される状態は IP アドレスに対して現在静的 NAT が有効化されているかどうかによって変化します。
			</div></li><li class="listitem"><div class="para">
				静的 NAT を有効化すると以下のようなダイアログが表示されます。
			</div><div class="mediaobject"><img src="./images/select-vm-staticnat-vpc.png" width="444" alt="select-vmstatic-nat.png: selecting a tier to apply staticNAT." /></div></li><li class="listitem"><div class="para">
				層と対象となる仮想マシンを選択して [Apply] ボタンを押して下さい。
			</div></li></ol></div></div><div xml:lang="ja-JP" class="section" id="add-loadbalancer-rule-vpc" lang="ja-JP"><div class="titlepage"><div><div><h3 class="title" id="add-loadbalancer-rule-vpc">15.19.10. VPC への負荷分散ルールの追加</h3></div></div></div><div class="para">
		CloudStack のユーザーや管理者はパブリック IP で受信されたトラフィックを負荷分散サービスが提供されているネットワーク層に所属する複数の仮想マシンに対して負荷分散するためのルールを作成することができます。ユーザーはアルゴリズムに基づいたルールを作成し、それらのルールを VPC 内の仮想マシンに割り当てることができます。
	</div><div class="orderedlist"><ol><li class="listitem"><div class="para">
				管理者またはユーザーとして CloudStack ユーザーインターフェイスにログオンします。
			</div></li><li class="listitem"><div class="para">
				左側のナビゲーションから [Network] を選択します。
			</div></li><li class="listitem"><div class="para">
				選択ビューから VPC を選択します。
			</div><div class="para">
				アカウントに対して作成された全ての VPC がページにリスト表示されます。
			</div></li><li class="listitem"><div class="para">
				負荷分散ルールを構成したい VPC の構成ボタンをクリックします。
			</div><div class="para">
				VPC ページではダイアグラム上にリストされる作成された全ての層が表示されます。
			</div></li><li class="listitem"><div class="para">
				設定アイコンをクリックします。
			</div><div class="para">
				以下のオプションが表示されます。
			</div><div class="itemizedlist"><ul><li class="listitem"><div class="para">
						IP アドレス
					</div></li><li class="listitem"><div class="para">
						ゲートウェイ
					</div></li><li class="listitem"><div class="para">
						サイト間 VPN
					</div></li><li class="listitem"><div class="para">
						ネットワーク ACL
					</div></li></ul></div></li><li class="listitem"><div class="para">
				IP アドレスを選択します。
			</div><div class="para">
				IP アドレスのページが表示されます。
			</div></li><li class="listitem"><div class="para">
				ルールを作成したい IP アドレスをクリックし、[Configuration] タブをクリックします。
			</div></li><li class="listitem"><div class="para">
				構成図のロードバランサーをクリックし、[View All] をクリックします。
			</div></li><li class="listitem"><div class="para">
				ルールを適用したい層を選択します。
			</div><div class="note"><div class="admonition_header"><h2>注記</h2></div><div class="admonition"><div class="para">
					VPC 内では単一の層に対して負荷分散サービスがサポートされます。
				</div></div></div></li><li class="listitem"><div class="para">
				以下の要素を指定します。
			</div><div class="itemizedlist"><ul><li class="listitem"><div class="para">
						<span class="bold bold"><strong>Name : </strong></span> 負荷分散ルールの名前です。
					</div></li><li class="listitem"><div class="para">
						<span class="bold bold"><strong>Public Port</strong></span>: 負荷分散用に受信されるトラッフィク用ポート
					</div></li><li class="listitem"><div class="para">
						<span class="bold bold"><strong>Private Port : </strong></span> 仮想マシンがトラフィックを受信するポート番号です。
					</div></li><li class="listitem"><div class="para">
						<span class="bold bold"><strong>Algorighm</strong></span>\nCloudStack で利用したい負荷分散アルゴリズムを選択します。以下のアルゴリズムがサポートされます。
					</div><div class="itemizedlist"><ul><li class="listitem"><div class="para">
								ラウンドロビン
							</div></li><li class="listitem"><div class="para">
								直近での接続
							</div></li><li class="listitem"><div class="para">
								接続元
							</div></li></ul></div></li><li class="listitem"><div class="para">
						<span class="bold bold"><strong>Stickness</strong></span>. (オプション) Click Configure and choose the algorithm for the stickiness policy. See Sticky Session Policies for Load Balancer Rules.\n[Configure] をクリックし、スティックネス規則用のアルゴリズムを選択します。負荷分散ルール用スティッキーセッション規則を参照して下さい。
					</div></li><li class="listitem"><div class="para">
						<span class="bold bold"><strong>Add VMs</strong></span>: Click Add VMs, then select two or more VMs that will divide the load of incoming traffic, and click Apply.\n[Add VMs] をクリックし受信トラフィックを負荷分散したい2つ以上の仮想マシンを選択します。その後、[Apply] をクリックします。
					</div></li></ul></div></li></ol></div><div class="para">
		新しい負荷分散ルールがリスト表示され、さらに IP アドレスに対しての負荷分散ルールを追加することができます。
	</div></div><div xml:lang="ja-JP" class="section" id="add-portforward-vpc" lang="ja-JP"><div class="titlepage"><div><div><h3 class="title" id="add-portforward-vpc">15.19.11. VPC へのポート転送ルールの追加</h3></div></div></div><div class="orderedlist"><ol><li class="listitem"><div class="para">
				管理者またはユーザーとして CloudStack ユーザーインターフェイスにログオンします。
			</div></li><li class="listitem"><div class="para">
				左側のナビゲーションから [Network] を選択します。
			</div></li><li class="listitem"><div class="para">
				選択ビューから VPC を選択します。
			</div><div class="para">
				アカウントに対して作成された全ての VPC がページにリスト表示されます。
			</div></li><li class="listitem"><div class="para">
				仮想マシンを展開したい VPC の [Configure] ボタンをクリックします。
			</div><div class="para">
				VPC ページではダイアグラム上にリストされる作成された全ての層が表示されます。
			</div></li><li class="listitem"><div class="para">
				設定アイコンをクリックします。
			</div><div class="para">
				以下のオプションが表示されます。
			</div><div class="itemizedlist"><ul><li class="listitem"><div class="para">
						IP アドレス
					</div></li><li class="listitem"><div class="para">
						ゲートウェイ
					</div></li><li class="listitem"><div class="para">
						サイト間 VPN
					</div></li><li class="listitem"><div class="para">
						ネットワーク ACL
					</div></li></ul></div></li><li class="listitem"><div class="para">
				既存の IP アドレスを選択するか新しい IP アドレスを取得します。リスト表示された IP アドレス名をクリックします。
			</div><div class="para">
				IP アドレスのページが表示されます。
			</div></li><li class="listitem"><div class="para">
				ルールを作成したい IP アドレスをクリックし、[Configuration] タブをクリックします。
			</div></li><li class="listitem"><div class="para">
				ダイアグラムの[Port Forwarding]ノードの[View All]をクリックします。
			</div></li><li class="listitem"><div class="para">
				ルールを適用したい層を選択します。
			</div></li><li class="listitem"><div class="para">
				以下の要素を指定します。
			</div><div class="itemizedlist"><ul><li class="listitem"><div class="para">
						<span class="bold bold"><strong>Public Port</strong></span>: The port to which public traffic will be addressed on the IP address you acquired in the previous step.以前の手順で取得したどの IP アドレスへのパブリックトラフィックを受信するポートを指定します。
					</div></li><li class="listitem"><div class="para">
						<span class="bold bold"><strong>Private Port</strong></span>: 仮想マシンが転送されたパブリックトラッフィクをリッスンするポートを指定します。
					</div></li><li class="listitem"><div class="para">
						<span class="bold bold"><strong>Protocol</strong></span>: それぞれのポートで利用する通信プロトコルを指定します。
					</div><div class="itemizedlist"><ul><li class="listitem"><div class="para">
								TCP
							</div></li><li class="listitem"><div class="para">
								UDP
							</div></li></ul></div></li><li class="listitem"><div class="para">
						<span class="bold bold"><strong>Add VM</strong></span>: [Add VM] をクリックします。その後、ルールを適用したい仮想マシン名を選択し [Apply] をクリックします。
					</div><div class="para">
						仮想マシンへの ssh セッションを作成することでルールをテストすることができます。
					</div></li></ul></div></li></ol></div></div><div xml:lang="ja-JP" class="section" id="remove-tier" lang="ja-JP"><div class="titlepage"><div><div><h3 class="title" id="remove-tier">15.19.12. 層の削除</h3></div></div></div><div class="para">
		VPC から層を削除することができ、削除された層は無効化することができません。層を削除した場合、層に設定したリソースのみ削除されます。全てのネットワークルール(ポート転送や負荷分散、静的 NAT など)と IP アドレスは削除された層に割り当てられたままになります。その際、IP アドレスは VPC に所属し続けます。
	</div><div class="orderedlist"><ol><li class="listitem"><div class="para">
				管理者またはユーザーとして CloudStack ユーザーインターフェイスにログオンします。
			</div></li><li class="listitem"><div class="para">
				左側のナビゲーションから [Network] を選択します。
			</div></li><li class="listitem"><div class="para">
				選択ビューから VPC を選択します。
			</div><div class="para">
				アカウントに対して作成された全ての VPC がページ上にリスト表示されます。
			</div></li><li class="listitem"><div class="para">
				層を設定したい VPC の [Configure] ボタンをクリックします。
			</div><div class="para">
				VPC の設定画面が表示され、設定したい層の情報が表示されます。
			</div></li><li class="listitem"><div class="para">
				[Remove VPC] ボタンをクリックします。
			</div><div class="mediaobject"><img src="./images/remove-tier.png" alt="remove-tier.png: removing a tier from a vpc." /></div><div class="para">
				層を削除するにはしばらく待ちます。
			</div></li></ol></div></div><div xml:lang="ja-JP" class="section" id="remove-vpc" lang="ja-JP"><div class="titlepage"><div><div><h3 class="title" id="remove-vpc">15.19.13. VPC の編集と再起動、削除</h3></div></div></div><div class="note"><div class="admonition_header"><h2>注記</h2></div><div class="admonition"><div class="para">
			VPC 削除前の全ての層の確認
		</div></div></div><div class="orderedlist"><ol><li class="listitem"><div class="para">
				管理者またはユーザーとして CloudStack ユーザーインターフェイスにログオンします。
			</div></li><li class="listitem"><div class="para">
				左側のナビゲーションから [Network] を選択します。
			</div></li><li class="listitem"><div class="para">
				選択ビューから VPC を選択します。
			</div><div class="para">
				アカウントに対して作成された全ての VPC がページにリスト表示されます。
			</div></li><li class="listitem"><div class="para">
				対象の VPC を選択します。
			</div></li><li class="listitem"><div class="para">
				削除するには [Remove VPC] ボタンをクリックします。
				<span class="inlinemediaobject"><img src="./images/remove-vpc.png" alt="remove-vpc.png: button to remove a VPC" /></span>
			</div><div class="para">
				VPCの名前と詳細情報を編集することができ、それには VPC を選択し [Edit] ボタンをクリックします。
				<span class="inlinemediaobject"><img src="./images/edit-icon.png" alt="edit-icon.png: button to edit a VPC" /></span>
			</div><div class="para">
				To restart a VPC, select the VPC, then click the Restart button.
				<span class="inlinemediaobject"><img src="./images/restart-vpc.png" alt="restart-vpc.png: button to restart a VPC" /></span>
				i
			</div></li></ol></div></div></div><div xml:lang="ja-JP" class="section" id="persistent-network" lang="ja-JP"><div class="titlepage"><div><div><h2 class="title" id="persistent-network">15.20. Persistent Networks</h2></div></div></div><div class="para">
		The network that you can provision without having to deploy any VMs on it is called a persistent network. A persistent network can be part of a VPC or a non-VPC environment.
	</div><div class="para">
		When you create other types of network, a network is only a database entry until the first VM is created on that network. When the first VM is created, a VLAN ID is assigned and the network is provisioned. Also, when the last VM is destroyed, the VLAN ID is released and the network is no longer available. With the addition of persistent network, you will have the ability to create a network in CloudStack in which physical devices can be deployed without having to run any VMs. Additionally, you can deploy physical devices on that network.
	</div><div class="para">
		One of the advantages of having a persistent network is that you can create a VPC with a tier consisting of only physical devices. For example, you might create a VPC for a three-tier application, deploy VMs for Web and Application tier, and use physical machines for the Database tier. Another use case is that if you are providing services by using physical hardware, you can define the network as persistent and therefore even if all its VMs are destroyed the services will not be discontinued.
	</div><div class="section" id="persistent-network-consideration"><div class="titlepage"><div><div><h3 class="title" id="persistent-network-consideration">15.20.1. Persistent Network Considerations</h3></div></div></div><div class="itemizedlist"><ul><li class="listitem"><div class="para">
					Persistent network is designed for isolated networks.
				</div></li><li class="listitem"><div class="para">
					All default network offerings are non-persistent.
				</div></li><li class="listitem"><div class="para">
					A network offering cannot be editable because changing it affects the behavior of the existing networks that were created using this network offering.
				</div></li><li class="listitem"><div class="para">
					When you create a guest network, the network offering that you select defines the network persistence. This in turn depends on whether persistent network is enabled in the selected network offering.
				</div></li><li class="listitem"><div class="para">
					An existing network can be made persistent by changing its network offering to an offering that has the Persistent option enabled. While setting this property, even if the network has no running VMs, the network is provisioned.
				</div></li><li class="listitem"><div class="para">
					An existing network can be made non-persistent by changing its network offering to an offering that has the Persistent option disabled. If the network has no running VMs, during the next network garbage collection run the network is shut down.
				</div></li><li class="listitem"><div class="para">
					When the last VM on a network is destroyed, the network garbage collector checks if the network offering associated with the network is persistent, and shuts down the network only if it is non-persistent.
				</div></li></ul></div></div><div class="section" id="set-up-persistent-network"><div class="titlepage"><div><div><h3 class="title" id="set-up-persistent-network">15.20.2. Creating a Persistent Guest Network</h3></div></div></div><div class="para">
			To create a persistent network, perform the following:
		</div><div class="orderedlist"><ol><li class="listitem"><div class="para">
					Create a network offering with the Persistent option enabled.
				</div><div class="para">
					See <a class="xref" href="#creating-network-offerings">「新しいネットワークオファリングの作成」</a>.
				</div></li><li class="listitem"><div class="para">
					Select Network from the left navigation pane.
				</div></li><li class="listitem"><div class="para">
					Select the guest network that you want to offer this network service to.
				</div></li><li class="listitem"><div class="para">
					Click the Edit button.
				</div></li><li class="listitem"><div class="para">
					From the Network Offering drop-down, select the persistent network offering you have just created.
				</div></li><li class="listitem"><div class="para">
					[OK]をクリックします。
				</div></li></ol></div></div></div></div><div xml:lang="ja-JP" class="chapter" id="working-with-system-vm" lang="ja-JP"><div class="titlepage"><div><div><h2 class="title">第16章 システム仮想マシンの操作</h2></div></div></div><div class="toc"><dl><dt><span class="section"><a href="#system-vm-template">16.1. システム仮想マシンテンプレート</a></span></dt><dt><span class="section"><a href="#multiple-system-vm-vmware">16.2. VMware のための複数のシステム仮想マシンのサポート</a></span></dt><dt><span class="section"><a href="#console-proxy">16.3. コンソールプロキシー</a></span></dt><dd><dl><dt><span class="section"><a href="#use-cert">16.3.1. Using a SSL Certificate for the Console Proxy</a></span></dt><dt><span class="section"><a href="#change-console-proxy-ssl-certificate-domain">16.3.2. コンソールプロキシの SSL 証明書とドメインの変更</a></span></dt></dl></dd><dt><span class="section"><a href="#virtual-router">16.4. 仮想ルーター</a></span></dt><dd><dl><dt><span class="section"><a href="#configure-virtual-router">16.4.1. 仮想ルーターの構成</a></span></dt><dt><span class="section"><a href="#upgrade-virtual-router-with-service-offering">16.4.2. システムサービスオファリングによる仮想ルーターのアップグレード</a></span></dt><dt><span class="section"><a href="#best-practices-virtual-router">16.4.3. 仮想ルーターのベストプラクティス</a></span></dt></dl></dd><dt><span class="section"><a href="#secondary-storage-vm">16.5. セカンダリストレージ VM</a></span></dt></dl></div><div class="para">
		CloudStack では、いくつかの種類のシステム仮想マシンを使用してクラウドでタスクを実行します。これらのシステム仮想マシンは通常、環境の規模および緊急のニーズに基づいて、CloudStack により管理、作成、起動、および停止されます。ただし、管理者はトラブルシューティングを円滑にするため、システム仮想マシンの存在とその役割を理解しておく必要があります。
	</div><div class="note"><div class="admonition_header"><h2>注記</h2></div><div class="admonition"><div class="para">
			You can configure the system.vm.random.password parameter to create a random system VM password to ensure higher security. If you reset the value for system.vm.random.password to true and restart the Management Server, a random password is generated and stored encrypted in the database. You can view the decrypted password under the system.vm.password global parameter on the CloudStack UI or by calling the listConfigurations API.
		</div></div></div><div xml:lang="ja-JP" class="section" id="system-vm-template" lang="ja-JP"><div class="titlepage"><div><div><h2 class="title" id="system-vm-template">16.1. システム仮想マシンテンプレート</h2></div></div></div><div class="para">
		システム仮想マシンは単一のテンプレートから作成されます。システム仮想マシンには、次の特性があります。
	</div><div class="itemizedlist"><ul><li class="listitem"><div class="para">
				Debian セキュリティ APT リポジトリから取得した最新のセキュリティパッチを適用した Debian 6.0(「Squeeze」) 2.6.32 カーネルを実行します。
			</div></li><li class="listitem"><div class="para">
				セキュリティ上脆弱な箇所を小さくするために、最小限のパッケージがインストールされています。
			</div></li><li class="listitem"><div class="para">
				Xen/VMWare 上のパフォーマンスを向上する 32 ビット版です。
			</div></li><li class="listitem"><div class="para">
				すべてのハイパーバイザー上で最適なパフォーマンスを実現する、Xen PV ドライバー、KVM virtio ドライバー、お よび VMware Tools を備えた pvops カーネルを使用します。
			</div></li><li class="listitem"><div class="para">
				Xen Tools が含まれ、パフォーマンスを監視できます。
			</div></li><li class="listitem"><div class="para">
				Debian リポジトリから入手する最新バージョンの HAProxy、iptables、IPsec、Apache により、セキュリティ保護と速度の向上を保証します。
			</div></li><li class="listitem"><div class="para">
				Sun/Oracle の最新バージョンの JRE により、セキュリティ保護と速度の向上を保証します。
			</div></li></ul></div></div><div xml:lang="ja-JP" class="section" id="multiple-system-vm-vmware" lang="ja-JP"><div class="titlepage"><div><div><h2 class="title" id="multiple-system-vm-vmware">16.2. VMware のための複数のシステム仮想マシンのサポート</h2></div></div></div><div class="para">
		CloudStack の各ゾーンには単一のシステム仮想マシンが存在します。この仮想マシンによって、テンプレートのダウンロードとアップロード、ISO のアップロードなどのテンプレート処理タスクが実行されます。VMware を使用するゾーンでは追加のシステム仮想マシンを起動して、スナップショットやプライベートテンプレートの作成などの VMware 特有のタスクを処理できます。負荷が増加すると、VMware 特有のタスクのために CloudStack 管理サーバーにより追加のシステム仮想マシンが起動されます。これらのシステム仮想マシンに送信されるすべてのコマンドが管理サーバーにより監視および重み付けされ、追加のシステム仮想マシンの動的な負荷分散と拡張が実行されます。
	</div></div><div xml:lang="ja-JP" class="section" id="console-proxy" lang="ja-JP"><div class="titlepage"><div><div><h2 class="title" id="console-proxy">16.3. コンソールプロキシー</h2></div></div></div><div class="para">
		コンソールプロキシーはWeb UI経由でコンソールビューを表示するロールを持ったシステム仮想マシンの一種です。ユーザーのブラウザーからハイパーバイザーのVNCポート経由でゲストのコンソールに接続します。管理者とエンドユーザーのWeb UIの両方からコンソール接続が可能です。
	</div><div class="para">
		Clicking a console icon brings up a new window. The AJAX code downloaded into that window refers to the public IP address of a console proxy VM. There is exactly one public IP address allocated per console proxy VM. The AJAX application connects to this IP. The console proxy then proxies the connection to the VNC port for the requested VM on the Host hosting the guest.
	</div><div class="note"><div class="admonition_header"><h2>注記</h2></div><div class="admonition"><div class="para">
			ハイパーバイザーはVNCのためにたくさんのポートを割り当てます。それにより、複数のVNCセッションを同時に行うことができます。
		</div></div></div><div class="para">
		ゲストの仮想IPには何のトラフィックも発生しませんので、ゲスト内でVNCを有効にする必要はありません。
	</div><div class="para">
		コンソールプロキシーVMはアクティブなセッションの数を管理サーバーに定期的にレポートします。デフォルトのレポート間隔は5分です。これは管理サーバーのグローバル設定のパラメーターのconsoleproxy.loadscan.intervalにより変更可能です。
	</div><div class="para">
		ゲストVMのコンソールプロキシーへの割り当てに際し、まず最初にゲストVMのコンソールプロキシーへの前回セッションがあるかを確認します。もしある場合、管理サーバーはそのプロキシーVMの負荷に関わらず、ゲストVMをそのコンソールプロキシーVMに割り当てます。そうでない場合、新しいセッションを処理できるキャパシティのあるコンソールプロキシーVMの中から最初に選ばれたものが使用されます。
	</div><div class="para">
		コンソールプロキシーは管理者により再起動できます。しかし、それにより、ユーザーの既存のコンソールセッションは中断されます。
	</div><div class="section" id="use-cert"><div class="titlepage"><div><div><h3 class="title" id="use-cert">16.3.1. Using a SSL Certificate for the Console Proxy</h3></div></div></div><div class="para">
			The console viewing functionality uses a dynamic DNS service under the domain name realhostip.com to assist in providing SSL security to console sessions. The console proxy is assigned a public IP address. In order to avoid browser warnings for mismatched SSL certificates, the URL for the new console window is set to the form of https://aaa-bbb-ccc-ddd.realhostip.com. You will see this URL during console session creation. CloudStack includes the realhostip.com SSL certificate in the console proxy VM. Of course, CloudStack cannot know about the DNS A records for our customers' public IPs prior to shipping the software. CloudStack therefore runs a dynamic DNS server that is authoritative for the realhostip.com domain. It maps the aaa-bbb-ccc-ddd part of the DNS name to the IP address aaa.bbb.ccc.ddd on lookups. This allows the browser to correctly connect to the console proxy's public IP, where it then expects and receives a SSL certificate for realhostip.com, and SSL is set up without browser warnings.
		</div></div><div class="section" id="change-console-proxy-ssl-certificate-domain"><div class="titlepage"><div><div><h3 class="title" id="change-console-proxy-ssl-certificate-domain">16.3.2. コンソールプロキシの SSL 証明書とドメインの変更</h3></div></div></div><div class="para">
			管理者は、顧客のコンソールセッションの URL に realhostip.com 以外のドメインを表示させることもできます。管理者は、 異なるドメインを選択して新しい SSL 証明書と秘密鍵をアップロードすることにより、表示されるドメインをカスタマイズできます。このドメインで、aaa-bbb-ccc-ddd.your.domain 形式のアドレスのクエリを aaa.bbb.ccc.ddd 形式(たとえば、 202.8.44.1)の IPv4 IP アドレスに解決できる DNS サービスを実行する必要があります。
		</div><div class="orderedlist"><ol><li class="listitem"><div class="para">
					動的な名前解決をセットアップするか、パブリック IP アドレスの範囲内の可能性のあるすべての DNS 名を既存の DNS サーバーに追加します。このとき、「aaa-bbb-ccc-ddd.company.com -&gt; aaa.bbb.ccc.ddd」の形式で追加します。
				</div></li><li class="listitem"><div class="para">
					秘密鍵と CSR(Certificate Signing Request:証明書署名要求)を生成します。openssl を使用して秘密鍵と公開鍵のペアおよび CSR を生成するときは、CloudStack ユーザーインターフェイスに貼り付ける秘密鍵を PKCS#8 形式に変換してください。
				</div><div class="orderedlist"><ol class="loweralpha"><li class="listitem"><div class="para">
							新しい 2048 ビットの秘密鍵を生成します。
						</div><pre class="programlisting">openssl genrsa -des3 -out yourprivate.key 2048</pre></li><li class="listitem"><div class="para">
							新しい証明書の CSR を生成します。
						</div><pre class="programlisting">openssl req -new -key yourprivate.key -out yourcertificate.csr</pre></li><li class="listitem"><div class="para">
							信頼できる証明機関の Web サイトを開き、SSL 証明書を購入し、CSR を送信します。その後、有効な証明書を受け取ります。
						</div></li><li class="listitem"><div class="para">
							秘密鍵の形式を PKCS#8 暗号化形式に変換します。
						</div><pre class="programlisting">openssl pkcs8 -topk8 -in yourprivate.key -out yourprivate.pkcs8.encrypted.key</pre></li><li class="listitem"><div class="para">
							暗号化された PKCS#8 秘密鍵を CloudStack で使用できる PKCS#8 形式に変換します。
						</div><pre class="programlisting">openssl pkcs8 -in yourprivate.pkcs8.encrypted.key -out yourprivate.pkcs8.key</pre></li></ol></div></li><li class="listitem"><div class="para">
					In the Update SSL Certificate screen of the CloudStack UI, paste the following:
				</div><div class="itemizedlist"><ul><li class="listitem"><div class="para">
							The certificate you've just generated.
						</div></li><li class="listitem"><div class="para">
							The private key you've just generated.
						</div></li><li class="listitem"><div class="para">
							適切な新しいドメイン名(たとえば、company.com)
						</div></li></ul></div><div class="mediaobject"><img src="./images/update-ssl.png" alt="updatessl.png: Updating Console Proxy SSL Certificate" /></div></li><li class="listitem"><div class="para">
					適切な新しいドメイン名(たとえば、company.com)
				</div><div class="para">
					This stops all currently running console proxy VMs, then restarts them with the new certificate and key. Users might notice a brief interruption in console availability.
				</div></li></ol></div><div class="para">
			The Management Server generates URLs of the form "aaa-bbb-ccc-ddd.company.com" after this change is made. The new console requests will be served with the new DNS domain name, certificate, and key.
		</div></div></div><div xml:lang="ja-JP" class="section" id="virtual-router" lang="ja-JP"><div class="titlepage"><div><div><h2 class="title" id="virtual-router">16.4. 仮想ルーター</h2></div></div></div><div class="para">
		仮想ルーターはシステム VM の一つであり、CloudStack で良く利用されるサービスプロバイダーのです。エンドユーザーは仮想ルーターに直接アクセスすることはできず、ping を打つことやいくつかの設定(ポートフォワーディングなど)のみができます。しかし、ユーザーは仮想ルーターに対しての SSH アクセスはできません。
	</div><div class="para">
		There is no mechanism for the administrator to log in to the virtual router. Virtual routers can be restarted by administrators, but this will interrupt public network access and other services for end users. A basic test in debugging networking issues is to attempt to ping the virtual router from a guest VM. Some of the characteristics of the virtual router are determined by its associated system service offering..
	</div><div xml:lang="ja-JP" class="section" id="configure-virtual-router" lang="ja-JP"><div class="titlepage"><div><div><h3 class="title" id="configure-virtual-router">16.4.1. 仮想ルーターの構成</h3></div></div></div><div class="para">
		次の項目を設定することができます。
	</div><div class="itemizedlist"><ul><li class="listitem"><div class="para">
				IP レンジ
			</div></li><li class="listitem"><div class="para">
				サポートされるネットワークサービス
			</div></li><li class="listitem"><div class="para">
				仮想ルーターで提供されるネットワークサービスに対してのデフォルトのドメイン名
			</div></li><li class="listitem"><div class="para">
				ゲートウェイの IP アドレス
			</div></li><li class="listitem"><div class="para">
				CloudStack がどれくらいの頻度で CloudStack 仮想ルーターから使用状況を取得するか。もし仮想ルーターからトラフィックの計測データを収集したい場合、グローバル設定の [router.stats.interval] を設定してください。仮想ルーターからネットワークの使用状況を収集しない場合は 0 を設定してください。
			</div></li></ul></div></div><div xml:lang="ja-JP" class="section" id="upgrade-virtual-router-with-service-offering" lang="ja-JP"><div class="titlepage"><div><div><h3 class="title" id="upgrade-virtual-router-with-service-offering">16.4.2. システムサービスオファリングによる仮想ルーターのアップグレード</h3></div></div></div><div class="para">
		CloudStack が仮想ルーターを作成する際はデフォルトのシステムサービスオファリングで定義されたデフォルト設定を利用します。詳細は <a class="xref" href="#system-service-offerings">「System Service Offerings」</a> を参照してください。単一ゲストネットワーク上の全ての仮想ルーターは同じシステムサービスオファリングを利用します。カスタムのシステムサービスオファリングを作成して適用することにより、 仮想ルーターの機能をアップグレードすることができます。
	</div><div class="orderedlist"><ol><li class="listitem"><div class="para">
				カスタムのシステムサービスオファリングを定義します。詳細は <a class="xref" href="#creating-system-service-offerings">「Creating a New System Service Offering」</a> を参照してください。[System VM Type] から [Domain Router] を選択します。
			</div></li><li class="listitem"><div class="para">
				Associate the system service offering with a network offering.  <span>See <a class="xref" href="#creating-network-offerings">「新しいネットワークオファリングの作成」</a>.</span>
			</div></li><li class="listitem"><div class="para">
				新しいシステムサービスオファリングを利用したい仮想ルーターが存在するネットワークに対しネットワークオファリングを適用します。もし新しいネットワークに対し適用したい場合は「追加のゲストネットワークの追加」の手順を参照してください。既存の仮想ルーターのサービスオファリングを変更したい場合は <a class="xref" href="#change-network-offering-on-guest-network">「ゲストネットワーク上のネットワークオファリングの変更」</a> の手順を参照してください。
			</div></li></ol></div></div><div xml:lang="ja-JP" class="section" id="best-practices-virtual-router" lang="ja-JP"><div class="titlepage"><div><div><h3 class="title" id="best-practices-virtual-router">16.4.3. 仮想ルーターのベストプラクティス</h3></div></div></div><div class="itemizedlist"><ul><li class="listitem"><div class="para">
				注意: ハイパーバイザーコンソールからの仮想マシンの再起動は全ての iptables 規則を削除します。この問題へのワークアラウンドは CloudStack インターフェイスから仮想ルーターの停止と起動を行なってください。
			</div></li><li class="listitem"><div class="para">
				注意: ネットワーク上に利用可能なルーターが1つしかない場合はdestroyRouter API を利用しないでください。これは restartNetwork API を cleanup=false パラメーターとともに利用すると後に再作成が行われないからです。ネットワーク上に利用可能なルーターが1つしかない状態で削除、再作成を実施したい場合は restartNetwork API に cleanup=true パラメーターを付与して利用してください。
			</div></li></ul></div></div></div><div xml:lang="ja-JP" class="section" id="secondary-storage-vm" lang="ja-JP"><div class="titlepage"><div><div><h2 class="title" id="secondary-storage-vm">16.5. セカンダリストレージ VM</h2></div></div></div><div class="para">
		追加ホスト上で CloudStack のセカンダリストレージ VM はセカンダリストレージをマウントし書き込みします。
	</div><div class="para">
		セカンダリストレージ VM のもう一つの目的としてテンプレートや様々なプロトコル越しの URL からの ISO イメージの検索が挙げられます。
	</div><div class="para">
		セカンダリストレージ VM は様々なセカンダリストレージの動作に対してのバックグラウンドタスクを提供し、ゾーンに対しての新しいテンプレートのダウンロードやゾーン間のテンプレートのコピー、バックアップ用のスナップショットを行います。
	</div><div class="para">
		必要に応じて管理者はセカンダリストレージ VM にログインすることもできます。
	</div></div></div><div xml:lang="ja-JP" class="chapter" id="sys-reliability-and-ha" lang="ja-JP"><div class="titlepage"><div><div><h2 class="title">第17章 システムの信頼性と高可用性</h2></div></div></div><div class="toc"><dl><dt><span class="section"><a href="#ha-management-server">17.1. HA for Management Server</a></span></dt><dt><span class="section"><a href="#management-server-lb">17.2. Management Server Load Balancing</a></span></dt><dt><span class="section"><a href="#ha-enabled-vm">17.3. 高可用性が有効な仮想マシン</a></span></dt><dt><span class="section"><a href="#ha-for-hosts">17.4. ホストの高可用性</a></span></dt><dd><dl><dt><span class="section"><a href="#dedicated-ha-hosts">17.4.1. Dedicated HA Hosts</a></span></dt></dl></dd><dt><span class="section"><a href="#primary-storage-outage-and-data-loss">17.5. プライマリストレージの停止とデータ損失</a></span></dt><dt><span class="section"><a href="#secondary-storage-outage-and-data-loss">17.6. セカンダリストレージの停止とデータ損失</a></span></dt><dt><span class="section"><a href="#api-throttling">17.7. Limiting the Rate of API Requests</a></span></dt><dd><dl><dt><span class="section"><a href="#api-throttling-configure">17.7.1. Configuring the API Request Rate</a></span></dt><dt><span class="section"><a href="#api-throttling-limitations">17.7.2. Limitations on API Throttling</a></span></dt></dl></dd></dl></div><div xml:lang="ja-JP" class="section" id="ha-management-server" lang="ja-JP"><div class="titlepage"><div><div><h2 class="title" id="ha-management-server">17.1. HA for Management Server</h2></div></div></div><div class="para">
		The CloudStack Management Server should be deployed in a multi-node configuration such that it is not susceptible to individual server failures. The Management Server itself (as distinct from the MySQL database) is stateless and may be placed behind a load balancer.
	</div><div class="para">
		Normal operation of Hosts is not impacted by an outage of all Management Serves. All guest VMs will continue to work.
	</div><div class="para">
		When the Management Server is down, no new VMs can be created, and the end user and admin UI, API, dynamic load distribution, and HA will cease to work.
	</div></div><div xml:lang="ja-JP" class="section" id="management-server-lb" lang="ja-JP"><div class="titlepage"><div><div><h2 class="title" id="management-server-lb">17.2. Management Server Load Balancing</h2></div></div></div><div class="para">
		CloudStack can use a load balancer to provide a virtual IP for multiple Management Servers. The administrator is responsible for creating the load balancer rules for the Management Servers. The application requires persistence or stickiness across multiple sessions. The following chart lists the ports that should be load balanced and whether or not persistence is required.
	</div><div class="para">
		Even if persistence is not required, enabling it is permitted.
	</div><div class="informaltable"><table border="1"><colgroup><col width="25%" /><col width="25%" /><col width="25%" /><col width="25%" /></colgroup><thead><tr><th align="left">
						<div class="para">
							Source Port
						</div>
					</th><th align="left">
						<div class="para">
							Destination Port
						</div>
					</th><th align="left">
						<div class="para">
							Protocol
						</div>
					</th><th align="left">
						<div class="para">
							Persistence Required?
						</div>
					</th></tr></thead><tbody><tr><td align="left">
						<div class="para">
							80 or 443
						</div>
					</td><td align="left">
						<div class="para">
							8080 (or 20400 with AJP)
						</div>
					</td><td align="left">
						<div class="para">
							HTTP (or AJP)
						</div>
					</td><td align="left">
						<div class="para">
							Yes
						</div>
					</td></tr><tr><td align="left">
						<div class="para">
							8250
						</div>
					</td><td align="left">
						<div class="para">
							8250
						</div>
					</td><td align="left">
						<div class="para">
							TCP
						</div>
					</td><td align="left">
						<div class="para">
							Yes
						</div>
					</td></tr><tr><td align="left">
						<div class="para">
							8096
						</div>
					</td><td align="left">
						<div class="para">
							8096
						</div>
					</td><td align="left">
						<div class="para">
							HTTP
						</div>
					</td><td align="left">
						<div class="para">
							No
						</div>
					</td></tr></tbody></table></div><div class="para">
		In addition to above settings, the administrator is responsible for setting the 'host' global config value from the management server IP to load balancer virtual IP address. If the 'host' value is not set to the VIP for Port 8250 and one of your management servers crashes, the UI is still available but the system VMs will not be able to contact the management server.
	</div></div><div xml:lang="ja-JP" class="section" id="ha-enabled-vm" lang="ja-JP"><div class="titlepage"><div><div><h2 class="title" id="ha-enabled-vm">17.3. 高可用性が有効な仮想マシン</h2></div></div></div><div class="para">
		ユーザーは、仮想マシンで高可用性を有効に指定できます。デフォルトでは仮想ルーターの仮想マシンとシステム仮想マシンはすべて、 自動的に高可用性が有効なマシンに構成されます。高可用性が有効な仮想マシンがクラッシュすると、CloudStack がクラッシュを検出し、同じ利用可能ゾーン内で仮想マシンを再起動します。異なる利用可能ゾーンをまたがって高可用性を 有効にすることはできません。CloudStack は、仮想マシンの再起動について慎重なポリシーを備えており、 同じ仮想マシンの 2 つのインスタンスは同時に実行されません。管理サーバーにより、同じクラスター内の別のホストで仮想マシンの起動が試行されます。
	</div><div class="para">
		高可用性機能は、iSCSI または NFS のプライマリストレージで機能します。ローカルストレージでの高可用性はサポートされていません。
	</div></div><div xml:lang="ja-JP" class="section" id="ha-for-hosts" lang="ja-JP"><div class="titlepage"><div><div><h2 class="title" id="ha-for-hosts">17.4. ホストの高可用性</h2></div></div></div><div class="para">
		ユーザーは、仮想マシンで高可用性を有効に指定できます。仮想ルーターの仮想マシンとシステム仮想マシンはすべて、 自動的に高可用性が有効なマシンに構成されます。高可用性が有効な仮想マシンがクラッシュすると、CloudStack がク ラッシュを検出し、同じ利用可能ゾーン内で仮想マシンを再起動します。異なる利用可能ゾーンをまたがって高可用性を 有効にすることはできません。CloudStack プラットフォームは、仮想マシンの再起動について慎重なポリシーを備えており、 同じ仮想マシンの 2 つのインスタンスは同時に実行されません。管理サーバーにより、同じクラスター内の別のホストで仮 想マシンの起動が試行されます。
	</div><div class="para">
		高可用性機能は、iSCSI または NFS のプライマリストレージで機能します。ローカルストレージでの高可用性はサポートさ れていません。
	</div><div xml:lang="ja-JP" class="section" id="dedicated-ha-hosts" lang="ja-JP"><div class="titlepage"><div><div><h3 class="title" id="dedicated-ha-hosts">17.4.1. Dedicated HA Hosts</h3></div></div></div><div class="para">
		One or more hosts can be designated for use only by HA-enabled VMs that are restarting due to a host failure. Setting up a pool of such dedicated HA hosts as the recovery destination for all HA-enabled VMs is useful to:
	</div><div class="itemizedlist"><ul><li class="listitem"><div class="para">
				Make it easier to determine which VMs have been restarted as part of the CloudStack high-availability function. If a VM is running on a dedicated HA host, then it must be an HA-enabled VM whose original host failed. (With one exception: It is possible for an administrator to manually migrate any VM to a dedicated HA host.).
			</div></li><li class="listitem"><div class="para">
				Keep HA-enabled VMs from restarting on hosts which may be reserved for other purposes.
			</div></li></ul></div><div class="para">
		The dedicated HA option is set through a special host tag when the host is created. To allow the administrator to dedicate hosts to only HA-enabled VMs, set the global configuration variable ha.tag to the desired tag (for example, "ha_host"), and restart the Management Server. Enter the value in the Host Tags field when adding the host(s) that you want to dedicate to HA-enabled VMs.
	</div><div class="note"><div class="admonition_header"><h2>注記</h2></div><div class="admonition"><div class="para">
			If you set ha.tag, be sure to actually use that tag on at least one host in your cloud. If the tag specified in ha.tag is not set for any host in the cloud, the HA-enabled VMs will fail to restart after a crash.
		</div></div></div></div></div><div xml:lang="ja-JP" class="section" id="primary-storage-outage-and-data-loss" lang="ja-JP"><div class="titlepage"><div><div><h2 class="title" id="primary-storage-outage-and-data-loss">17.5. プライマリストレージの停止とデータ損失</h2></div></div></div><div class="para">
		プライマリストレージが停止すると、そのストレージデバイスに格納されているすべての仮想マシンがハイパーバイザーにより即座に停止されます。プライマリストレージがオンラインに戻ると、高可用性とマークされているゲストは実行可能になり次第再起動されます。NFS の場合は、問題の性質に応じて、ハイパーバイザーの許可により仮想マシンが動作し続ける場合があります。たとえば NFS がハングすると、ストレージ接続が回復するまで、ゲスト仮想マシンは一時停止になります。プライマリストレージはバックアップされる設計になっていません。プライマリストレージの個々のボリュームは、スナップショットを使用してバックアップできます。
	</div></div><div xml:lang="ja-JP" class="section" id="secondary-storage-outage-and-data-loss" lang="ja-JP"><div class="titlepage"><div><div><h2 class="title" id="secondary-storage-outage-and-data-loss">17.6. セカンダリストレージの停止とデータ損失</h2></div></div></div><div class="para">
		セカンダリストレージサーバーが 1 台のみのゾーンでは、セカンダリストレージが停止すると使用できなくなる機能がありますが、動作中のゲスト仮想マシンは影響を受けません。ユーザーが選択したテンプレートを使用して仮想マシンを作成できなくなる可能性があります。ユーザーがスナップショットの保存や保存されたスナップショットの調査および復元を実行できなくなる可能性もあります。セカンダリストレージがオンラインに戻ると、これらの機能は自動的に使用できるようになります。
	</div><div class="para">
		セカンダリストレージのデータ損失は、テンプレート、スナップショット、ISO イメージなどの、最近追加されたユーザーデータに影響を及ぼします。セカンダリストレージは定期的にバックアップする必要があります。各ゾーンに複数のセカンダリストレージサーバーを準備し、システムのスケーラビリティを向上させることができます。
	</div></div><div xml:lang="ja-JP" class="section" id="api-throttling" lang="ja-JP"><div class="titlepage"><div><div><h2 class="title" id="api-throttling">17.7. Limiting the Rate of API Requests</h2></div></div></div><div class="para">
		You can limit the rate at which API requests can be placed for each account. This is useful to avoid malicious attacks on the Management Server, prevent performance degradation, and provide fairness to all accounts.
	</div><div class="para">
		If the number of API calls exceeds the threshold, an error message is returned for any additional API calls. The caller will have to retry these API calls at another time.
	</div><div class="section" id="api-throttling-configure"><div class="titlepage"><div><div><h3 class="title" id="api-throttling-configure">17.7.1. Configuring the API Request Rate</h3></div></div></div><div class="para">
			To control the API request rate, use the following global configuration settings:
		</div><div class="itemizedlist"><ul><li class="listitem"><div class="para">
					api.throttling.enabled - Enable/Disable API throttling. By default, this setting is false, so API throttling is not enabled.
				</div></li><li class="listitem"><div class="para">
					api.throttling.interval (in seconds) - Time interval during which the number of API requests is to be counted. When the interval has passed, the API count is reset to 0.
				</div></li><li class="listitem"><div class="para">
					api.throttling.max - Maximum number of APIs that can be placed within the api.throttling.interval period.
				</div></li><li class="listitem"><div class="para">
					api.throttling.cachesize - Cache size for storing API counters. Use a value higher than the total number of accounts managed by the cloud. One cache entry is needed for each account, to store the running API total for that account.
				</div></li></ul></div></div><div class="section" id="api-throttling-limitations"><div class="titlepage"><div><div><h3 class="title" id="api-throttling-limitations">17.7.2. Limitations on API Throttling</h3></div></div></div><div class="para">
			The following limitations exist in the current implementation of this feature.
		</div><div class="note"><div class="admonition_header"><h2>注記</h2></div><div class="admonition"><div class="para">
				Even with these limitations, CloudStack is still able to effectively use API throttling to avoid malicious attacks causing denial of service.
			</div></div></div><div class="para">
		</div><div class="itemizedlist"><ul><li class="listitem"><div class="para">
					In a deployment with multiple Management Servers, the cache is not synchronized across them. In this case, CloudStack might not be able to ensure that only the exact desired number of API requests are allowed. In the worst case, the number of API calls that might be allowed is (number of Management Servers) * (api.throttling.max).
				</div></li><li class="listitem"><div class="para">
					The API commands resetApiLimit and getApiLimit are limited to the Management Server where the API is invoked.
				</div></li></ul></div></div></div></div><div xml:lang="ja-JP" class="chapter" id="manage-cloud" lang="ja-JP"><div class="titlepage"><div><div><h2 class="title">第18章 クラウドの管理</h2></div></div></div><div class="toc"><dl><dt><span class="section"><a href="#tagging-resources">18.1. Using Tags to Organize Resources in the Cloud</a></span></dt><dt><span class="section"><a href="#change-database-config">18.2. Changing the Database Configuration</a></span></dt><dt><span class="section"><a href="#change-database-password">18.3. Changing the Database Password</a></span></dt><dt><span class="section"><a href="#admin-alerts">18.4. 管理者アラート</a></span></dt><dt><span class="section"><a href="#customizing-dns">18.5. ネットワークドメイン名のカスタマイズ</a></span></dt><dt><span class="section"><a href="#stop-restart-management-server">18.6. Stopping and Restarting the Management Server</a></span></dt></dl></div><div xml:lang="ja-JP" class="section" id="tagging-resources" lang="ja-JP"><div class="titlepage"><div><div><h2 class="title" id="tagging-resources">18.1. Using Tags to Organize Resources in the Cloud</h2></div></div></div><div class="para">
		A tag is a key-value pair that stores metadata about a resource in the cloud. Tags are useful for categorizing resources. For example, you can tag a user VM with a value that indicates the user's city of residence. In this case, the key would be "city" and the value might be "Toronto" or "Tokyo." You can then request CloudStack to find all resources that have a given tag; for example, VMs for users in a given city.
	</div><div class="para">
		You can tag a user virtual machine, volume, snapshot, guest network, template, ISO, firewall rule, port forwarding rule, public IP address, security group, load balancer rule, project, VPC, network ACL, or static route. You can not tag a remote access VPN.
	</div><div class="para">
		You can work with tags through the UI or through the API commands createTags, deleteTags, and listTags. You can define multiple tags for each resource. There is no limit on the number of tags you can define. Each tag can be up to 255 characters long. Users can define tags on the resources they own, and administrators can define tags on any resources in the cloud.
	</div><div class="para">
		An optional input parameter, "tags," exists on many of the list* API commands. The following example shows how to use this new parameter to find all the volumes having tag region=canada OR tag city=Toronto:
	</div><pre class="programlisting">command=listVolumes
				&amp;listAll=true
				&amp;tags[0].key=region
				&amp;tags[0].value=canada
				&amp;tags[1].key=city
				&amp;tags[1].value=Toronto</pre><div class="para">
		The following API commands have the "tags" input parameter:
	</div><div class="itemizedlist"><ul><li class="listitem"><div class="para">
				listVirtualMachines
			</div></li><li class="listitem"><div class="para">
				ボリュームリスト
			</div></li><li class="listitem"><div class="para">
				スナップショットリスト
			</div></li><li class="listitem"><div class="para">
				listNetworks
			</div></li><li class="listitem"><div class="para">
				listTemplates
			</div></li><li class="listitem"><div class="para">
				listIsos
			</div></li><li class="listitem"><div class="para">
				listFirewallRules
			</div></li><li class="listitem"><div class="para">
				listPortForwardingRules
			</div></li><li class="listitem"><div class="para">
				listPublicIpAddresses
			</div></li><li class="listitem"><div class="para">
				listSecurityGroups
			</div></li><li class="listitem"><div class="para">
				listLoadBalancerRules
			</div></li><li class="listitem"><div class="para">
				listProjects
			</div></li><li class="listitem"><div class="para">
				listVPCs
			</div></li><li class="listitem"><div class="para">
				listNetworkACLs
			</div></li><li class="listitem"><div class="para">
				listStaticRoutes
			</div></li></ul></div></div><div xml:lang="ja-JP" class="section" id="change-database-config" lang="ja-JP"><div class="titlepage"><div><div><h2 class="title" id="change-database-config">18.2. Changing the Database Configuration</h2></div></div></div><div class="para">
		The CloudStack Management Server stores database configuration information (e.g., hostname, port, credentials) in the file <code class="filename">/etc/cloud/management/db.properties</code>. To effect a change, edit this file on each Management Server, then restart the Management Server.
	</div></div><div xml:lang="ja-JP" class="section" id="change-database-password" lang="ja-JP"><div class="titlepage"><div><div><h2 class="title" id="change-database-password">18.3. Changing the Database Password</h2></div></div></div><div class="para">
		You may need to change the password for the MySQL account used by CloudStack. If so, you'll need to change the password in MySQL, and then add the encrypted password to <code class="filename">/etc/cloud/management/db.properties</code>.
	</div><div class="orderedlist"><ol><li class="listitem"><div class="para">
				Before changing the password, you'll need to stop CloudStack's management server and the usage engine if you've deployed that component.
			</div><pre class="screen">
<code class="command"># service cloudstack-management stop</code>
<code class="command"># service cloudstack-usage stop</code></pre></li><li class="listitem"><div class="para">
				Next, you'll update the password for the CloudStack user on the MySQL server.
			</div><pre class="screen">
<code class="command"># mysql -u root -p</code></pre><div class="para">
				At the MySQL shell, you'll change the password and flush privileges:
			</div><pre class="screen">
<code class="command">update mysql.user set password=PASSWORD("newpassword123") where User='cloud';</code>
<code class="command">flush privileges;</code>
<code class="command">quit;</code></pre></li><li class="listitem"><div class="para">
				The next step is to encrypt the password and copy the encrypted password to CloudStack's database configuration (<code class="filename">/etc/cloud/management/db.properties</code>).
			</div><pre class="screen">
<code class="command"># java -classpath /usr/share/java/cloud-jasypt-1.8.jar \ org.jasypt.intf.cli.JasyptPBEStringEncryptionCLI encrypt.sh \ input="newpassword123" password="`cat /etc/cloud/management/key`" \ verbose=false </code></pre><div class="note"><div class="admonition_header"><h2>File encryption type</h2></div><div class="admonition"><div class="para">
					Note that this is for the file encryption type. If you're using the web encryption type then you'll use password="management_server_secret_key"
				</div></div></div></li><li class="listitem"><div class="para">
				Now, you'll update <code class="filename">/etc/cloud/management/db.properties</code> with the new ciphertext. Open <code class="filename">/etc/cloud/management/db.properties</code> in a text editor, and update these parameters:
			</div><pre class="programlisting">
db.cloud.password=ENC(encrypted_password_from_above) 
db.usage.password=ENC(encrypted_password_from_above)
</pre></li><li class="listitem"><div class="para">
				After copying the new password over, you can now start CloudStack (and the usage engine, if necessary).
			</div><pre class="screen">
        <code class="command"># service cloudstack-management start</code>
        <code class="command"># service cloudstack-usage start</code>
</pre></li></ol></div></div><div xml:lang="ja-JP" class="section" id="admin-alerts" lang="ja-JP"><div class="titlepage"><div><div><h2 class="title" id="admin-alerts">18.4. 管理者アラート</h2></div></div></div><div class="para">
		システム生成のアラートとイベントは、クラウド管理に役立ちます。アラートは通常、電子メールで配信され、クラウドでエラーが発生していることを管理者に通知します。アラートの動作は構成できます。
	</div><div class="para">
		イベントは、クラウド内のすべてのユーザーおよび管理者の操作を追跡します。たとえば、ゲスト仮想マシンが起動するたびに、関連するイベントが作成されます。イベントは、管理サーバーのデータベースに格納されます。
	</div><div class="para">
		電子メールは、次のような場合に管理者に送信されます。
	</div><div class="itemizedlist"><ul><li class="listitem"><div class="para">
				管理サーバークラスターで、CPU、メモリ、またはストレージリソースが不足している。
			</div></li><li class="listitem"><div class="para">
				管理サーバーがホストからハートビートを 3 分以上受信していない。
			</div></li><li class="listitem"><div class="para">
				ホストクラスターで、CPU、メモリ、またはストレージリソースが不足している。
			</div></li></ul></div></div><div xml:lang="ja-JP" class="section" id="customizing-dns" lang="ja-JP"><div class="titlepage"><div><div><h2 class="title" id="customizing-dns">18.5. ネットワークドメイン名のカスタマイズ</h2></div></div></div><div class="para">
		ルート管理者は、ネットワーク、アカウント、ドメイン、ゾーン、または CloudStack 環境全体のレベルで、オプションでカスタム DNS サフィックスを割り当てることができます。 カスタムドメイン名を指定して有効にするには、次の手順に従います。
	</div><div class="orderedlist"><ol><li class="listitem"><div class="para">
				望ましい範囲で DNS サフィックスを設定します。
			</div><div class="itemizedlist"><ul><li class="listitem"><div class="para">
						ネットワークレベルでは、ユーザーインターフェイスで新しいネットワークを作成するときに(<a class="xref" href="#add-additional-guest-network">「ゲストネットワークの追加」</a>を参照)、または、CloudStack API の updateNetwork コマンドを使用して DNS サフィックスを割り当てることができます。
					</div></li><li class="listitem"><div class="para">
						アカウント、ドメイン、またはゾーンのレベルでは、適切な CloudStack API コマンド(createAccount、editAccount、 createDomain、editDomain、createZone、または editZone)を使用して DNS サフィックスを割り当てることができます。
					</div></li><li class="listitem"><div class="para">
						グローバルレベルでは、構成パラメーターの guest.domain.suffix を使用します。ユーザーインターフェイスからパラメーターにアクセスするには、管理者用ユーザーインターフェイスにログオンし、[Configuration]、[Global Settings]の順に選択します。CloudStack API コマンドの updateConfiguration を使用することもできます。このグローバル構成を変更した後で管理サーバーを再起動して、新しい設定を有効にします。
					</div></li></ul></div></li><li class="listitem"><div class="para">
				既存のネットワークで新しい DNS サフィックスを有効にするには、CloudStack API コマンドの updateNetwork を呼び出します。新しいネットワークを作成するときに DNS サフィックスを指定した場合は、この手順は不要です。
			</div></li></ol></div><div class="para">
		使用するネットワークドメインのソースは、次の規則によって決まります。
	</div><div class="itemizedlist"><ul><li class="listitem"><div class="para">
				すべてのネットワークで、ネットワークドメインがネットワーク自体の構成の一部として指定された場合は、その値が使用されます。
			</div></li><li class="listitem"><div class="para">
				アカウント固有のネットワークでは、アカウント用に指定されたネットワークドメインが使用されます。何も指定されていない場合は、ドメイン、ゾーン、グローバル構成の順に値が検索されます。
			</div></li><li class="listitem"><div class="para">
				ドメイン固有のネットワークでは、ドメイン用に指定されたネットワークドメインが使用されます。何も指定されてい ない場合は、ゾーン、グローバル構成の順に値が検索されます。
			</div></li><li class="listitem"><div class="para">
				ゾーン固有のネットワークでは、ゾーン用に指定されたネットワークドメインが使用されます。何も指定されていない場合は、グローバル構成の値が検索されます。
			</div></li></ul></div></div><div xml:lang="ja-JP" class="section" id="stop-restart-management-server" lang="ja-JP"><div class="titlepage"><div><div><h2 class="title" id="stop-restart-management-server">18.6. Stopping and Restarting the Management Server</h2></div></div></div><div class="para">
		The root administrator will need to stop and restart the Management Server from time to time.
	</div><div class="para">
		For example, after changing a global configuration parameter, a restart is required. If you have multiple Management Server nodes, restart all of them to put the new parameter value into effect consistently throughout the cloud..
	</div><div class="para">
		To stop the Management Server, issue the following command at the operating system prompt on the Management Server node:
	</div><pre class="programlisting"># service cloudstack-management stop</pre><div class="para">
		To start the Management Server:
	</div><pre class="programlisting"># service cloudstack-management start</pre><div class="para">
		To stop the Management Server:
	</div><pre class="programlisting"># service cloudstack-management stop</pre></div></div><div xml:lang="ja-JP" class="chapter" id="global-config" lang="ja-JP"><div class="titlepage"><div><div><h2 class="title">第19章 Global Configuration Parameters</h2></div></div></div><div class="toc"><dl><dt><span class="section"><a href="#setting-global-config-parameters">19.1. グローバル構成パラメーターの設定</a></span></dt><dt><span class="section"><a href="#about-global-config-parameters">19.2. About Global Configuration Parameters</a></span></dt></dl></div><div class="section" id="setting-global-config-parameters"><div class="titlepage"><div><div><h2 class="title" id="setting-global-config-parameters">19.1. グローバル構成パラメーターの設定</h2></div></div></div><div class="para">
			CloudStack には、クラウドのさまざまな側面を制御するために設定できるパラメーターが備わっています。CloudStack を初めてインストールするとき、そしてその後で定期的に、これらの設定を変更する必要が出てくる可能性があります。
		</div><div class="orderedlist"><ol><li class="listitem"><div class="para">
					ユーザーインターフェイスに管理者としてログインします。
				</div></li><li class="listitem"><div class="para">
					左側のナビゲーションバーで[Global Settings]をクリックします。
				</div></li><li class="listitem"><div class="para">
					[Select view]ボックスの一覧で次のどちらかを選択します。
				</div><div class="itemizedlist"><ul><li class="listitem"><div class="para">
							Global Settings: パラメーターが、簡単な説明と現在の値と共に一覧表示されます。
						</div></li><li class="listitem"><div class="para">
							Hypervisor Capabilities: ハイパーバイザーのバージョンが、それぞれにサポートされるゲスト数の上限と共に一覧表示されます。
						</div></li></ul></div></li><li class="listitem"><div class="para">
					検索ボックスを使用して、関心のある項目のみが表示されるように一覧内容を絞り込みます。
				</div></li><li class="listitem"><div class="para">
					値を変更するには[Edit]アイコンをクリックします。ハイパーバイザーの機能を表示する場合は、編集画面を開くためにまずハイパーバイザー名をクリックする必要があります。
				</div></li></ol></div></div><div class="section" id="about-global-config-parameters"><div class="titlepage"><div><div><h2 class="title" id="about-global-config-parameters">19.2. About Global Configuration Parameters</h2></div></div></div><div class="para">
			CloudStack provides a variety of settings you can use to set limits, configure features, and enable or disable features in the cloud. Once your Management Server is running, you might need to set some of these global configuration parameters, depending on what optional features you are setting up.
		</div><div class="para">
			To modify global configuration parameters, use the steps in "Setting Global Configuration Parameters."
		</div><div class="para">
			The documentation for each CloudStack feature should direct you to the names of the applicable parameters. Many of them are discussed in the CloudStack Administration Guide. The following table shows a few of the more useful parameters.
		</div><div class="informaltable"><table border="1"><colgroup><col width="67%" align="left" class="c1" /><col width="33%" align="left" class="c2" /></colgroup><thead><tr><th align="left">
							<div class="para">
								Field
							</div>
						</th><th align="left">
							<div class="para">
								値
							</div>
						</th></tr></thead><tbody><tr><td align="left">
							<div class="para">
								management.network.cidr
							</div>
						</td><td align="left">
							<div class="para">
								A CIDR that describes the network that the management CIDRs reside on. This variable must be set for deployments that use vSphere. It is recommended to be set for other deployments as well. Example: 192.168.3.0/24.
							</div>
						</td></tr><tr><td align="left">
							<div class="para">
								xen.setup.multipath
							</div>
						</td><td align="left">
							<div class="para">
								For XenServer nodes, this is a true/false variable that instructs CloudStack to enable iSCSI multipath on the XenServer Hosts when they are added. This defaults to false. Set it to true if you would like CloudStack to enable multipath.
							</div>
							 <div class="para">
								If this is true for a NFS-based deployment multipath will still be enabled on the XenServer host. However, this does not impact NFS operation and is harmless.
							</div>
						</td></tr><tr><td align="left">
							<div class="para">
								secstorage.allowed.internal.sites
							</div>
						</td><td align="left">
							<div class="para">
								This is used to protect your internal network from rogue attempts to download arbitrary files using the template download feature. This is a comma-separated list of CIDRs. If a requested URL matches any of these CIDRs the Secondary Storage VM will use the private network interface to fetch the URL. Other URLs will go through the public interface. We suggest you set this to 1 or 2 hardened internal machines where you keep your templates. For example, set it to 192.168.1.66/32.
							</div>
						</td></tr><tr><td align="left">
							<div class="para">
								use.local.storage
							</div>
						</td><td align="left">
							<div class="para">
								Determines whether CloudStack will use storage that is local to the Host for data disks, templates, and snapshots. By default CloudStack will not use this storage. You should change this to true if you want to use local storage and you understand the reliability and feature drawbacks to choosing local storage.
							</div>
						</td></tr><tr><td align="left">
							<div class="para">
								host
							</div>
						</td><td align="left">
							<div class="para">
								This is the IP address of the Management Server. If you are using multiple Management Servers you should enter a load balanced IP address that is reachable via the private network.
							</div>
						</td></tr><tr><td align="left">
							<div class="para">
								default.page.size
							</div>
						</td><td align="left">
							<div class="para">
								Maximum number of items per page that can be returned by a CloudStack API command. The limit applies at the cloud level and can vary from cloud to cloud. You can override this with a lower value on a particular API call by using the page and pagesize API command parameters. For more information, see the Developer's Guide. Default: 500.
							</div>
						</td></tr><tr><td align="left">
							<div class="para">
								ha.tag
							</div>
						</td><td align="left">
							<div class="para">
								The label you want to use throughout the cloud to designate certain hosts as dedicated HA hosts. These hosts will be used only for HA-enabled VMs that are restarting due to the failure of another host. For example, you could set this to ha_host. Specify the ha.tag value as a host tag when you add a new host to the cloud.
							</div>
						</td></tr></tbody></table></div></div></div><div xml:lang="ja-JP" class="chapter" id="api-overview" lang="ja-JP"><div class="titlepage"><div><div><h2 class="title">第20章 CloudStack API</h2></div></div></div><div class="toc"><dl><dt><span class="section"><a href="#provisioning-auth-api">20.1. プロビジョニングと認証 API</a></span></dt><dt><span class="section"><a href="#allocators">20.2. アロケーター</a></span></dt><dt><span class="section"><a href="#user-data-and-meta-data">20.3. ユーザーデータとメタデータ</a></span></dt></dl></div><div class="para">
		CloudStack API は低レベル API で、Web ユーザーインターフェイスの実装に使用されます。この API は、EC2/S3 や新しい DMTF 標準などのそのほかの一般的な API の実装ベースにもなります。
	</div><div class="para">
		多くの CloudStack API は非同期呼び出しを利用しています。これらの API を呼び出すと、即座にジョブ ID が即座に戻されます。このジョブ ID を使用して、後でジョブの状態をクエリすることができます。また、影響を受けたリソースに状態呼び出しを実行することで、その状態の一部が示されます。
	</div><div class="para">
		この API は REST に類似したクエリ基盤を備えており、結果を XML または JSON で戻します。
	</div><div class="para">
		<a href="http://docs.cloudstack.org/CloudStack_Documentation/Developer's_Guide%3A_CloudStack">the Developer’s Guide</a> と <a href="http://docs.cloudstack.org/CloudStack_Documentation/API_Reference%3A_CloudStack">the API Reference</a> を参照してください.
	</div><div xml:lang="ja-JP" class="section" id="provisioning-auth-api" lang="ja-JP"><div class="titlepage"><div><div><h2 class="title" id="provisioning-auth-api">20.1. プロビジョニングと認証 API</h2></div></div></div><div class="para">
		CloudStack では、顧客が独自のユーザープロビジョニングインフラストラクチャを持っていることが期待されます。したがって、そのような既存のシステムを統合する API が提供されます。これらのシステムから CloudStack を呼び出し、ユーザーを追加および削除します。
	</div><div class="para">
		CloudStack は、プラグ可能な認証子をサポートします。デフォルトでは、CloudStack は、この認証子がユーザーのパスワードと共にプロビジョニングされ、その結果、認証がローカルで行われることを前提としてい ます。ただし、外部で認証することもできます。例については、「LDAP サーバーによるユーザー認証」を参照し てください。
	</div></div><div xml:lang="ja-JP" class="section" id="allocators" lang="ja-JP"><div class="titlepage"><div><div><h2 class="title" id="allocators">20.2. アロケーター</h2></div></div></div><div class="para">
		CloudStack では、管理者がカスタムアロケーターを開発し、新しいゲストを配置するホストとゲスト仮想ディスクイメージを割り当てるストレージホストを選択することができます。
	</div></div><div xml:lang="ja-JP" class="section" id="user-data-and-meta-data" lang="ja-JP"><div class="titlepage"><div><div><h2 class="title" id="user-data-and-meta-data">20.3. ユーザーデータとメタデータ</h2></div></div></div><div class="para">
		CloudStack は、展開された仮想マシンにユーザーデータをアタッチするための API アクセスを提供します。 展開された仮想マシンは、仮想ルーターを経由してインスタンスメタデータにもアクセスします。
	</div><div class="para">
		仮想ルーターの IP アドレスがわかれば、ユーザーデータにアクセスできます。この IP アドレスがわかったら、次の手順に従ってユーザーデータにアクセスします。
	</div><div class="orderedlist"><ol><li class="listitem"><div class="para">
				次のコマンドを実行して、仮想ルーターを見つけます。
			</div><pre class="programlisting"># cat /var/lib/dhclient/dhclient-eth0.leases | grep dhcp-server-identifier | tail -1</pre></li><li class="listitem"><div class="para">
				上のコマンドの結果を使用して次のコマンドを実行し、ユーザーデータにアクセスします。
			</div><pre class="programlisting"># curl http://10.1.1.1/latest/user-data</pre></li></ol></div><div class="para">
		「http://10.1.1.1/latest/meta-data/{metadata type}」形式の URL を使用して、メタデータにも同様の方法でアクセスできま す(後方互換性を維持するため、以前の「http://10.1.1.1/latest/{metadata type}」形式の URL もサポートされます)。メタデータについては、次のいずれか 1 つを使用します。
	</div><div class="itemizedlist"><ul><li class="listitem"><div class="para">
				service-offering : 仮想マシンサービスオファリングの説明です。
			</div></li><li class="listitem"><div class="para">
				availability-zone : ゾーン名です。
			</div></li><li class="listitem"><div class="para">
				local-ipv4 : 仮想マシンのゲスト IP アドレスです。
			</div></li><li class="listitem"><div class="para">
				local-hostname : 仮想マシンのホスト名です。
			</div></li><li class="listitem"><div class="para">
				public-ipv4 : ルーターの最初のパブリック IP アドレスです(例:eth2 の最初の IP アドレス)。
			</div></li><li class="listitem"><div class="para">
				public-hostname : public-ipv4 と同じです。
			</div></li><li class="listitem"><div class="para">
				instance-id : 仮想マシンのインスタンス名です。
			</div></li></ul></div></div></div><div xml:lang="ja-JP" class="chapter" id="tuning" lang="ja-JP"><div class="titlepage"><div><div><h2 class="title">第21章 チューニング</h2></div></div></div><div class="toc"><dl><dt><span class="section"><a href="#performance-monitoring">21.1. 性能監視</a></span></dt><dt><span class="section"><a href="#increase-management-server-max-memory">21.2. 管理サーバーの最大メモリの増設</a></span></dt><dt><span class="section"><a href="#set-database-buffer-pool-size">21.3. データベースのバッファープールサイズの設定</a></span></dt><dt><span class="section"><a href="#set-monitor-total-vm-limits-per-host">21.4. Set and Monitor Total VM Limits per Host</a></span></dt><dt><span class="section"><a href="#configure-xenserver-dom0-memory">21.5. XenServer の dom0 メモリの構成</a></span></dt></dl></div><div class="para">
		ここでは、クラウドのパフォーマンスを向上させるヒントについて説明します。
	</div><div xml:lang="ja-JP" class="section" id="performance-monitoring" lang="ja-JP"><div class="titlepage"><div><div><h2 class="title" id="performance-monitoring">21.1. 性能監視</h2></div></div></div><div class="para">
		エンドユーザーおよび管理者は、ホストおよびゲストのパフォーマンス監視が可能です。これにより、ユーザーがリソースの使用状況を監視し、より強力なサービスオファリングや、より大きなディスクをいつ選択するのが適切であるかを決断させます。
	</div></div><div xml:lang="ja-JP" class="section" id="increase-management-server-max-memory" lang="ja-JP"><div class="titlepage"><div><div><h2 class="title" id="increase-management-server-max-memory">21.2. 管理サーバーの最大メモリの増設</h2></div></div></div><div class="para">
		管理サーバーの負荷が高い場合は、デフォルトの最大 JVM メモリ割り当てでは不十分になる可能性があります。メモリを増設するには、次の手順に従います。
	</div><div class="orderedlist"><ol><li class="listitem"><div class="para">
				Tomcat 構成ファイルを編集します。
			</div><pre class="programlisting">/etc/cloud/management/tomcat6.conf</pre></li><li class="listitem"><div class="para">
				コマンドラインパラメーターの-XmxNNNm の NNN の数値を大きくします。
			</div><div class="para">
				たとえば、現在の値が–Xmx128m の場合は、この値を–Xmx1024m 以上にします。
			</div></li><li class="listitem"><div class="para">
				新しい設定を有効にするには、管理サーバーを再起動します。
			</div><pre class="programlisting"># service cloudstack-management restart</pre></li></ol></div><div class="para">
		メモリの問題について詳しくは、『<a href="http://wiki.apache.org/tomcat/FAQ/Memory">Tomcat Wiki</a>』の「FAQ: Memory」を参 照してください。
	</div></div><div xml:lang="ja-JP" class="section" id="set-database-buffer-pool-size" lang="ja-JP"><div class="titlepage"><div><div><h2 class="title" id="set-database-buffer-pool-size">21.3. データベースのバッファープールサイズの設定</h2></div></div></div><div class="para">
		データとインデックスをキャッシュするために、MySQL データベースに十分なメモリ容量を提供することが重要です。
	</div><div class="orderedlist"><ol><li class="listitem"><div class="para">
				Edit the MySQL configuration file:
			</div><pre class="programlisting">/etc/my.cnf</pre></li><li class="listitem"><div class="para">
				Insert the following line in the [mysqld] section, below the datadir line. Use a value that is appropriate for your situation. We recommend setting the buffer pool at 40% of RAM if MySQL is on the same server as the management server or 70% of RAM if MySQL has a dedicated server. The following example assumes a dedicated server with 1024M of RAM.
			</div><pre class="programlisting">innodb_buffer_pool_size=700M</pre></li><li class="listitem"><div class="para">
				MySQL サービスを再起動します。
			</div><pre class="programlisting"># service mysqld restart</pre></li></ol></div><div class="para">
		バッファープールについて詳しくは、『<a href="http://dev.mysql.com/doc/refman/5.5/en/innodb-buffer-pool.html">MySQL Reference Manual</a>』の「The InnoDB Buffer Pool」を参照してください。
	</div></div><div xml:lang="ja-JP" class="section" id="set-monitor-total-vm-limits-per-host" lang="ja-JP"><div class="titlepage"><div><div><h2 class="title" id="set-monitor-total-vm-limits-per-host">21.4. Set and Monitor Total VM Limits per Host</h2></div></div></div><div class="para">
		The CloudStack administrator should monitor the total number of VM instances in each cluster, and disable allocation to the cluster if the total is approaching the maximum that the hypervisor can handle. Be sure to leave a safety margin to allow for the possibility of one or more hosts failing, which would increase the VM load on the other hosts as the VMs are automatically redeployed. Consult the documentation for your chosen hypervisor to find the maximum permitted number of VMs per host, then use CloudStack global configuration settings to set this as the default limit. Monitor the VM activity in each cluster at all times. Keep the total number of VMs below a safe level that allows for the occasional host failure. For example, if there are N hosts in the cluster, and you want to allow for one host in the cluster to be down at any given time, the total number of VM instances you can permit in the cluster is at most (N-1) * (per-host-limit). Once a cluster reaches this number of VMs, use the CloudStack UI to disable allocation of more VMs to the cluster.
	</div></div><div xml:lang="ja-JP" class="section" id="configure-xenserver-dom0-memory" lang="ja-JP"><div class="titlepage"><div><div><h2 class="title" id="configure-xenserver-dom0-memory">21.5. XenServer の dom0 メモリの構成</h2></div></div></div><div class="para">
		XenServer の dom0 へのメモリ割り当てを増やすために、dom0 の設定を構成します。これにより、XenServer でより多くの 仮想マシンを制御できるようになります。XenServer の dom0 に 2940MB の RAM を割り当てることをお勧めします。この方 法について詳しくは、<a href="http://support.citrix.com/article/CTX126531">Citrix Knowledgebase Article</a>を参照してください。このアーティクルで言及されてい るのは XenServer 5.6 ですが、同じことが XenServer 6.0 にも当てはまります。
	</div></div></div><div xml:lang="ja-JP" class="chapter" id="troubleshooting" lang="ja-JP"><div class="titlepage"><div><div><h2 class="title">第22章 Troubleshooting</h2></div></div></div><div class="toc"><dl><dt><span class="section"><a href="#events">22.1. イベント</a></span></dt><dd><dl><dt><span class="section"><a href="#events-log">22.1.1. イベントログ</a></span></dt><dt><span class="section"><a href="#event-framework">22.1.2. Event Notification</a></span></dt><dt><span class="section"><a href="#standard-events">22.1.3. 標準イベント</a></span></dt><dt><span class="section"><a href="#long-running-job-events">22.1.4. 長期間実行するジョブのイベント</a></span></dt><dt><span class="section"><a href="#event-log-queries">22.1.5. Event Log Queries</a></span></dt></dl></dd><dt><span class="section"><a href="#troubleshooting-working-with-server-logs">22.2. サーバーログに関わる作業</a></span></dt><dt><span class="section"><a href="#troubleshooting-dataloss-on-exported-primary-storage">22.3. エクスポートしたプライマリストレージのデータ損失</a></span></dt><dt><span class="section"><a href="#troubleshooting-recover-lost-virtual-router">22.4. 喪失した仮想ルーターの復旧</a></span></dt><dt><span class="section"><a href="#troubleshooting-maintenance-mode-not-working-on-vCenter">22.5. vCenter が動作しない際の保守モード</a></span></dt><dt><span class="section"><a href="#troubleshooting-unable-to-deploy-vms">22.6. アップロードした vSphere 用テンプレートが展開できない場合</a></span></dt><dt><span class="section"><a href="#troubleshooting-unable-to-power-on-vm">22.7. VMware 上で仮想マシンの電源が入らない</a></span></dt><dt><span class="section"><a href="#troubleshooting-lb-rules-fails">22.8. 負荷分散ルールがネットワークオファリングを変更すると失敗する</a></span></dt></dl></div><div xml:lang="ja-JP" class="section" id="events" lang="ja-JP"><div class="titlepage"><div><div><h2 class="title" id="events">22.1. イベント</h2></div></div></div><div class="para">
		An event is essentially a significant or meaningful change in the state of both virtual and physical resources associated with a cloud environment. Events are used by monitoring systems, usage and billing systems, or any other event-driven workflow systems to discern a pattern and make the right business decision. In CloudStack an event could be a state change of virtual or psychical resources, an action performed by an user (action events), or policy based events (alerts).
	</div><div xml:lang="ja-JP" class="section" id="events-log" lang="ja-JP"><div class="titlepage"><div><div><h3 class="title" id="events-log">22.1.1. イベントログ</h3></div></div></div><div class="para">
		2 種類のイベントが CloudStack イベントログに記録されます。標準的なイベントについてはイベントの成功または失敗が記録され、失敗したジョブまたはプロセスを特定するために使用することができます。長期間実行するジョブのイベントもあります。非同期ジョブのイベントは、ジョブがスケジュールされたとき、ジョブが開始されたとき、およびジョブが完了したときに記録されます。そのほかの長期間実行する同期ジョブのイベントは、ジョブが開始されたときと完了したときに記録されます。長期間実行する同期ジョブと非同期ジョブのイベントログを使用して、保留中のジョブの状態に関する詳細情報を取得したり、ハングしている、または開始されていないジョブを特定したりできます。次に、これらのイベントに関してさらに説明します。
	</div></div><div xml:lang="ja-JP" class="section" id="event-framework" lang="ja-JP"><div class="titlepage"><div><div><h3 class="title" id="event-framework">22.1.2. Event Notification</h3></div></div></div><div class="para">
		Event notification framework provides a means for the Management Server components to publish and subscribe to CloudStack events. Event notification is achieved by implementing the concept of event bus abstraction in the Management Server. An event bus is introduced in the Management Server that allows the CloudStackcomponents and extension plug-ins to subscribe to the events by using the Advanced Message Queuing Protocol (AMQP) client. In CloudStack, a default implementation of event bus is provided as a plug-in that uses the RabbitMQ AMQP client. The AMQP client pushes the published events to a compatible AMQP server. Therefore all the CloudStack events are published to an exchange in the AMQP server.
	</div><div class="para">
		A new event for state change, resource state change, is introduced as part of Event notification framework. Every resource, such as user VM, volume, NIC, network, public IP, snapshot, and template, is associated with a state machine and generates events as part of the state change. That implies that a change in the state of a resource results in a state change event, and the event is published in the corresponding state machine on the event bus. All the CloudStack events (alerts, action events, usage events) and the additional category of resource state change events, are published on to the events bus.
	</div><div class="formalpara"><h5 class="formalpara" id="idp30418432">Use Cases</h5>
			The following are some of the use cases:
		</div><div class="itemizedlist"><ul><li class="listitem"><div class="para">
				Usage or Billing Engines: A third-party cloud usage solution can implement a plug-in that can connects to CloudStack to subscribe to CloudStack events and generate usage data. The usage data is consumed by their usage software.
			</div></li><li class="listitem"><div class="para">
				AMQP plug-in can place all the events on the a message queue, then a AMQP message broker can provide topic-based notification to the subscribers.
			</div></li><li class="listitem"><div class="para">
				Publish and Subscribe notification service can be implemented as a pluggable service in CloudStack that can provide rich set of APIs for event notification, such as topics-based subscription and notification. Additionally, the pluggable service can deal with multi-tenancy, authentication, and authorization issues.
			</div></li></ul></div><div class="formalpara"><h5 class="formalpara" id="idm3026888">Configuration</h5>
			As a CloudStack administrator, perform the following one-time configuration to enable event notification framework. At run time no changes can control the behaviour.
		</div><div class="orderedlist"><ol><li class="listitem"><div class="para">
				Open <code class="filename">'componentContext.xml</code>.
			</div></li><li class="listitem"><div class="para">
				Define a bean named <code class="filename">eventNotificationBus</code> as follows:
			</div><div class="itemizedlist"><ul><li class="listitem"><div class="para">
						name : Specify a name for the bean.
					</div></li><li class="listitem"><div class="para">
						server : The name or the IP address of the RabbitMQ AMQP server.
					</div></li><li class="listitem"><div class="para">
						port : The port on which RabbitMQ server is running.
					</div></li><li class="listitem"><div class="para">
						username : The username associated with the account to access the RabbitMQ server.
					</div></li><li class="listitem"><div class="para">
						password : The password associated with the username of the account to access the RabbitMQ server.
					</div></li><li class="listitem"><div class="para">
						exchange : The exchange name on the RabbitMQ server where CloudStack events are published.
					</div><div class="para">
						A sample bean is given below:
					</div><pre class="programlisting">&lt;bean id="eventNotificationBus" class="org.apache.cloudstack.mom.rabbitmq.RabbitMQEventBus"&gt;
    &lt;property name="name" value="eventNotificationBus"/&gt;
    &lt;property name="server" value="127.0.0.1"/&gt;
    &lt;property name="port" value="5672"/&gt;
    &lt;property name="username" value="guest"/&gt;
    &lt;property name="password" value="guest"/&gt;
   &lt;property name="exchange" value="cloudstack-events"/&gt;
   &lt;/bean&gt;</pre><div class="para">
						The <code class="filename">eventNotificationBus</code> bean represents the <code class="filename">org.apache.cloudstack.mom.rabbitmq.RabbitMQEventBus</code> class.
					</div></li></ul></div></li><li class="listitem"><div class="para">
				管理サーバーを再起動します。
			</div></li></ol></div></div><div xml:lang="ja-JP" class="section" id="standard-events" lang="ja-JP"><div class="titlepage"><div><div><h3 class="title" id="standard-events">22.1.3. 標準イベント</h3></div></div></div><div class="para">
		イベントログには、3 種類の標準イベントが記録されます。
	</div><div class="itemizedlist"><ul><li class="listitem"><div class="para">
				INFO : 操作が正常に実行されたときに、このイベントが生成されます。
			</div></li><li class="listitem"><div class="para">
				WARN:このイベントは次の状況で生成されます。
			</div><div class="itemizedlist"><ul><li class="listitem"><div class="para">
						テンプレートダウンロードの監視中に、ネットワークが切断されたとき。
					</div></li><li class="listitem"><div class="para">
						テンプレートダウンロードが中止されたとき。
					</div></li><li class="listitem"><div class="para">
						ストレージサーバーの問題により、ミラーストレージサーバーにボリュームがフェールオーバーしたとき。
					</div></li></ul></div></li><li class="listitem"><div class="para">
				ERROR : 操作が正常に実行されなかったときに、このイベントが生成されます。
			</div></li></ul></div></div><div xml:lang="ja-JP" class="section" id="long-running-job-events" lang="ja-JP"><div class="titlepage"><div><div><h3 class="title" id="long-running-job-events">22.1.4. 長期間実行するジョブのイベント</h3></div></div></div><div class="para">
		イベントログには、3 種類の標準イベントが記録されます。
	</div><div class="itemizedlist"><ul><li class="listitem"><div class="para">
				INFO : 操作が正常に実行されたときに、このイベントが生成されます。
			</div></li><li class="listitem"><div class="para">
				WARN : このイベントは次の状況で生成されます。
			</div><div class="itemizedlist"><ul><li class="listitem"><div class="para">
						テンプレートダウンロードの監視中に、ネットワークが切断されたとき。
					</div></li><li class="listitem"><div class="para">
						テンプレートダウンロードが中止されたとき。
					</div></li><li class="listitem"><div class="para">
						ストレージサーバーの問題により、ミラーストレージサーバーにボリュームがフェールオーバーしたとき。
					</div></li></ul></div></li><li class="listitem"><div class="para">
				ERROR : 操作が正常に実行されなかったときに、このイベントが生成されます。
			</div></li></ul></div></div><div xml:lang="ja-JP" class="section" id="event-log-queries" lang="ja-JP"><div class="titlepage"><div><div><h3 class="title" id="event-log-queries">22.1.5. Event Log Queries</h3></div></div></div><div class="para">
		Database logs can be queried from the user interface. The list of events captured by the system includes:
	</div><div class="itemizedlist"><ul><li class="listitem"><div class="para">
				Virtual machine creation, deletion, and on-going management operations
			</div></li><li class="listitem"><div class="para">
				Virtual router creation, deletion, and on-going management operations
			</div></li><li class="listitem"><div class="para">
				Template creation and deletion
			</div></li><li class="listitem"><div class="para">
				Network/load balancer rules creation and deletion
			</div></li><li class="listitem"><div class="para">
				Storage volume creation and deletion
			</div></li><li class="listitem"><div class="para">
				User login and logout
			</div></li></ul></div></div></div><div xml:lang="ja-JP" class="section" id="troubleshooting-working-with-server-logs" lang="ja-JP"><div class="titlepage"><div><div><h2 class="title" id="troubleshooting-working-with-server-logs">22.2. サーバーログに関わる作業</h2></div></div></div><div class="para">
		The CloudStack Management Server logs all web site, middle tier, and database activities for diagnostics purposes in /var/log/cloudstack/management/. The CloudStack logs a variety of error messages. We recommend this command to find the problematic output in the Management Server log:.
	</div><div class="note"><div class="admonition_header"><h2>注記</h2></div><div class="admonition"><div class="para">
			￼コマンドをコピーして実行するときは、単一の行として貼り付けたことを確認してください。一部のドキュメントビューアーでは、コピーしたテキストに不要な改行が含まれる可能性があります。
		</div></div></div><pre class="programlisting">
        grep -i -E 'exception|unable|fail|invalid|leak|warn|error' /var/log/cloudstack/management/management-server.log
</pre><div class="para">
		CloudStack では、ジョブ ID を使用して要求を処理します。ログでエラーを発見して問題をデバッグしたい場合は、管理サーバーロ グ中のジョブ ID を grep で検索します。たとえば、次のエラーメッセージを発見したとします。
	</div><pre class="programlisting">
        2010-10-04 13:49:32,595 ERROR [cloud.vm.UserVmManagerImpl] (Job-Executor-11:job-1076) Unable to find any host for [User|i-8-42-VM-untagged]
</pre><div class="para">
		ジョブ ID が 1076 であることに注意してください。次の grep 検索によって、ジョブ 1076 に関連するイベントを追跡することができます。
	</div><pre class="programlisting">
        grep "job-1076)" management-server.log
</pre><div class="para">
		The CloudStack Agent Server logs its activities in /var/log/cloudstack/agent/.
	</div></div><div xml:lang="ja-JP" class="section" id="troubleshooting-dataloss-on-exported-primary-storage" lang="ja-JP"><div class="titlepage"><div><div><h2 class="title" id="troubleshooting-dataloss-on-exported-primary-storage">22.3. エクスポートしたプライマリストレージのデータ損失</h2></div></div></div><div class="formalpara"><h5 class="formalpara" id="idm1096584">症状</h5>
			Linux NFS として提供されているプライマリストレージを iSCSI ボリュームとしてエクスポートすると既存データの損失が発生する。
		</div><div class="formalpara"><h5 class="formalpara" id="idp5543464">原因</h5>
			外部のクライアントから特定プールがマウントされている可能性があります。この場合、 LVM がデータを一掃し、ボリューム上の全てのデータが失われます。
		</div><div class="formalpara"><h5 class="formalpara" id="idm12324104">解決方法</h5>
			LUN エクスポートの設定をした際、サブネットマスクを指定することでアクセスが許可されている IP アドレスレンジを除外します。以下に例を示します。
		</div><pre class="programlisting">echo “/export 192.168.1.0/24(rw,async,no_root_squash)” &gt; /etc/exports</pre><div class="para">
		上記のコマンドをあなたの環境に合わせて修正します。
	</div><div class="formalpara"><h5 class="formalpara" id="idp5490576">詳細情報</h5>
			CloudStack インストールガイドの「Secondary Storage」の項のエクスポート手順を参照してください。
		</div></div><div xml:lang="ja-JP" class="section" id="troubleshooting-recover-lost-virtual-router" lang="ja-JP"><div class="titlepage"><div><div><h2 class="title" id="troubleshooting-recover-lost-virtual-router">22.4. 喪失した仮想ルーターの復旧</h2></div></div></div><div class="formalpara"><h5 class="formalpara" id="idm2703456">症状</h5>
			仮想ルーターが起動中だがホストが切断され、仮想ルーターが予期せず動作しなくなる。
		</div><div class="formalpara"><h5 class="formalpara" id="idp25168840">原因</h5>
			仮想ルーターがダウン状態にあるか通信が切断された。
		</div><div class="formalpara"><h5 class="formalpara" id="idm12869160">解決方法</h5>
			仮想ルーターが恒久的にダウンしている、もしくは予期せず動作していないといったことが確認できたら削除してください。バックアップルーターが動作している場合、再度新しいルーターを作成します。(これにはルーターの冗長構成を組んでいる必要があります)
		</div><div class="itemizedlist"><ul><li class="listitem"><div class="para">
				強制的にルーターを停止させるには「stopRouter」API に 「forced=true」パラメーターを追加します。
			</div></li><li class="listitem"><div class="para">
				また、ルーターを削除する前に、バックアップのルーターが正常に動作していることを確認します。さもなければ、ネットワークの通信が喪失してしまします。
			</div></li><li class="listitem"><div class="para">
				「destoryRouter」API を利用しルーターを削除します。
			</div></li></ul></div><div class="para">
		「restartNetwork」API に「cleanup=false」パラメーターを追加してルーターを再構築します。ルーターの冗長構成に関する詳細情報は「Creating a New Network Offering」を参照してください。
	</div><div class="para">
		また、API シンタックスのより詳細な情報は <a href="http://docs.cloudstack.org/CloudStack_Documentation/API_Reference%3A_CloudStack"> API Reference </a>を参照してください。
	</div></div><div xml:lang="ja-JP" class="section" id="troubleshooting-maintenance-mode-not-working-on-vCenter" lang="ja-JP"><div class="titlepage"><div><div><h2 class="title" id="troubleshooting-maintenance-mode-not-working-on-vCenter">22.5. vCenter が動作しない際の保守モード</h2></div></div></div><div class="formalpara"><h5 class="formalpara" id="idp16422304">症状</h5>
			ホストが保守モードであるにも関わらず、vCenter で動作しているように表示される。
		</div><div class="formalpara"><h5 class="formalpara" id="idm1179968">原因</h5>
			CloudStack 管理者ユーザーインターフェイスを使用して、ホストを計画保守モードにしました。このモードは、vCenter の保守モード とは異なります。
		</div><div class="formalpara"><h5 class="formalpara" id="idp8925072">解決方法</h5>
			vCenter からホストをメンテナンスモードに設定します。
		</div><div class="formalpara"><h5 class="formalpara" id="idp30141984">詳細情報</h5>
			<a class="xref" href="#scheduled-maintenance-maintenance-mode-hosts">「ホストの計画保守と保守モード」</a> を参照してください。
		</div></div><div xml:lang="ja-JP" class="section" id="troubleshooting-unable-to-deploy-vms" lang="ja-JP"><div class="titlepage"><div><div><h2 class="title" id="troubleshooting-unable-to-deploy-vms">22.6. アップロードした vSphere 用テンプレートが展開できない場合</h2></div></div></div><div class="formalpara"><h5 class="formalpara" id="idm3402712">症状</h5>
			仮想マシンを作成しようとしても、仮想マシンが展開できない。
		</div><div class="formalpara"><h5 class="formalpara" id="idm9124392">原因</h5>
			vSphere Client で利用していた OVA ファイルをアップロードしテンプレートを作成しており、OVA が ISO イメージを含んでいた場合、テンプレートからの仮想マシンの展開が失敗する可能性があります。
		</div><div class="formalpara"><h5 class="formalpara" id="idm5322880">解決方法</h5>
			ISO を削除した後、テンプレートを再アップロードしてください。
		</div></div><div xml:lang="ja-JP" class="section" id="troubleshooting-unable-to-power-on-vm" lang="ja-JP"><div class="titlepage"><div><div><h2 class="title" id="troubleshooting-unable-to-power-on-vm">22.7. VMware 上で仮想マシンの電源が入らない</h2></div></div></div><div class="formalpara"><h5 class="formalpara" id="idp3206136">症状</h5>
			仮想マシンの電源が入らず、次のようなエラーが表示されます。
		</div><div class="itemizedlist"><ul><li class="listitem"><div class="para">
				Unable to open Swap File
			</div></li><li class="listitem"><div class="para">
				Unable to access a file since it is locked
			</div></li><li class="listitem"><div class="para">
				Unable to access Virtual machine configuration
			</div></li></ul></div><div class="formalpara"><h5 class="formalpara" id="idp15638264">原因</h5>
			VMware のマシンでの既知の問題です。ESX ホストは重大な仮想マシンファイルと同時に変更のあったファイルシステムをロックしますがこれらのファイルは仮想マシンがパワーオフされた際正常にアンロックされないことがあります。その後、仮想マシンの電源を入れようとすると重大なファイルにアクセスすることができず、仮想マシンの電源を入れることができません。
		</div><div class="formalpara"><h5 class="formalpara" id="idm7128760">解決方法</h5>
			次を参照してください。
		</div><div class="para">
		<a href="http://kb.vmware.com/selfservice/microsites/search.do?language=en_US&amp;cmd=displayKC&amp;externalId=10051/">VMware Knowledge Base Article</a>
	</div></div><div xml:lang="ja-JP" class="section" id="troubleshooting-lb-rules-fails" lang="ja-JP"><div class="titlepage"><div><div><h2 class="title" id="troubleshooting-lb-rules-fails">22.8. 負荷分散ルールがネットワークオファリングを変更すると失敗する</h2></div></div></div><div class="formalpara"><h5 class="formalpara" id="idp21178872">症状</h5>
			あるネットワークのネットワークオファリングを変更した後で、負荷分散ルールが動かなくなります。
		</div><div class="formalpara"><h5 class="formalpara" id="idp8338680">原因</h5>
			NetScaler のような外部の負荷分散装置を含むネットワークサービスオファリングを使用しているときに負荷分散規則を作成し、後で CloudStack 仮想ルーターを使用するネットワークサービスオファリングへとオファリングを変更しました。
		</div><div class="formalpara"><h5 class="formalpara" id="idp5955696">解決方法</h5>
			仮想ルーターに既存の負荷分散ルールを再設定することで、再び機能するようになります。
		</div></div></div><div xml:lang="ja-JP" class="appendix" id="time-zones" lang="ja-JP"><div class="titlepage"><div><div><h1 class="title">タイムゾーン</h1></div></div></div><div class="para">
		CloudStack では、次のタイムゾーン識別子を使用できます。設定の一部で、必須またはオプションのパラメーターとしてタイムゾー ンを使用します。これには、構成テーブルにおける、定期スナップショットのスケジュール、ユーザーの作成、および使用タイムゾーンの指定が含まれます。
	</div><div class="informaltable"><table border="1"><colgroup><col align="left" class="c1" width="33%" /><col align="left" class="c2" width="33%" /><col align="left" class="c3" width="33%" /></colgroup><tbody><tr><td align="left">
						<div class="para">
							Etc/GMT+12
						</div>
					</td><td align="left">
						<div class="para">
							Etc/GMT+11
						</div>
					</td><td align="left">
						<div class="para">
							Pacific/Samoa
						</div>
					</td></tr><tr><td align="left">
						<div class="para">
							Pacific/Honolulu
						</div>
					</td><td align="left">
						<div class="para">
							US/Alaska
						</div>
					</td><td align="left">
						<div class="para">
							America/Los_Angeles
						</div>
					</td></tr><tr><td align="left">
						<div class="para">
							Mexico/BajaNorte
						</div>
					</td><td align="left">
						<div class="para">
							US/Arizona
						</div>
					</td><td align="left">
						<div class="para">
							US/Mountain
						</div>
					</td></tr><tr><td align="left">
						<div class="para">
							America/Chihuahua
						</div>
					</td><td align="left">
						<div class="para">
							America/Chicago
						</div>
					</td><td align="left">
						<div class="para">
							America/Costa_Rica
						</div>
					</td></tr><tr><td align="left">
						<div class="para">
							America/Mexico_City
						</div>
					</td><td align="left">
						<div class="para">
							Canada/Saskatchewan
						</div>
					</td><td align="left">
						<div class="para">
							America/Bogota
						</div>
					</td></tr><tr><td align="left">
						<div class="para">
							America/New_York
						</div>
					</td><td align="left">
						<div class="para">
							America/Caracas
						</div>
					</td><td align="left">
						<div class="para">
							America/Asuncion
						</div>
					</td></tr><tr><td align="left">
						<div class="para">
							America/Cuiaba
						</div>
					</td><td align="left">
						<div class="para">
							America/Halifax
						</div>
					</td><td align="left">
						<div class="para">
							America/La_Paz
						</div>
					</td></tr><tr><td align="left">
						<div class="para">
							America/Santiago
						</div>
					</td><td align="left">
						<div class="para">
							America/St_Johns
						</div>
					</td><td align="left">
						<div class="para">
							America/Araguaina
						</div>
					</td></tr><tr><td align="left">
						<div class="para">
							America/Argentina/Buenos_Aires
						</div>
					</td><td align="left">
						<div class="para">
							America/Cayenne
						</div>
					</td><td align="left">
						<div class="para">
							America/Godthab
						</div>
					</td></tr><tr><td align="left">
						<div class="para">
							America/Montevideo
						</div>
					</td><td align="left">
						<div class="para">
							Etc/GMT+2
						</div>
					</td><td align="left">
						<div class="para">
							Atlantic/Azores
						</div>
					</td></tr><tr><td align="left">
						<div class="para">
							Atlantic/Cape_Verde
						</div>
					</td><td align="left">
						<div class="para">
							Africa/Casablanca
						</div>
					</td><td align="left">
						<div class="para">
							Etc/UTC
						</div>
					</td></tr><tr><td align="left">
						<div class="para">
							Atlantic/Reykjavik
						</div>
					</td><td align="left">
						<div class="para">
							Europe/London
						</div>
					</td><td align="left">
						<div class="para">
							CET
						</div>
					</td></tr><tr><td align="left">
						<div class="para">
							Europe/Bucharest
						</div>
					</td><td align="left">
						<div class="para">
							Africa/Johannesburg
						</div>
					</td><td align="left">
						<div class="para">
							Asia/Beirut
						</div>
					</td></tr><tr><td align="left">
						<div class="para">
							Africa/Cairo
						</div>
					</td><td align="left">
						<div class="para">
							Asia/Jerusalem
						</div>
					</td><td align="left">
						<div class="para">
							Europe/Minsk
						</div>
					</td></tr><tr><td align="left">
						<div class="para">
							Europe/Moscow
						</div>
					</td><td align="left">
						<div class="para">
							Africa/Nairobi
						</div>
					</td><td align="left">
						<div class="para">
							Asia/Karachi
						</div>
					</td></tr><tr><td align="left">
						<div class="para">
							Asia/Kolkata
						</div>
					</td><td align="left">
						<div class="para">
							Asia/Bangkok
						</div>
					</td><td align="left">
						<div class="para">
							Asia/Shanghai
						</div>
					</td></tr><tr><td align="left">
						<div class="para">
							Asia/Kuala_Lumpur
						</div>
					</td><td align="left">
						<div class="para">
							Australia/Perth
						</div>
					</td><td align="left">
						<div class="para">
							Asia/Taipei
						</div>
					</td></tr><tr><td align="left">
						<div class="para">
							Asia/Tokyo
						</div>
					</td><td align="left">
						<div class="para">
							Asia/Seoul
						</div>
					</td><td align="left">
						<div class="para">
							Australia/Adelaide
						</div>
					</td></tr><tr><td align="left">
						<div class="para">
							Australia/Darwin
						</div>
					</td><td align="left">
						<div class="para">
							Australia/Brisbane
						</div>
					</td><td align="left">
						<div class="para">
							Australia/Canberra
						</div>
					</td></tr><tr><td align="left">
						<div class="para">
							Pacific/Guam
						</div>
					</td><td align="left">
						<div class="para">
							Pacific/Auckland
						</div>
					</td><td align="left">
						<div class="para">
						</div>
					</td></tr></tbody></table></div></div><div xml:lang="ja-JP" class="appendix" id="event-types" lang="ja-JP"><div class="titlepage"><div><div><h1 class="title">イベントの種類</h1></div></div></div><div class="informaltable"><table border="1"><colgroup><col align="left" class="c1" width="33%" /><col align="left" class="c2" width="33%" /><col width="33%" /></colgroup><tbody><tr><td align="left">
						<div class="para">
							VM.CREATE
						</div>
					</td><td align="left">
						<div class="para">
							TEMPLATE.EXTRACT
						</div>
					</td><td align="left">
						<div class="para">
							SG.REVOKE.INGRESS
						</div>
					</td></tr><tr><td align="left">
						<div class="para">
							VM.DESTROY
						</div>
					</td><td align="left">
						<div class="para">
							TEMPLATE.UPLOAD
						</div>
					</td><td align="left">
						<div class="para">
							HOST.RECONNECT
						</div>
					</td></tr><tr><td align="left">
						<div class="para">
							VM.START
						</div>
					</td><td align="left">
						<div class="para">
							TEMPLATE.CLEANUP
						</div>
					</td><td align="left">
						<div class="para">
							MAINT.CANCEL
						</div>
					</td></tr><tr><td align="left">
						<div class="para">
							VM.STOP
						</div>
					</td><td align="left">
						<div class="para">
							VOLUME.CREATE
						</div>
					</td><td align="left">
						<div class="para">
							MAINT.CANCEL.PS
						</div>
					</td></tr><tr><td align="left">
						<div class="para">
							VM.REBOOT
						</div>
					</td><td align="left">
						<div class="para">
							VOLUME.DELETE
						</div>
					</td><td align="left">
						<div class="para">
							MAINT.PREPARE
						</div>
					</td></tr><tr><td align="left">
						<div class="para">
							VM.UPGRADE
						</div>
					</td><td align="left">
						<div class="para">
							VOLUME.ATTACH
						</div>
					</td><td align="left">
						<div class="para">
							MAINT.PREPARE.PS
						</div>
					</td></tr><tr><td align="left">
						<div class="para">
							VM.RESETPASSWORD
						</div>
					</td><td align="left">
						<div class="para">
							VOLUME.DETACH
						</div>
					</td><td align="left">
						<div class="para">
							VPN.REMOTE.ACCESS.CREATE
						</div>
					</td></tr><tr><td align="left">
						<div class="para">
							ROUTER.CREATE
						</div>
					</td><td align="left">
						<div class="para">
							VOLUME.UPLOAD
						</div>
					</td><td align="left">
						<div class="para">
							VPN.USER.ADD
						</div>
					</td></tr><tr><td align="left">
						<div class="para">
							ROUTER.DESTROY
						</div>
					</td><td align="left">
						<div class="para">
							SERVICEOFFERING.CREATE
						</div>
					</td><td align="left">
						<div class="para">
							VPN.USER.REMOVE
						</div>
					</td></tr><tr><td align="left">
						<div class="para">
							ROUTER.START
						</div>
					</td><td align="left">
						<div class="para">
							SERVICEOFFERING.UPDATE
						</div>
					</td><td align="left">
						<div class="para">
							NETWORK.RESTART
						</div>
					</td></tr><tr><td align="left">
						<div class="para">
							ROUTER.STOP
						</div>
					</td><td align="left">
						<div class="para">
							SERVICEOFFERING.DELETE
						</div>
					</td><td align="left">
						<div class="para">
							UPLOAD.CUSTOM.CERTIFICATE
						</div>
					</td></tr><tr><td align="left">
						<div class="para">
							ROUTER.REBOOT
						</div>
					</td><td align="left">
						<div class="para">
							DOMAIN.CREATE
						</div>
					</td><td align="left">
						<div class="para">
							UPLOAD.CUSTOM.CERTIFICATE
						</div>
					</td></tr><tr><td align="left">
						<div class="para">
							ROUTER.HA
						</div>
					</td><td align="left">
						<div class="para">
							DOMAIN.DELETE
						</div>
					</td><td align="left">
						<div class="para">
							STATICNAT.DISABLE
						</div>
					</td></tr><tr><td align="left">
						<div class="para">
							PROXY.CREATE
						</div>
					</td><td align="left">
						<div class="para">
							DOMAIN.UPDATE
						</div>
					</td><td align="left">
						<div class="para">
							SSVM.CREATE
						</div>
					</td></tr><tr><td align="left">
						<div class="para">
							PROXY.DESTROY
						</div>
					</td><td align="left">
						<div class="para">
							SNAPSHOT.CREATE
						</div>
					</td><td align="left">
						<div class="para">
							SSVM.DESTROY
						</div>
					</td></tr><tr><td align="left">
						<div class="para">
							PROXY.START
						</div>
					</td><td align="left">
						<div class="para">
							SNAPSHOT.DELETE
						</div>
					</td><td align="left">
						<div class="para">
							SSVM.START
						</div>
					</td></tr><tr><td align="left">
						<div class="para">
							PROXY.STOP
						</div>
					</td><td align="left">
						<div class="para">
							SNAPSHOTPOLICY.CREATE
						</div>
					</td><td align="left">
						<div class="para">
							SSVM.STOP
						</div>
					</td></tr><tr><td align="left">
						<div class="para">
							PROXY.REBOOT
						</div>
					</td><td align="left">
						<div class="para">
							SNAPSHOTPOLICY.UPDATE
						</div>
					</td><td align="left">
						<div class="para">
							SSVM.REBOOT
						</div>
					</td></tr><tr><td align="left">
						<div class="para">
							PROXY.HA
						</div>
					</td><td align="left">
						<div class="para">
							SNAPSHOTPOLICY.DELETE
						</div>
					</td><td align="left">
						<div class="para">
							SSVM.H
						</div>
					</td></tr><tr><td align="left">
						<div class="para">
							VNC.CONNECT
						</div>
					</td><td align="left">
						<div class="para">
							VNC.DISCONNECT
						</div>
					</td><td align="left">
						<div class="para">
							NET.IPASSIGN
						</div>
					</td></tr><tr><td align="left">
						<div class="para">
							NET.IPRELEASE
						</div>
					</td><td align="left">
						<div class="para">
							NET.RULEADD
						</div>
					</td><td align="left">
						<div class="para">
							NET.RULEDELETE
						</div>
					</td></tr><tr><td align="left">
						<div class="para">
							NET.RULEMODIFY
						</div>
					</td><td align="left">
						<div class="para">
							NETWORK.CREATE
						</div>
					</td><td align="left">
						<div class="para">
							NETWORK.DELETE
						</div>
					</td></tr><tr><td align="left">
						<div class="para">
							LB.ASSIGN.TO.RULE
						</div>
					</td><td align="left">
						<div class="para">
							LB.REMOVE.FROM.RULE
						</div>
					</td><td align="left">
						<div class="para">
							LB.CREATE
						</div>
					</td></tr><tr><td align="left">
						<div class="para">
							LB.DELETE
						</div>
					</td><td align="left">
						<div class="para">
							LB.UPDATE
						</div>
					</td><td align="left">
						<div class="para">
							USER.LOGIN
						</div>
					</td></tr><tr><td align="left">
						<div class="para">
							USER.LOGOUT
						</div>
					</td><td align="left">
						<div class="para">
							USER.CREATE
						</div>
					</td><td align="left">
						<div class="para">
							USER.DELETE
						</div>
					</td></tr><tr><td align="left">
						<div class="para">
							USER.UPDATE
						</div>
					</td><td align="left">
						<div class="para">
							USER.DISABLE
						</div>
					</td><td align="left">
						<div class="para">
							TEMPLATE.CREATE
						</div>
					</td></tr><tr><td align="left">
						<div class="para">
							TEMPLATE.DELETE
						</div>
					</td><td align="left">
						<div class="para">
							TEMPLATE.UPDATE
						</div>
					</td><td align="left">
						<div class="para">
							TEMPLATE.COPY
						</div>
					</td></tr><tr><td align="left">
						<div class="para">
							TEMPLATE.DOWNLOAD.START
						</div>
					</td><td align="left">
						<div class="para">
							TEMPLATE.DOWNLOAD.SUCCESS
						</div>
					</td><td align="left">
						<div class="para">
							TEMPLATE.DOWNLOAD.FAILED
						</div>
					</td></tr><tr><td align="left">
						<div class="para">
							ISO.CREATE
						</div>
					</td><td align="left">
						<div class="para">
							ISO.DELETE
						</div>
					</td><td align="left">
						<div class="para">
							ISO.COPY
						</div>
					</td></tr><tr><td align="left">
						<div class="para">
							ISO.ATTACH
						</div>
					</td><td align="left">
						<div class="para">
							ISO.DETACH
						</div>
					</td><td align="left">
						<div class="para">
							ISO.EXTRACT
						</div>
					</td></tr><tr><td align="left">
						<div class="para">
							ISO.UPLOAD
						</div>
					</td><td align="left">
						<div class="para">
							SERVICE.OFFERING.CREATE
						</div>
					</td><td align="left">
						<div class="para">
							SERVICE.OFFERING.EDIT
						</div>
					</td></tr><tr><td align="left">
						<div class="para">
							SERVICE.OFFERING.DELETE
						</div>
					</td><td align="left">
						<div class="para">
							DISK.OFFERING.CREATE
						</div>
					</td><td align="left">
						<div class="para">
							DISK.OFFERING.EDIT
						</div>
					</td></tr><tr><td align="left">
						<div class="para">
							DISK.OFFERING.DELETE
						</div>
					</td><td align="left">
						<div class="para">
							NETWORK.OFFERING.CREATE
						</div>
					</td><td align="left">
						<div class="para">
							NETWORK.OFFERING.EDIT
						</div>
					</td></tr><tr><td align="left">
						<div class="para">
							NETWORK.OFFERING.DELETE
						</div>
					</td><td align="left">
						<div class="para">
							POD.CREATE
						</div>
					</td><td align="left">
						<div class="para">
							POD.EDIT
						</div>
					</td></tr><tr><td align="left">
						<div class="para">
							POD.DELETE
						</div>
					</td><td align="left">
						<div class="para">
							ZONE.CREATE
						</div>
					</td><td align="left">
						<div class="para">
							ZONE.EDIT
						</div>
					</td></tr><tr><td align="left">
						<div class="para">
							ZONE.DELETE
						</div>
					</td><td align="left">
						<div class="para">
							VLAN.IP.RANGE.CREATE
						</div>
					</td><td align="left">
						<div class="para">
							VLAN.IP.RANGE.DELETE
						</div>
					</td></tr><tr><td align="left">
						<div class="para">
							CONFIGURATION.VALUE.EDIT
						</div>
					</td><td align="left">
						<div class="para">
							SG.AUTH.INGRESS
						</div>
					</td><td align="left">
						<div class="para">
						</div>
					</td></tr></tbody></table></div></div><div xml:lang="ja-JP" class="appendix" id="alerts" lang="ja-JP"><div class="titlepage"><div><div><h1 class="title">Alerts</h1></div></div></div><div class="para">
		The following is the list of alert type numbers. The current alerts can be found by calling listAlerts.
	</div><pre class="programlisting">MEMORY = 0</pre><pre class="programlisting">CPU = 1</pre><pre class="programlisting">STORAGE =2</pre><pre class="programlisting">STORAGE_ALLOCATED = 3</pre><pre class="programlisting">PUBLIC_IP = 4</pre><pre class="programlisting">PRIVATE_IP = 5</pre><pre class="programlisting">HOST = 6</pre><pre class="programlisting">USERVM = 7</pre><pre class="programlisting">DOMAIN_ROUTER = 8</pre><pre class="programlisting">CONSOLE_PROXY = 9</pre><pre class="programlisting">ROUTING = 10// lost connection to default route (to the gateway)</pre><pre class="programlisting">STORAGE_MISC = 11 // lost connection to default route (to the gateway)</pre><pre class="programlisting">USAGE_SERVER = 12 // lost connection to default route (to the gateway)</pre><pre class="programlisting">MANAGMENT_NODE = 13 // lost connection to default route (to the gateway)</pre><pre class="programlisting">DOMAIN_ROUTER_MIGRATE = 14</pre><pre class="programlisting">CONSOLE_PROXY_MIGRATE = 15</pre><pre class="programlisting">USERVM_MIGRATE = 16</pre><pre class="programlisting">VLAN = 17</pre><pre class="programlisting">SSVM = 18</pre><pre class="programlisting">USAGE_SERVER_RESULT = 19</pre><pre class="programlisting">STORAGE_DELETE = 20;</pre><pre class="programlisting">UPDATE_RESOURCE_COUNT = 21; //Generated when we fail to update the resource count</pre><pre class="programlisting">USAGE_SANITY_RESULT = 22;</pre><pre class="programlisting">DIRECT_ATTACHED_PUBLIC_IP = 23;</pre><pre class="programlisting">LOCAL_STORAGE = 24;</pre><pre class="programlisting">RESOURCE_LIMIT_EXCEEDED = 25; //Generated when the resource limit exceeds the limit. Currently used for recurring snapshots only</pre></div><div xml:lang="ja-JP" class="appendix" id="appe-cloudstack-Revision_History" lang="ja-JP"><div class="titlepage"><div><div><h1 class="title">Revision History</h1></div></div></div><div class="para">
		<div class="revhistory"><table border="0" width="100%" summary="Revision history"><tr><th align="left" valign="top" colspan="3"><strong>改訂履歴</strong></th></tr><tr><td align="left">改訂 0-0</td><td align="left">Tue May 29 2012</td><td align="left"><span class="author"><span class="surname">Tomechak</span> <span class="firstname">Jessica</span> [FAMILY Given]</span></td></tr><tr><td align="left" colspan="3">
					<table border="0" summary="Simple list" class="simplelist"><tr><td>Initial creation of book by publican</td></tr></table>

				</td></tr></table></div>

	</div></div></div></body></html>